
Jack-O’-Lanterns are the “face” of Halloween. It’s easy to make your own custom Jack-O’-Lantern in Cricut Design Space using only the shapes tools. No imported files needed!
This tutorial will step you through how to make a Halloween pumpkin and add a face using only the Cricut Design Space shapes. Use this technique to create a whole arsenal of faces for Halloween.
Note: If you’d like even more jack-o’-lanterns for your Cricut projects, you can purchase our Halloween Jack-o’-lantern, Pumpkins, & Letters bundle from our Etsy store.
Ready to get started? All you need is your Cricut Design Space account and some ingenuity. Let’s go.
Log In to Cricut Design Space and Create a New Project.
Once you have a fresh canvas, click the Shapes icon in the left column and take a look at the shapes tools. There aren’t many, but you’d be surprised what you can do with them. The key to creating unique images with the available shapes is to use multiple shapes and merge and/or slice them til you get what you want. Often you’ll use a shape more as a “tool” for sculpting images.
Create the Pumpkin Shape
We’ll create a pumpkin with five segments that looks something like this:

Create an oval for the front segment (segment 1)
Start by creating an oval for the front segment. In your new project, click the Shapes icon in the left column to access the shapes tools. Select the Circle.

Click the lock icon at the lower left of the circle to unlock its proportions.

Drag the green four pointed arrow icon to reshape the circle into an oval. I made mine about 2″ by 3.5″.
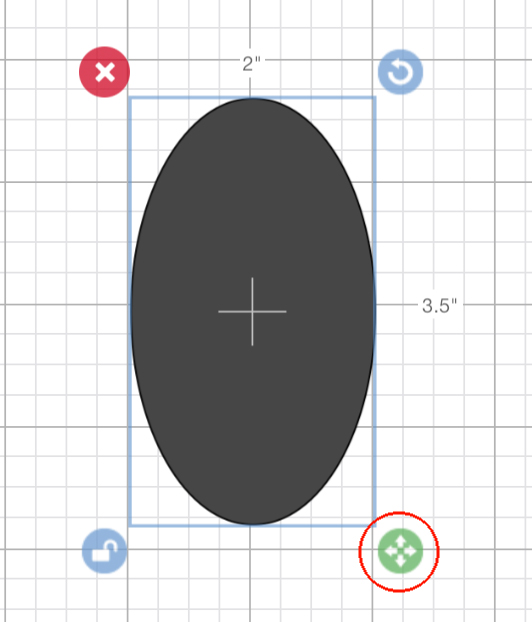
Change the oval to orange to give it more of a pumpkin color. It’s not necessary, but it will help you to envision this as a pumpkin better. To change the color, select the colored square next to the Linetype field. From the drop-down, select orange.

Create segment 2 of your pumpkin
Select your oval, copy and paste it to get a second oval (ctrl-C / ctrl-V on a PC; command-C / command-V on a Mac). This will be your second segment. Select segment 2 and send it behind the original oval by clicking Arrange –> Send to back on the top menu.

Use the four sided arrow at the bottom right of the second segment to resize it smaller. I made mine 1.87 inches wide. Don’t worry too much about the dimensions. You’ll be tweaking this as you go along. Use the rotate icon in the upper right to rotate it a bit. To further refine segment 2, unlock it and make it a bit wider. Move it into place behind the first oval.
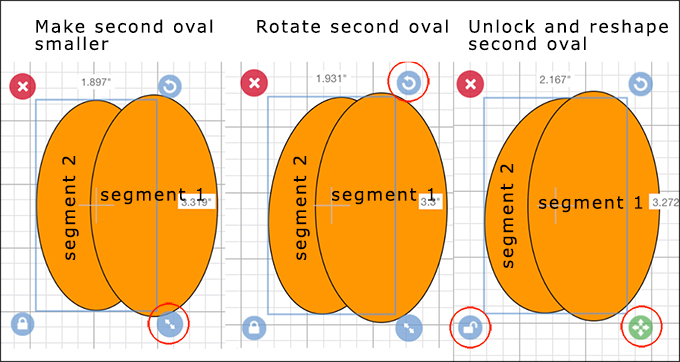
Create segment 3
Select the second oval. Copy/paste it (ctrl – C/ctrl-V on a PC; command-c/command-V on a Mac). This will give you segment 3 of the pumpkin. Position it slightly to the left and overlapping segment 2 (as shown below). Use the Arrange menu option to send it to the back.
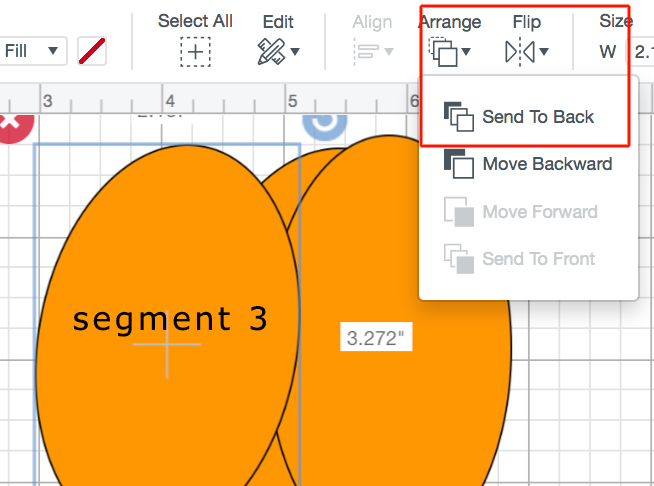
Resize, rotate, and reshape segment 3 until it begins to fit into the shape of your pumpkin.
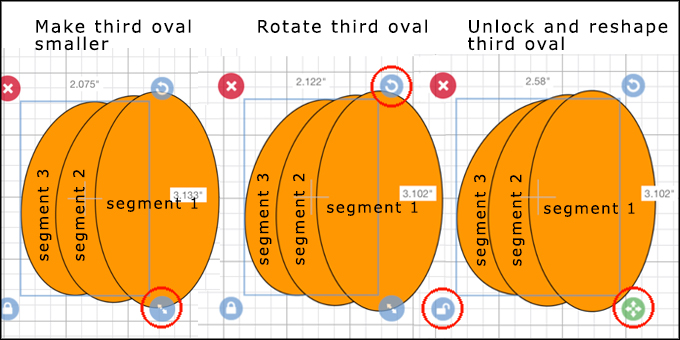
Now you can tweak these 3 segments, moving, rotating, reshaping, until the image begins to look like the left side of a pumpkin.
Create segments 4 and 5
The right side of the pumpkin consists of copies of segments 2 and 3 that have been flipped horizontally.
In the Layers panel, click the segment 3 layer, hold down shift on your keyboard, and click the segment 2 layer to select them both. Copy/paste these layers to make segments 4 and 5. With segments 4 and 5 selected, click Flip –> Flip Horizontal from the top menu.

With segments 4 and 5 still selected, click Arrange –> Send to Back.
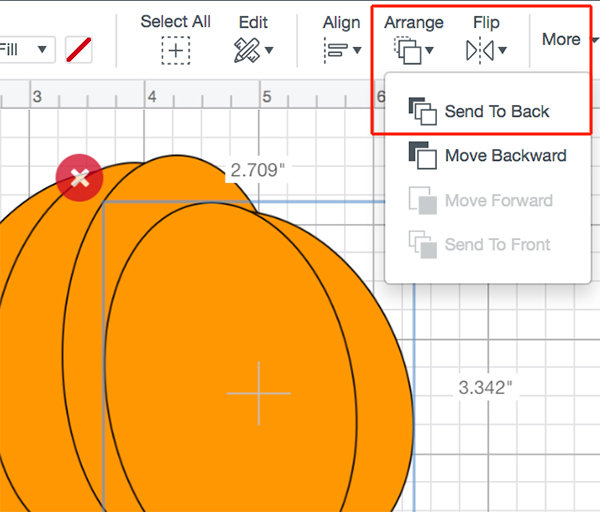
Reposition segments 4 and 5 to fit into the pumpkin. This is a good time to make sure all five segments are positioned where you want them. Here’s what mine looks like now.
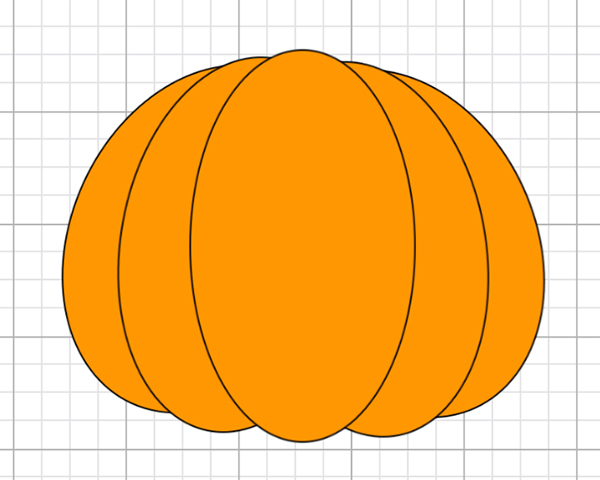
Duplicate the segments
We’re going to merge the segments together, but before we do, we’ll need an unmerged copy of them to use later. Select all five segments and copy/paste them (ctrl-c/ctrl-v on a PC; command-c/command-v on a Mac). After you have a duplicate, carefully move it to another area of the canvas without deselecting the five segments. With the five segments still selected, click Weld at the bottom of the Layers panel.
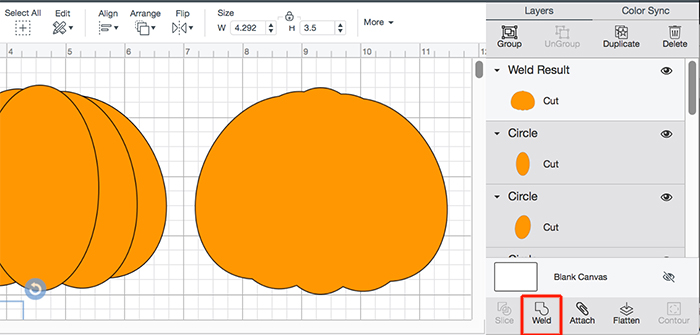
Your shape should really start looking like a pumpkin. Next we’ll create cut out areas to redefine the look of the segments.
Add Cutout Segment Dividers to your Basic Shape
This is where things really begin to get creative. We’ll use the limited shapes built into Design Space to create thin crescents to define the contour of the segments. Our goal is something like this: a single shape with contour cutouts that leave room in the center to add a face.

Create a thin crescent
You’ll use the non-welded version of your pumpkin as the source for creating the thin, curved crescents that you’ll cut out of the pumpkin. Select both segment 1 and segment 2 of your non-welded version and then copy/paste them.

With the two segment copies selected, click Slice at the bottom of the Layers panel. Pull apart the shapes that resulted from slicing the segments.

Refine the crescent shape
You’ll use the leftmost shape from your slice result as the start of your crescent. (Delete the other shapes). It’s already a crescent shape but it needs to be thinner. To do this you’ll use a shape from your saved source segments.
Copy/ paste a copy of segment 2. Use the color swatch drop-down to change its color so you’ll be able to see it easier. I made mine a different shade of orange.
Make your copy a little larger, then use it to overlap the slice result shape. Adjust the overlap until you can see a nice, thin crescent. Select both shapes and click Slice from the bottom of the Layers panel.

Change the color of your thin crescent to a lighter orange using the color swatch drop-down next to the Linetype field. Make a copy of it to hold in reserve. It will serve as the basis for all of the segments.
Create the interior crescents
Here are the crescents we’ll be working on.

Select a copy of your crescent and move it to an area of your canvas where you’ll have some room to work.
Position the crescent over your welded pumpkin shape. Unlock the crescent and resize/reshape it so it fits well inside the pumpkin and leaves plenty of room in the center of the pumpkin to put a face. It doesn’t have to line up with the segment bumps on the pumpkin. I made mine smaller and narrower.

Because these crescents will be cut out from the welded pumpkin shape, they need to be broken into smaller segments. The full crescent would be too much of a cut. You’ll use rectangles as tools to break them down.
From your Shapes options, select Square. Unlock it and use the four sided arrow icon to push it into a narrow horizontal rectangle. Make a copy of the rectangle then position them over your crescent.

When your rectangles look something like the example above, slice them from the crescent. To do this, select one rectangle, hold down the shift key and select the crescent. Then click Slice at the bottom of the Layers panel. Repeat for the second rectangle. When you’re done, delete the scraps that resulted from the slices.
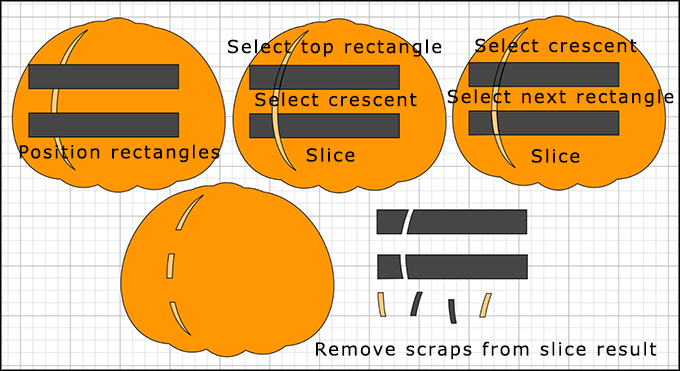
Select and copy/paste the resulting dashed crescent. With the copy select, click Flip –> Flip Horizontal from the top menu.
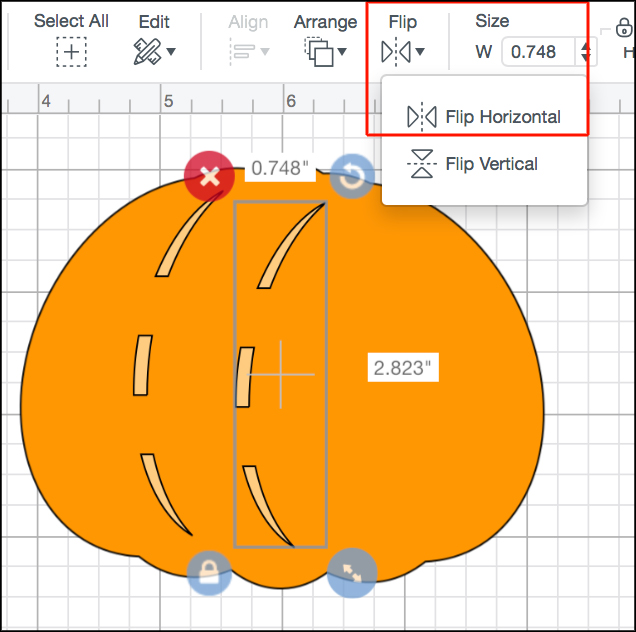
Move the second crescent to the right and roughly position the two crescents so they look something like this:

We won’t slice these from the pumpkin yet to give us the ability to reposition them later.
Create the exterior crescents
Locate your original crescent and follow the same process as you used to create the previous ones, only this time just make one rectangle to divide the crescent in two. Here’s a recap:
- Select the original crescent
- Place it over your pumpkin shape
- Unlock it and reshape it using the four sided arrow icon to make it smaller and thinner
- Get a Square from the Shapes tools. Unlock it and reshape it as a rectangle
- Position the rectangle over the middle of the new crescent
- Select both the crescent and the rectangle then click Slice at the bottom of the Layers panel
- Remove the scraps from the cutting result
- Select the new crescent and copy/paste it to create the far right crescent
- Select the copy and from the top menu choose Flip –> Flip Horizontal
- Move the copy in position over the pumpkin

Slice the crescents from the pumpkin
Now that you have all four crescent shapes created, tweak their size and/or position if necessary making sure to leave plenty of room for a face. When you like how they look, slice them one by one from the pumpkin shape.
To do this, select a crescent, hold down the shift key and select the pumpkin, then click Slice at the bottom of the Layers panel.

After doing this if your other crescents seem to disappear, select the pumpkin and from the top menu choose Arrange –> Send to back.

Repeat the process to slice the remaining 3 crescents from the pumpkin. You should now have something like this:

Delete the scraps.
Add a Stem to the Pumpkin
There are lots of ways to create a stem for your pumpkin using various shapes, welding and slicing them until you sculpt one you like. I’ve found one of the easiest is to use rectangles. The graphic below shows how I do this.

Create the Face
Now the fun part, creating a face for your pumpkin. I thought this was much easier than creating the pumpkin itself.
Triangles for eyes
The go-to shape for jack-o’-lantern eyes is the triangle. Since the triangle is one of Design Space’s default shapes, all you have to do is choose the triangle shape from the Shapes menu and shape it to your liking.
For mine, I unlocked the triangle to make it taller and thinner, resized it, and rotated it.
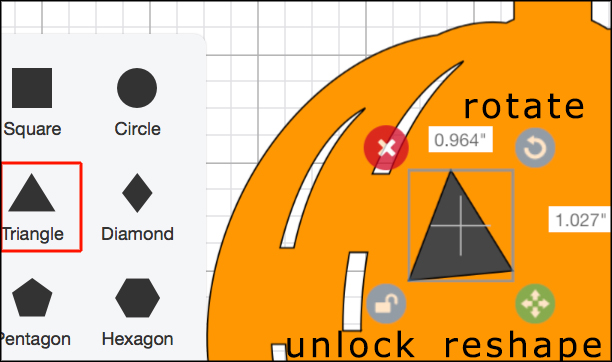
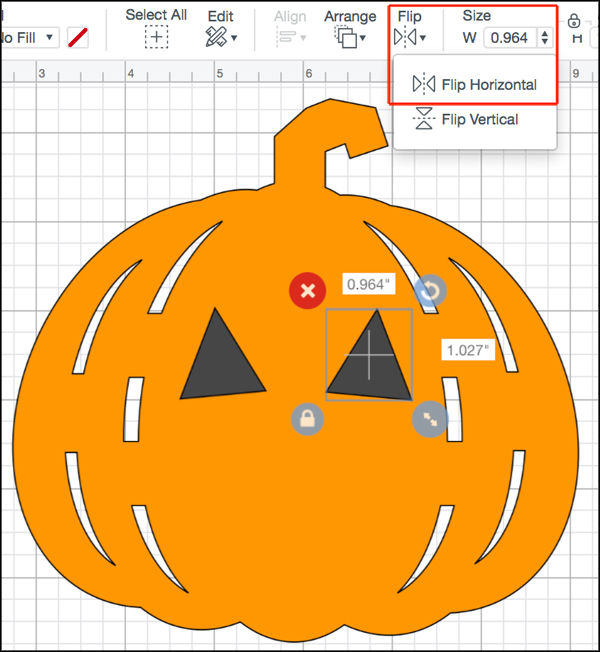
Then I copy/pasted it to create the other eye. I selected the copy and from the top menu, chose Flip –> Flip Horizontal. Here’s what my face looks like so far.
Create a nose
The nose could be a triangle as well, but let’s switch things up a bit and make it a diamond shape. Select the Diamond from the Shapes tools. Unlock the diamond, resize and reshape it. Position it on the pumpkin.

Create the mouth
You can make an interesting mouth from a circle. Select the circle shape from the shape tools. Then create a square and position it over the top half of the circle making sure it fully overlaps the circle as shown below. With the circle and square both selected, click Slice at the bottom of the Layers panel. To make it more of a smile, select another circle from the Shapes. Unlock the circle and make it an oval. Position the oval over the circle and slice the oval from the circle.

Slice the face from the pumpkin
Position the smile on the pumpkin and adjust the eyes, nose, and mouth until you like the face. We’ll be adding some teeth, but first, let’s slice the face from the pumpkin. You can only slice one thing at a time from the pumpkin. Click the left eye, hold down the shift key and click the pumpkin then click Slice at the bottom of the Layers panel.
If the rest of the face disappears behind the pumpkin, select the pumpkin and click Arrange –> Send to back from the top menu. Repeat the slice procedure for the other eye, the nose, and the mouth.
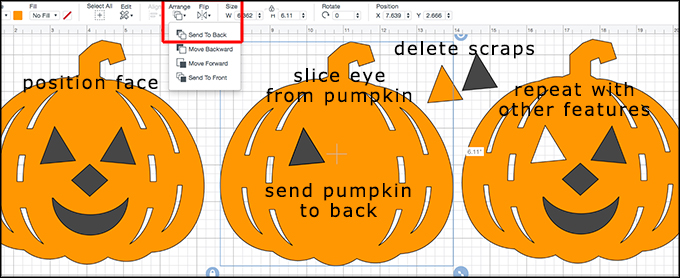
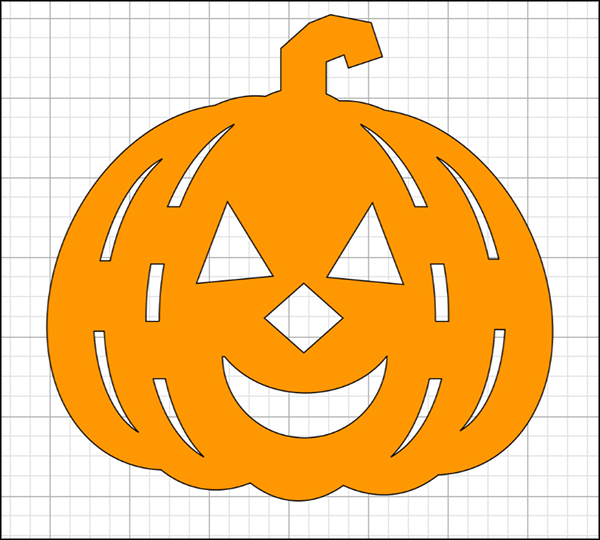
You should now have something like this:
Add some teeth
What’s a jack-o’-lantern smile without teeth? You can make teeth out of rectangles or pointed teeth out of the diamond or triangle shapes. I used a square modified into a rectangle.
Click the Shapes icon and select Square. Unlock, resize and reshape the square then position it over the mouth. You may want to rotate is as well until it looks like a tooth. Copy/paste the tooth. Move the copy to another part of the mouth. Rotate it if necessary. Lastly, hold down the shift key and select both teeth and the pumpkin. At the bottom of the layers panel, click Weld.
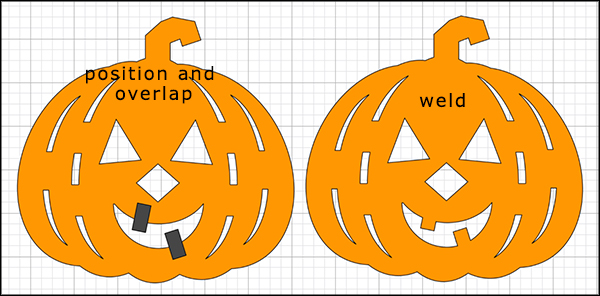
Here’s the finished jack-o’-lantern!

Other Examples
Here are two other examples of jack-o’-lanterns I made using only shapes.

Get a Full Set of Jack-o-Lanterns
If you want more jack-o’-lanterns to use for your Cricut projects, we have a set of pumpkins, jack-o’-lanterns and text listed in our Etsy shop! The set includes 10 jack-o’-lanterns with faces, 10 pumpkin shapes, and Halloween lettering. They come as both SVG files and transparent PNG’s. These are great for Halloween projects. Click HERE to access the listing.
Here’s an example of what comes in the jack-o’-lanterns and pumpkins set.

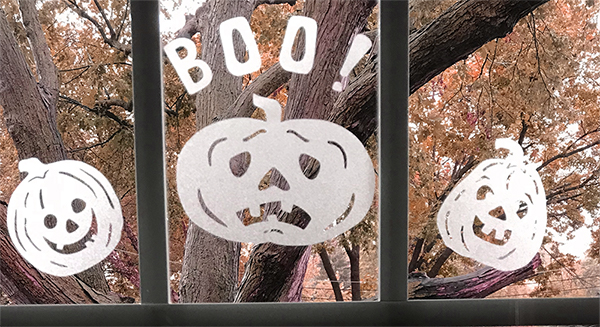
Here are 3 of the jack-o’-lanterns cut out of window cling.
Thank you!
Thanks for visiting mapletreemakery.com. We hope you enjoyed this tutorial! Come back often for more information and tutorials.

This is the best step by step I’ve ever followed. I feel like a pro after doing this. Thank you so much!
It’s always fun and challenging to create cut files using just the shapes. I’m glad you enjoyed the tutorial!