
In this tutorial, I’ll show you how to use the existing Monoline brush to make an outline brush in Procreate 5.
You can also purchase outline brushes from our shop.
Let’s make the brush!
Watch the video or read the tutorial below:
For this tutorial you’ll need:
iPad
Procreate 5
Apple Pencil
Create the Outline Brush
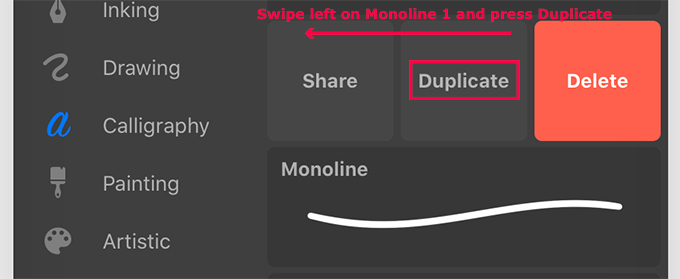
Duplicate the Monoline brush
Locate the Monoline brush in the Calligraphy set.

Swipe left on the brush and press Duplicate.

This should create a brush called Monoline 1 if you haven’t duplicated the brush before. Now swipe left on the Monoline 1 brush and duplicate it to create a brush called Monoline 1 1.
Combine the brushes
Tap on Monoline 1 1 and then swipe right on Monoline 1. At the top of the brush menu, press Combine.

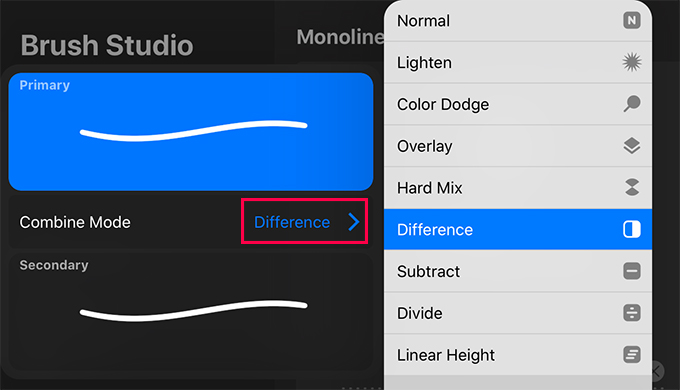
Tap on the combined brush (Monoline 1 1) to open the Brush Studio.
Combine Mode
In the Brush Studio, tap on the top brush (the Primary brush). Next to Combine Mode, press Normal. Change it to Difference.
Brush size
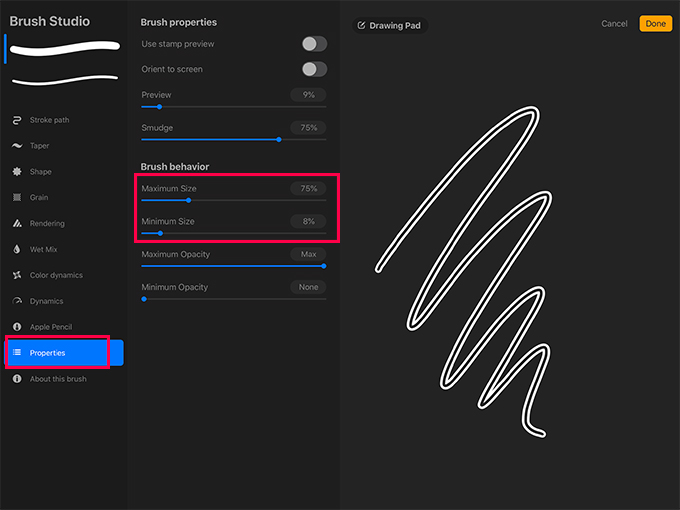
With the top brush still selected, tap Properties in the left column of the Brush Studio.
Under Brush Behavior, increase the Maximum Size to make the Primary brush larger than the Secondary brush. Notice that the preview on the right of the screen shows the outline get thicker as you increase the size. I’m going to make it about 75%. You can either use the sliders or tap in the percentage field to select a value. This will be the largest your Primary bush can be.
Now increase the Minimum Size a bit. I’ll make it 8%. This is how small your Primary brush can be.
Now tap on the Secondary brush to select it. In the left column, tap Properties. Increase the Maximum Size. I’m going to make it 40%. Notice in the preview that this makes the line inside of the outlines wider.

Name the brush
In the left column, tap About this brush. At the top of the screen, tap Monoline 1 to give the dual brush a name. I’m going to call it “Outlines.” Then tap Done in the upper right corner of the Brush Studio.

Test the brush
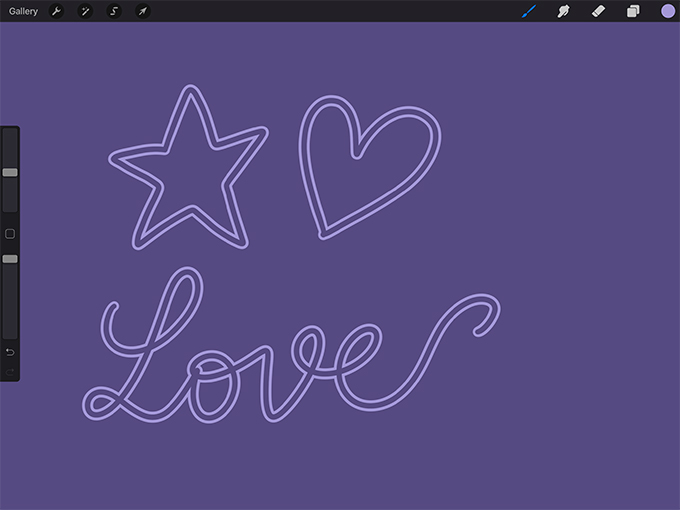
Choose a color and test the brush. Use the size slider on the side of the screen to try different sizes. If you want, go back into the Brush Studio and change the sizes of Primary and Secondary brushes until you like how the brush looks.

If you want, choose another color and drag from the color swatch into the center of the outline to fill it with color.
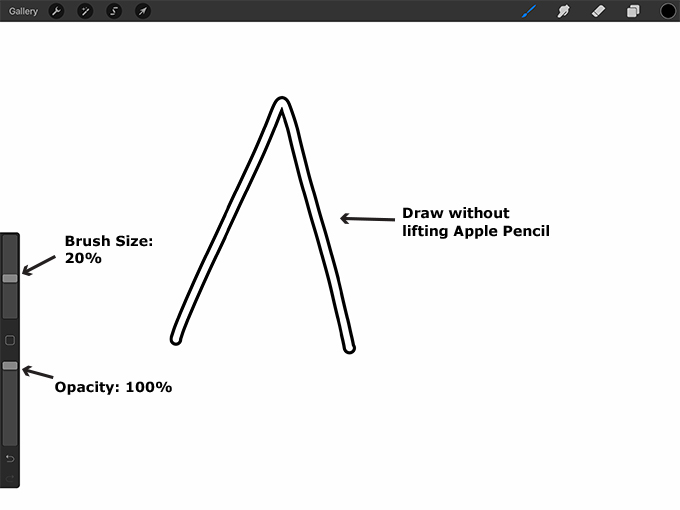
Overlapping Lines
As long as you draw without picking up your Apple Pencil, the outlines will form a single shape.
If you pick up your Apple Pencil and cross over the outlines, for instance to cross a “t,” there will be overlapping lines.

This is fine, but I’ll show you two methods to get rid of these lines. Method 1 is to erase the lines. Method 2 is to select and clear the overlapping lines. Method 2 is more technical, but also more exact.
Draw an “A”
To practice both methods, use the sliders on the side of the screen to make the size of the brush about 20% and the opacity 100%. Now draw the main shape of a capital “A” without lifting your Apple Pencil. Don’t add the crossbar yet.
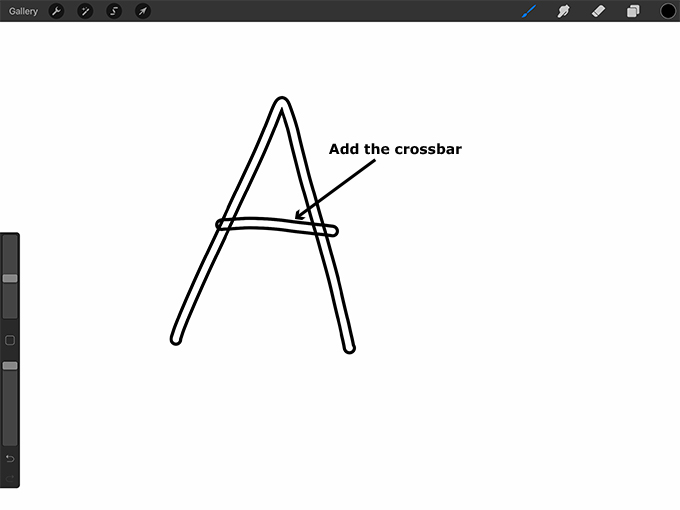
Create a new layer.

Add the crossbar to the A.
Now choose either Method 1 or Method 2 to erase the overlapping lines and create a single shape.
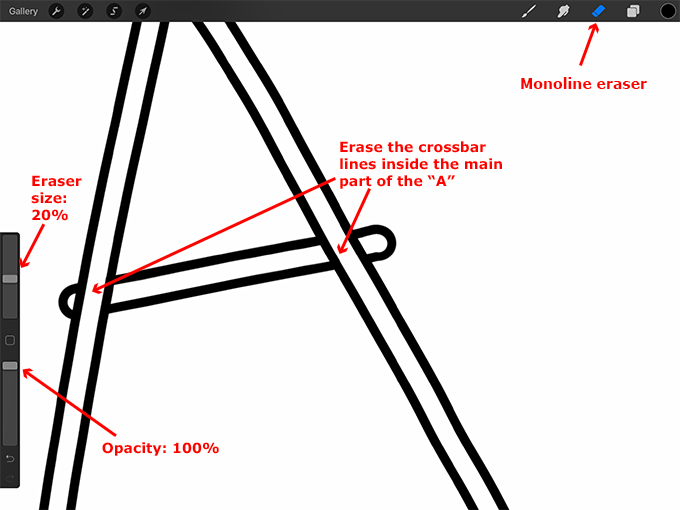
Overlapping Lines Method 1: Erase
Choose an eraser and set the size
Make sure you still have the crossbar layer selected, (Layer 2).
Tap on the eraser button and choose an eraser. I’m going to use the Monoline eraser from the Calligraphy set.
Use the sliders on the side of the screen to set the size and opacity of the eraser. I made the size 20% and the opacity 100%. (The size of the eraser will depend on the inside area of the letter you drew).
Erase the lines inside of the “A”
Use two fingers and pinch out on the canvas to zoom in on the overlapped areas. Now erase the lines that are inside of the main part of the “A.”
Erase the lines inside of the crossbar
Now tap on Layer 1.

Now erase the lines inside of the crossbar. Be careful not to erase outside of the intended area.
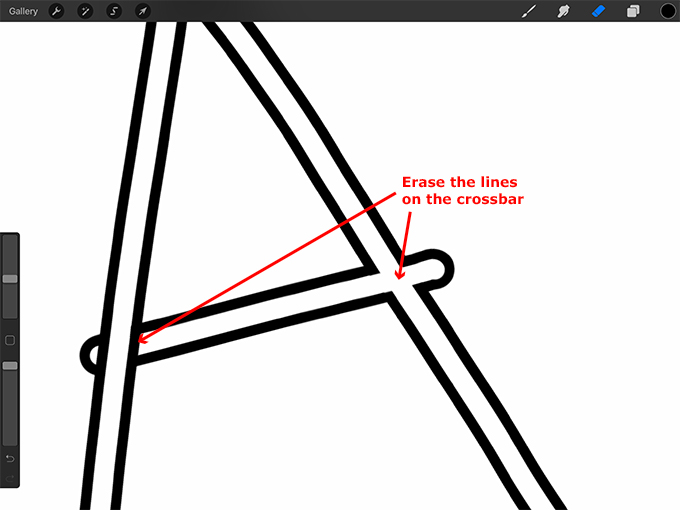
If you zoomed in on the canvas, use two fingers to pinch inwards on the canvas to zoom out.
Merge the layers together and fill with color
If you’re happy with how the “A” looks, open the Layers menu. Tap on the crossbar layer and open the flyout menu. Then tap Merge Down to merge it with the main part of the “A” on Layer 1.
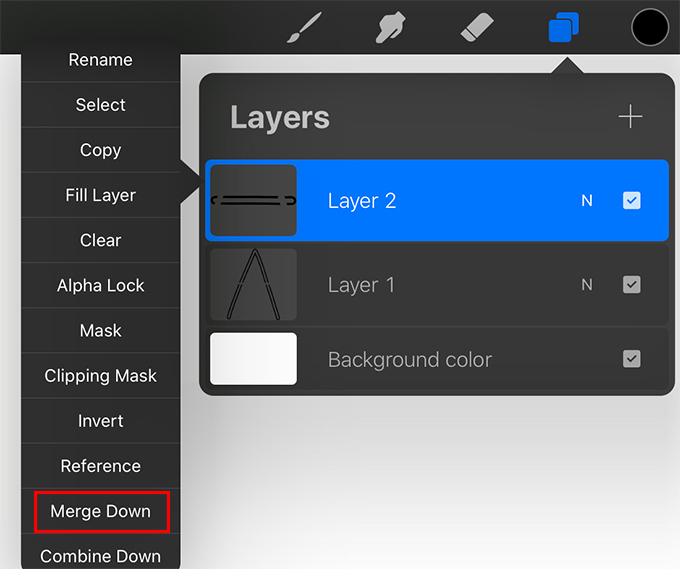
The “A” should now all be on one layer. If you want to fill the letter, you can choose a color and drag from the color swatch into the “A” to fill it with color.

Overlapping Lines Method 2: Select and Clear
To learn this method, follow the steps listed before Method 1 to draw the letter “A.”
Select the crossbar
Make sure you’re working on Layer 2. Now tap on the selection button. Tap Automatic at the bottom of the screen. Now tap inside of the crossbar to select just the interior and not the outlines. If you need to zoom in, pinch outwards with two fingers on the canvas. To zoom out, pinch inwards with two fingers.

The inside of the crossbar should turn blue as shown in the graphic above. If you need the selection to be smaller or larger, you may need to change the Selection Threshold. To do this, tap and hold on the inside of the crossbar and move your Apple Pencil to the left to decrease the Selection Threshold and to the right to increase it. You should see the percentage at the top of the screen.
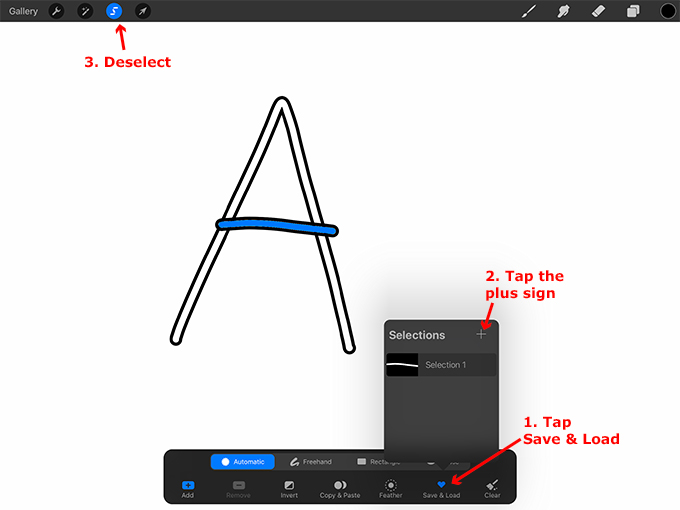
Save & Load the selection
When you’re ready, tap Save & Load at the bottom of the screen. Tap the (+) to save this selection. Then tap on the selection button to deselect the crossbar.
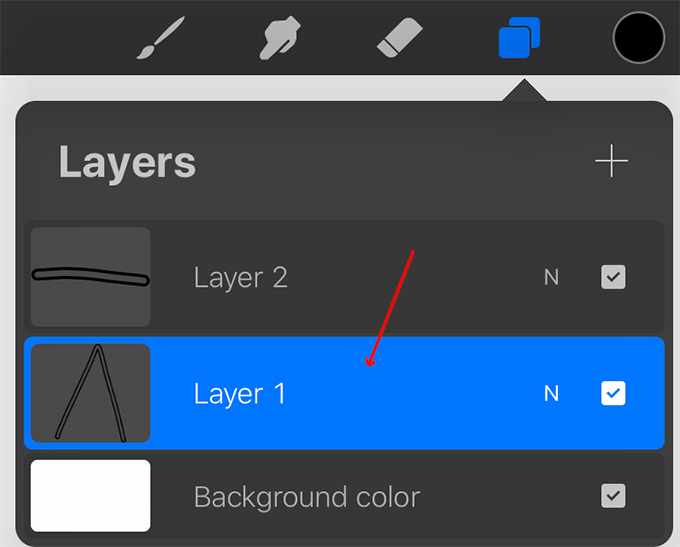
Select Layer 1
Open the Layers menu. Tap on the original layer, Layer 1.
Tap on the selection button again. Tap inside the main part of the “A” to select just the interior and not the outlines. Tap Save & Load and then the (+) to save this selection.

Clear the selection from Layer 2
With the main part of the “A” still selected, open the Layers menu. Tap on the crossbar layer, Layer 2 and open the flyout menu. Then press Clear to clear the selection from the crossbar. Now you can see that the lines of the main part of the “A” have been erased from the crossbar in the Layers menu.

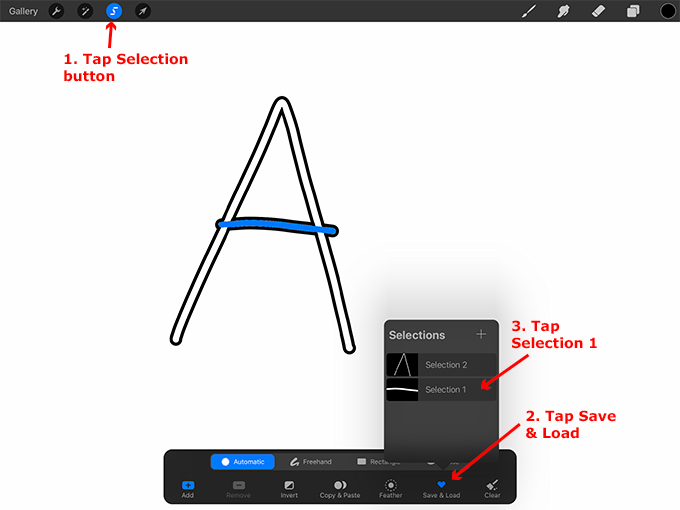
Clear the crossbar selection from the “A”
Now we need to clear the crossbar from the main part of the “A.” To do this, tap on the selection button. Tap Save & Load at the bottom of the screen and tap on Selection 1, the crossbar selection. This should turn the inside of the crossbar blue.
Now open the Layers menu. Tap on Layer 1 to open its flyout menu and press Clear.

Merge Down the layers
Now the “A” should appear as one shape! If you need to, you can clean up any areas you want using the eraser. When you’re done, tap on Layer 2. In the flyout menu press Merge Down.

The “A” is now on one layer. If you want, you can fill it with color. Just choose a color and drag from the color swatch inside of the letter to fill it with color.
Get More Outline Brushes
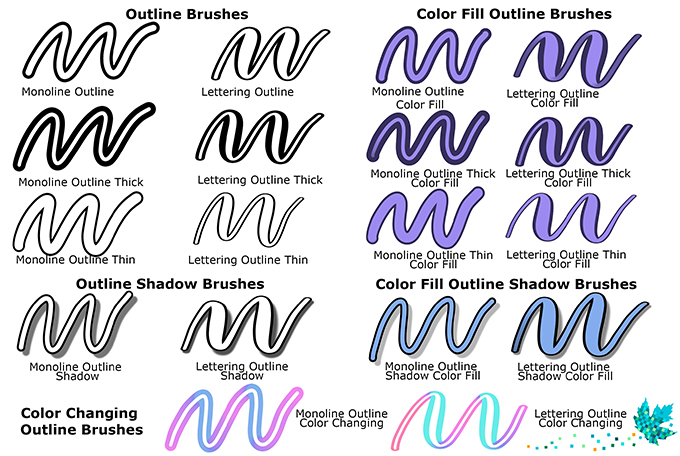
I created a set of monoline outline brushes and pressure sensitive lettering outline brushes that you can purchase from our Etsy shop.
The brush set includes 18 brushes. There are regular outlines of varying widths as well as color fill brushes. There are also color changing outline brushes and shadow outline brushes.
Thank you!
Thanks for visiting mapletreemakery.com. We hope you enjoyed this tutorial! Come back often for more information and tutorials.


Thank you so much for this! It was so easy to follow along with & I’m so happy with how my new brush turned out! I had no idea I could do any of that with the preset brushes in procreate! Ahhh thank you! <3
I’m glad it was helpful!
Thanks so much for the tutorial! I tried it, but when I go to Brush Studio, it doesn’t show me a primary and secondary brush. It just shows one line. Do you know how I could make it show hem? Thanks!
Kat
To combine the brushes you’ll need Procreate 5. I don’t think this will work on Procreate Pocket. Also make sure you are combining two duplicated brushes because you won’t be able to combine a brush with the default brush. Select both duplicated brushes and pressed Combine and then tap on the combined brush and you should see both the Primary and Secondary brushes in the Brush Studio. I hope that helps!
Thanks al lot. ?
I am very thankfully to your learning lesson without a Video.
I am create my First brush „Outline“
Thank you. How do you add the shadow? Can you only do this with Monoline brushes? Meaning can you make it with a texture/bumpy edge brush? I tried it, but it doesn’t close the lines like with just Monoline. So just curious.
To make the outline shadow brushes, I had to create custom Shape Sources. You can make outline brushes using other shapes/textures but you have to modify a few settings. It’s a bit difficult to explain the process in a comment. I hope to make tutorials for both shadow brushes and texture outline brushes in the future.