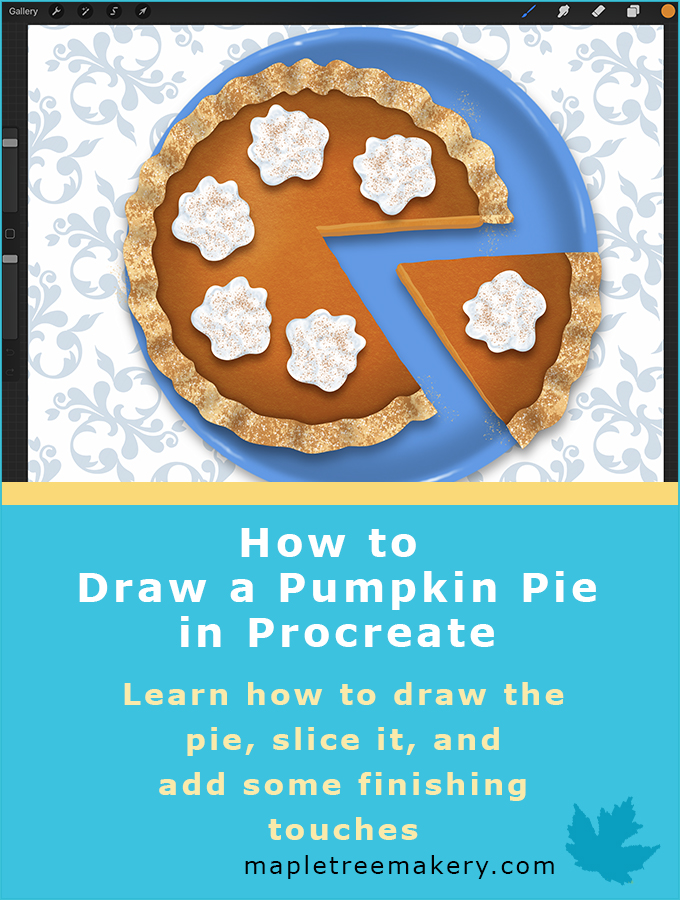
The holidays are coming up which means lots of baking and, of course, pumpkin pie. In this tutorial I’ll show you how to draw a pumpkin pie in Procreate. Then I’ll show you how to slice the pie and add some finishing touches including a plate and a background.
Let’s get started!
You can watch the video or read the post below:
What I used:
- iPad Pro
- Procreate app
- Apple Pencil
Draw the Pumpkin Pie
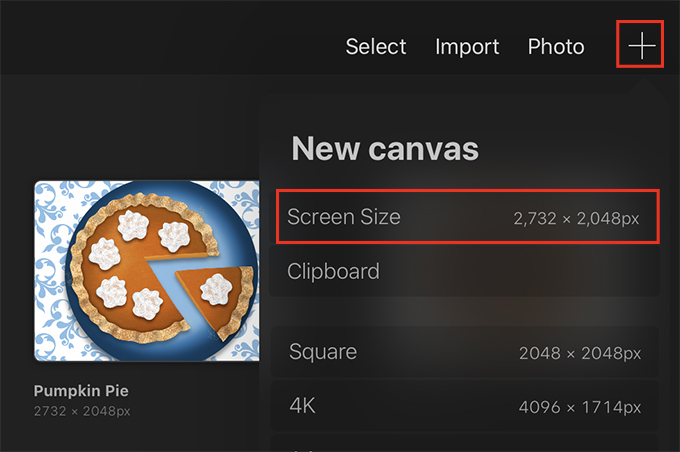
Create a new canvas
Tap on the (+) and choose the Screen Size for this tutorial.
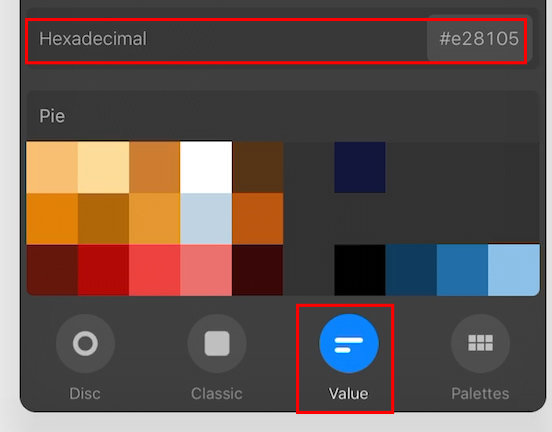
Draw a circle
Tap on the color swatch and choose an orange color for the pumpkin pie filling. To get same color I used, tap Value, at the bottom of the colors menu and enter the Hexadecimal #e28105.
It may help to add this color and any colors used throughout this tutorial to your color palette so you can access them easily.
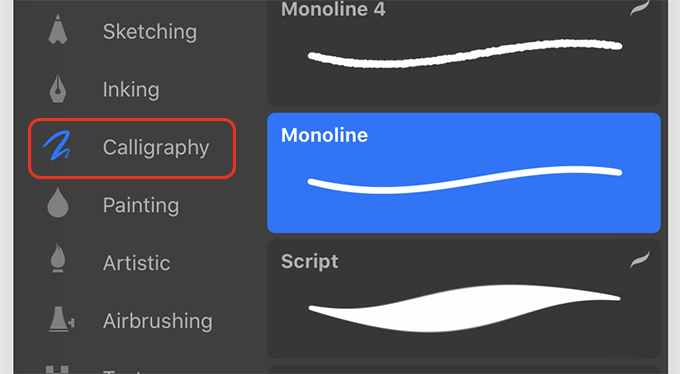
Now tap on the paintbrush and get the Monoline brush located in the Calligraphy set.
Use the size slider on the side of the screen to set the size. It doesn’t matter what size you use. I made the brush size 20%. Make sure the opacity is 100%.
Draw a large circle in the center of the canvas. When you’re done drawing the circle, keep your Apple Pencil held down until it forms a more perfect shape. Tap Edit Shape at the top of the screen and then Circle.
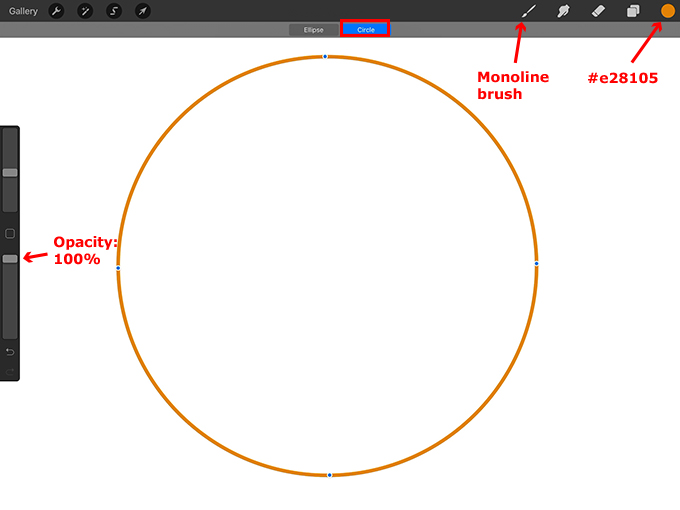
Make sure there are no gaps in the line and then drag from the color swatch into the circle to fill it with orange.
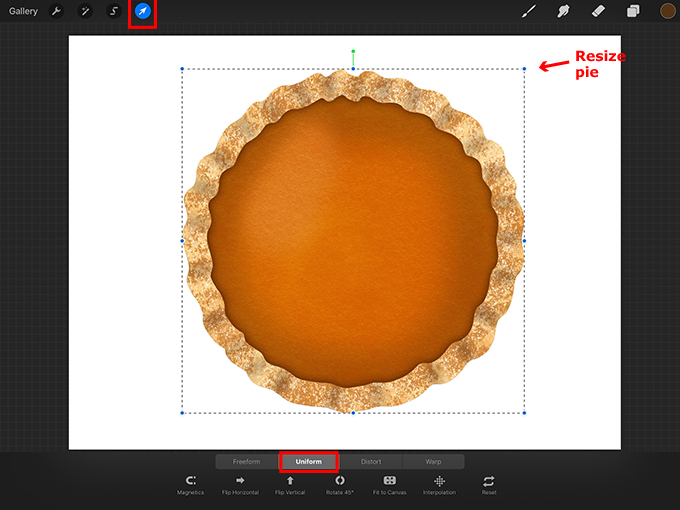
Tap the arrow at the top of the screen and tap Uniform at the bottom of the screen. Center the circle on the canvas and then drag the nodes to resize the circle if necessary. Make sure to leave some space around the circle for the crust.

Tap on this layer and in the fly-out menu tap Rename. Now you can rename this layer “Filling.”
Draw the pie crust
Create a new layer above the filling layer and rename it “Crust.”
Tap on the color swatch and choose a color for your pie crust. I used Hexadecimal #f8bf72. Save the color to your color palette.
Now use the circle as a guide to help you draw the crust. I drew a wavy line around the circle. Make sure the line connects at the end.

Now swipe left on the crust layer and press Duplicate.

Tap on the arrow, tap Uniform at the bottom of the screen, and resize the duplicated crust so it’s smaller. Move it to form a thicker crust.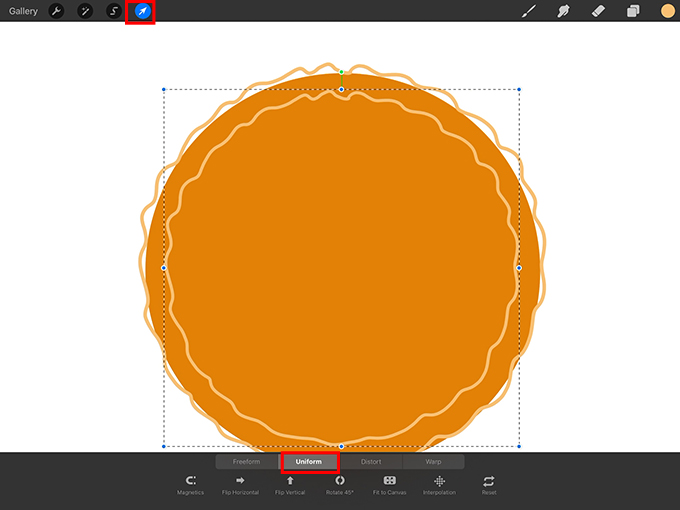
When you’re happy with how the crust looks, tap on the duplicated crust layer and in the fly-out menu, press Merge Down.

Then drag from the color swatch into the crust to fill it. If you need to, tap on the arrow and resize the crust. It should cover the orange circle.
Add texture to the crust
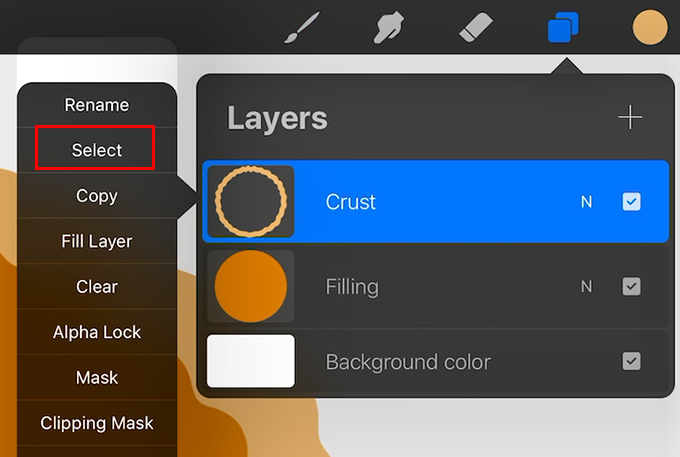
Tap on the crust layer and press Select.
Create a new layer above this layer.
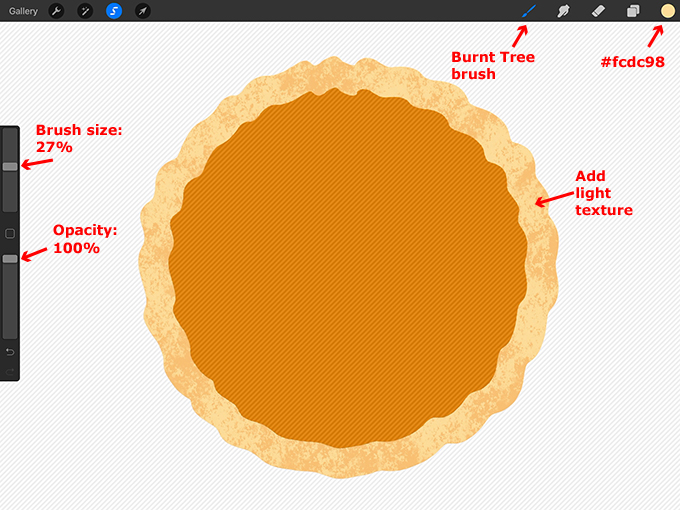
Get a lighter color, Hexadecimal #fcdc98.
Get the Burnt Tree brush from the Charcoals set.
Use the sliders on the side of the screen to set the size and opacity of the brush. I made the size 27% and the opacity 100%. Then paint some light texture on the crust.
Now get a darker color, Hexadecimal #cd7d30, and paint some dark texture on the pie crust.

Now you can tap on the N on the texture layer and reduce the Opacity if you want. I made mine about 87%.

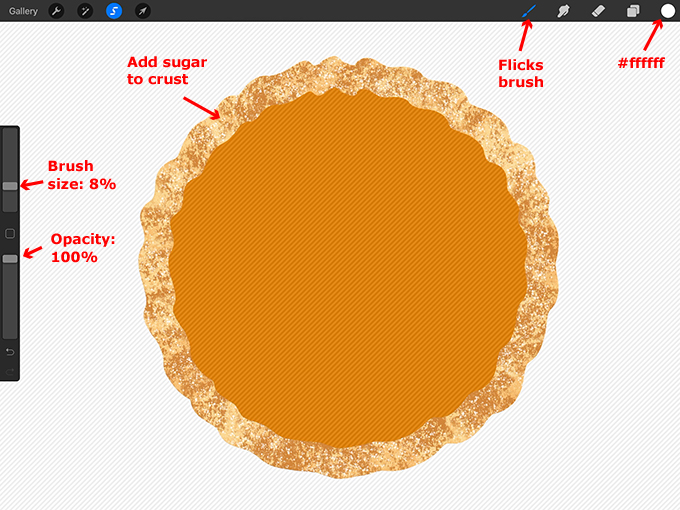
Add sugar to the crust
With the crust layer still selected, create a new layer above the texture layer.
Get white for the color, Hexadecimal #ffffff.
Get the Flicks brush from the Spraypaints set.
I made the size about 8% and the opacity 100%. Now paint some sugar on the crust.
Paint shadows on top of the crust
With the crust still selected, create a new layer on top of the sugar layer.
Get a brown color for the shadows, Hexadecimal ##553415.
And get the Soft Airbrush from the Airbrushing set.
I made the brush size 8% and the opacity 100%. Now paint some shadows on the lower areas of the wavy crust.

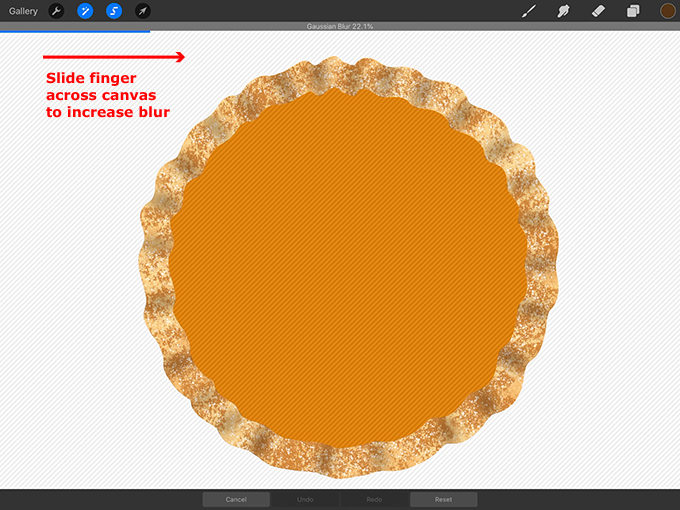
Now tap on the adjustments button and tap Gaussian Blur.
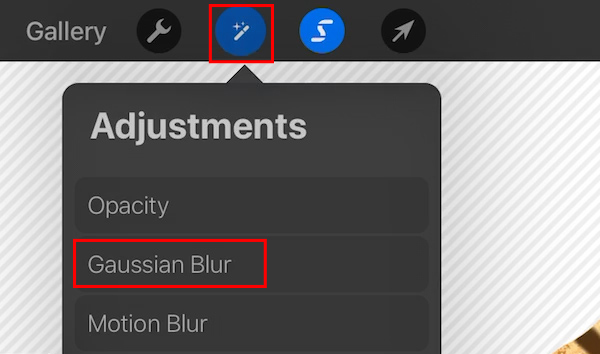
Slide your finger across the canvas to increase the blur. I made mine about 22%.
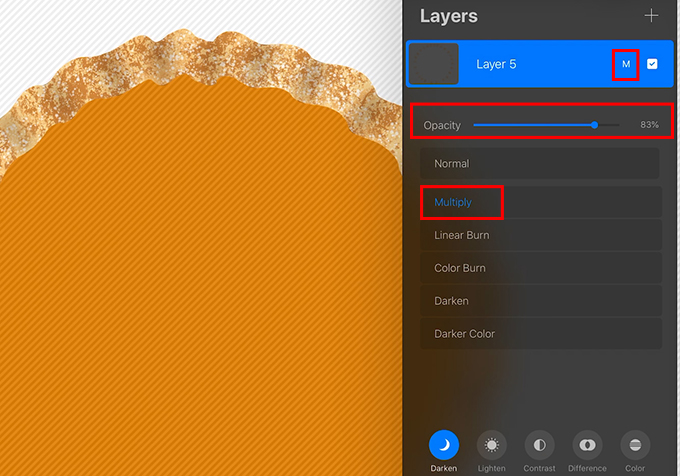
Tap on the N on this shadow layer and then tap Multiply to change the blend mode. You can also decrease the Opacity of the shadows. I made mine about 83%.
Add shadows behind the crust
With the crust layer still selected, create a new layer.
Tap on the N on this layer and tap Multiply.
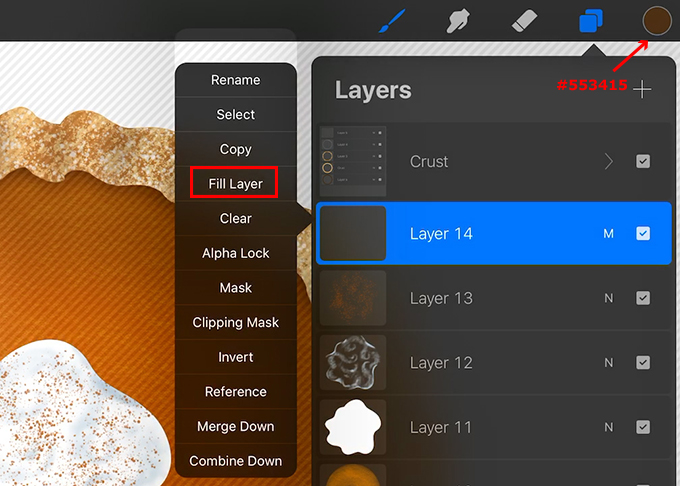
Then tap on this layer and tap Fill Layer to fill it with the brown color.

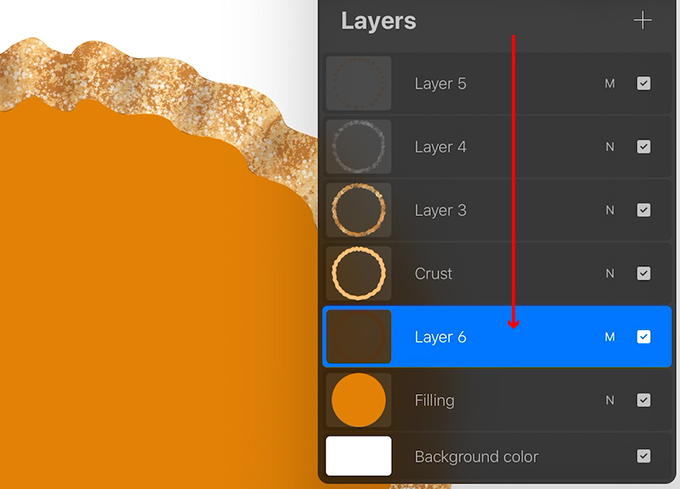
Tap and hold on this layer and move it underneath the crust layer.
Now we want to blur this shadow layer without it blurring outside of the circle area. So tap on the Filling layer and press Select.

Then tap on the shadow layer directly above the Filling layer.
Now tap on the adjustments button and tap Gaussian Blur. Then apply a blur to the shadow. The shadow should blur around the inside of the crust. I made mine about 21%.

If you want, you can reduce the opacity of this shadow layer.
Group the crust layers
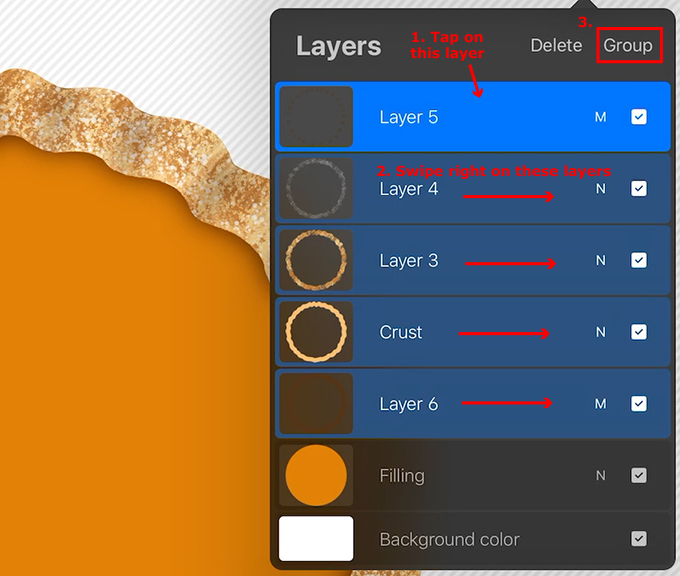
Tap on the top layer and swipe right on all of the layers below it except for the Filling layer. Then tap Group.
Tap on the small arrow next to New group to collapse the group.
Now you can tap on the group and tap Rename in the fly-out menu and rename the group “Crust.”
Turn off the visibility of the Crust group for now.

Add shading to the pumpkin pie filling
Tap on the Filling layer and in the fly-out menu press Select.
Create a new layer above the Filling layer.
Get a darker orange color, Hexadecimal #b06608.
Get the Medium Brush from the Airbrushing set.
I made the size 8% and the opacity 100%. Now paint some shading around the edges of the circle.

Now tap on the adjustments button and tap Gaussian Blur. Apply a blur to the shading. I made mine about 34%.
With the Filling layer still selected, create a new layer above the shading layer. Get a lighter orange color, Hexadecimal #e69730. Now paint a highlight on the pumpkin pie filling. I painted it in the upper left corner of the circle.

Then tap on the adjustments button and apply a Gaussian Blur to the highlight. I made mine about 28%.
Add texture on top of the pumpkin pie filling
With the Filling layer still selected, create a new layer above the highlight layer. Tap on the N on this layer and tap Multiply.
Get the original orange color, Hexadecimal #e28105.
Get the Carbon Stick from the Charcoals set.
I made the brush size 37% and the opacity 77%. Now paint some texture on the circle.

Now tap on the N on this texture layer and reduce the Opacity. Mine was pretty dark so I reduced it to about 60%.

Add whipped cream to the top of the pie
Before you start the whipped cream, turn on the visibility of the crust by checking the box on the Crust group layer.
Create a new layer above the texture layer we just made.
Get white for the color, Hexadecimal #ffffff.
Get the Monoline brush from the Calligraphy set.
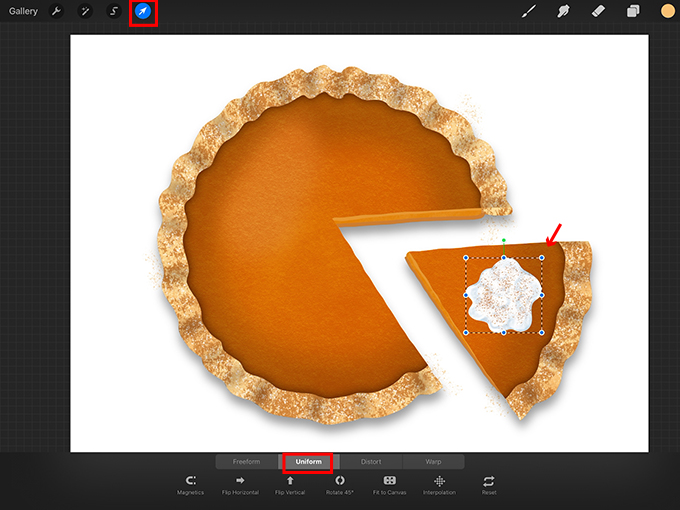
Draw some whipped cream on top of the pie. Fill it with white. Note: If you want to move the whipped cream to the center of the pie, tap the Arrow tool to select and move it.

Tap on the whipped cream layer and in the fly-out menu press Select.

Then create a new layer above the whipped cream layer.
Get a color for the shading. I used a light blue gray color, Hexadecimal #bfd3e2.
Get the Soft Airbrush from the Airbrushing set.
Now paint some shading on the whipped cream.

Add cinnamon to the whipped cream
With the whipped cream layer still selected, create a new layer above the whipped cream shading layer.
Get a cinnamon color, Hexadecimal #bb560f.
Get the Flicks brush from the Spraypaints set.
I made the size about 6%. Now paint some cinnamon on top of the whipped cream.

Add a shadow to the whipped cream
With the whipped cream layer still selected, create a new layer. Tap on the N on this layer and tap Multiply.
Get the brown shadow color, Hexadecimal #553415.
Tap on the new layer and press Fill Layer to fill it with the brown color.
Move this layer below the whipped cream layer.
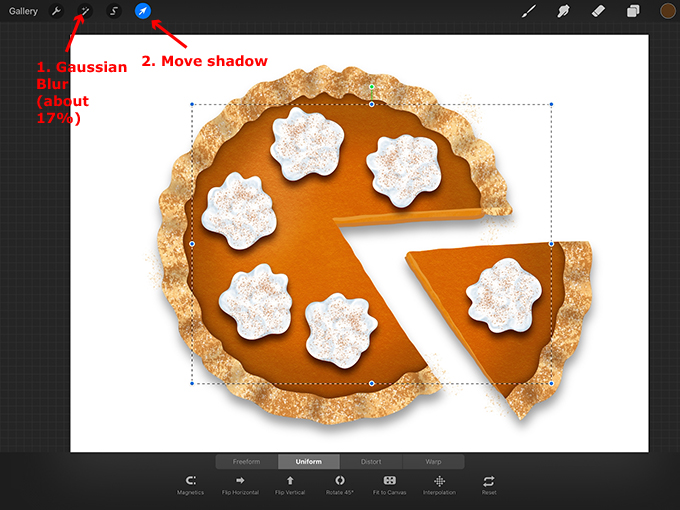
Then tap on the adjustments button and apply a Gaussian Blur to the whipped cream shadow. I made mine about 18.5%.
Then tap on the M on this shadow layer and reduce the opacity. I made mine about 90%.

The pumpkin pie is finished! You can leave it as a whole pie or read on to learn how to slice the pie and add some finishing touches.
Slice the Pie
Duplicate the pumpkin pie
Let’s duplicate the pie group so we have a copy of the full pie. Tap on the Crust group and swipe right on all of the layers underneath it and then tap Group.

Tap on the small arrow next to New group to collapse the pumpkin pie group.
Now swipe left on this group and press Duplicate.
Rename the original pumpkin pie group “Pumpkin” and then turn off the visibility of this group. Tap on the small arrow next to the top group to expand the duplicated pumpkin pie group.
Move and group the whipped cream layers
Now tap on the layer underneath the crust group, for me it’s the cinnamon layer. Then swipe right on all of the whipped cream layers.

Once they’re all selected (blue), drag them above the duplicated pumpkin pie group. Then tap Group to group them together and collapse the group.
Flatten the duplicated pie group
Now tap on the New group below the whipped cream group. Tap on this and tap Flatten in the fly-out menu to flatten the duplicated pumpkin pie.

Now if you want you can tap on this layer and rename it. I renamed it “Pumpkin Pie.” You can also rename the whipped cream group. I named it “Whipped Cream.”
Now turn off the visibility of the whipped cream group.

Slice the pie
Work on the Pumpkin Pie layer. Tap on the arrow and make sure Uniform is selected at the bottom of the screen. Now move the pie into the center of the canvas and resize it slightly smaller to make room for the slice.
Now tap on the selection button. Make sure Freehand is selected at the bottom of the screen. Now you can draw a pie slice to select it.
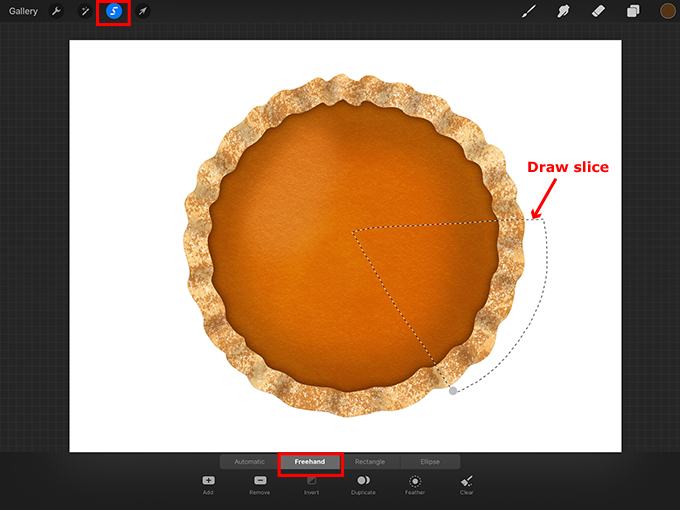
Tap on the arrow and then move the slice away from the pie. I moved it down and to the right. When you’re done, tap on the selection button to deselect the slice.

Now if you want, you can tap on the arrow and move the pie and the slice into the center of the canvas.
Create the side of the filling
I’m going to add some depth to this pie by drawing the side of the filling and crust.
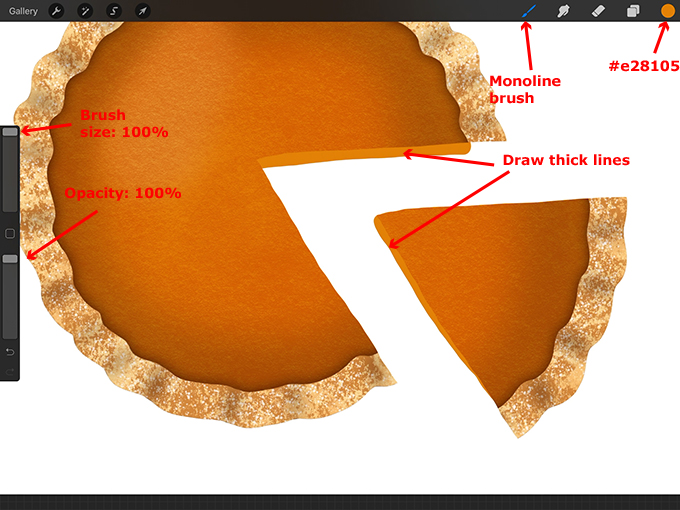
To do this, create a new layer and move it underneath the flattened pie layer.

Get the orange color, Hexadecimal #e28105, and get the Monoline brush from the Calligraphy set. I made the size 100% and the opacity 100%. Now paint some thick lines underneath the pie to create the side of the pie filling. I made the line under the slice start thick at the point and gradually get thinner towards the crust.
Add thin line
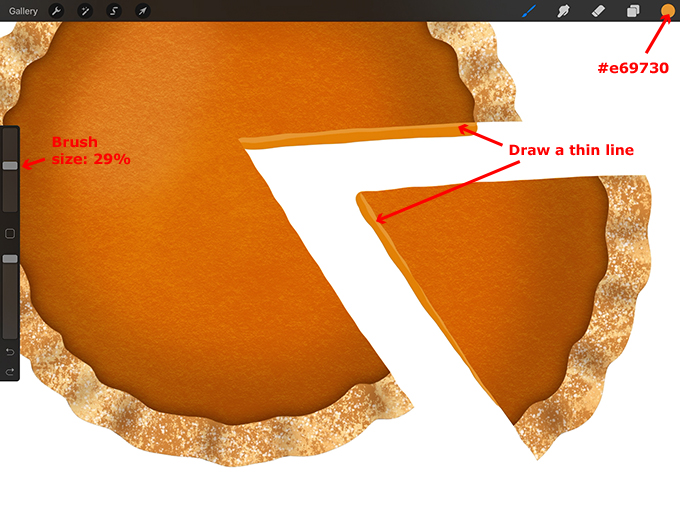
Create a new layer on top of the thick line layer.
Get the light orange color (Hexadecimal #e69730). Reduce the brush size. I made mine about 29%. Draw a thin line on the top of the thick line you just drew, between the top of the filling and the side of the filling.
Make the bottom and side of the crust
Create a new layer above the thin line layer you just made.
Get the dark crust color, Hexadecimal #cd7d30.
Now draw a thin line under the thick line to make the crust under the side of the filling. Then draw the edge of the upper crust. When drawing the crust under the slice, I reduced my brush size to 12%.

Add some texture to the upper edge of the crust
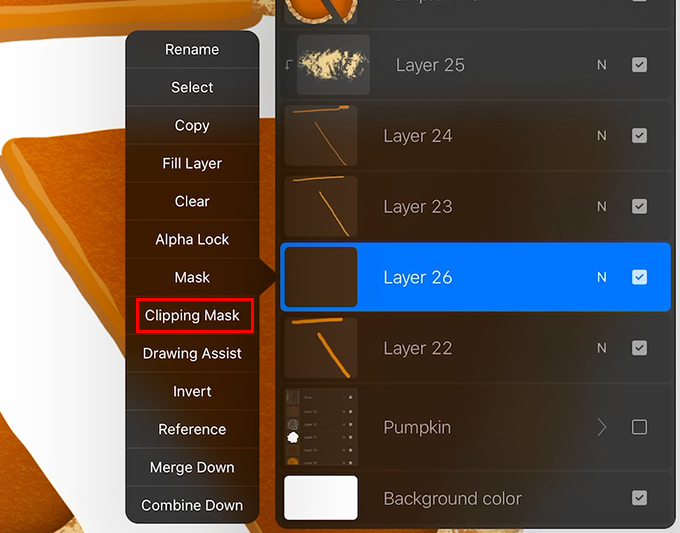
Create a new layer above the line layers and below the Pumpkin Pie layer. Tap on this layer and tap Clipping Mask in the fly-out menu.

Get the lightest crust color, Hexadecimal #fcdc98, and get the Burnt Tree brush from the Charcoals set.
Reduce the size of the brush. I made it about 4%. Now paint some light texture on the upper edge of the pie crust.
NOTE: Because we’re using a clipping mask the texture will stay within the crust area.

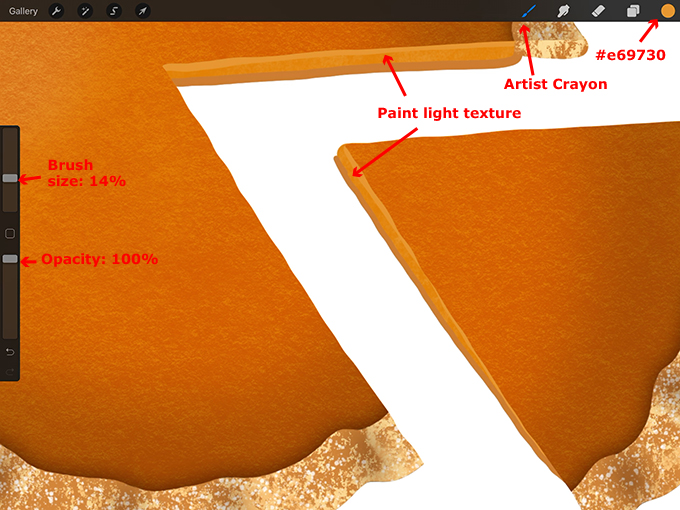
Add texture to the side of the filling
Create a new layer above the thick line layer. Tap on this layer and tap Clipping Mask.
Get the light orange color, Hexadecimal #e69730.
I’m going to use the Artist Crayon brush from the Sketching set.
I made the size about 14% and the opacity 100%. Now paint some light texture on the side of the filling.
After painting you can tap on the N on this layer and reduce the opacity of the texture if you want. I made mine about 94%.
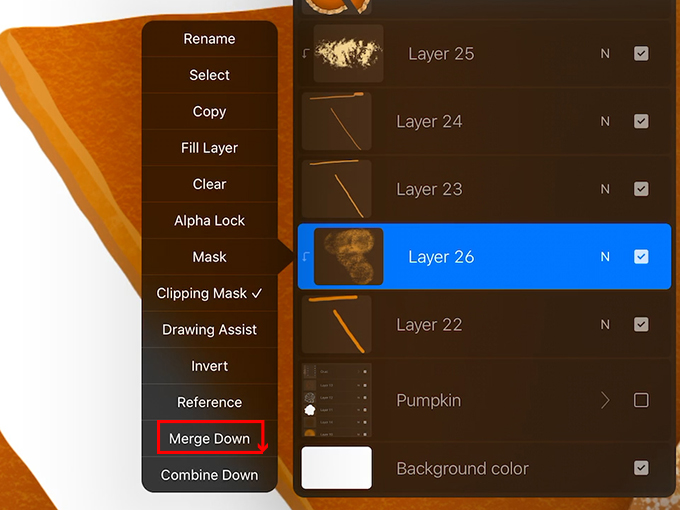
Merge the pie layers
Now tap on the texture layer you just made and tap Merge Down to merge it with the thick line layer.
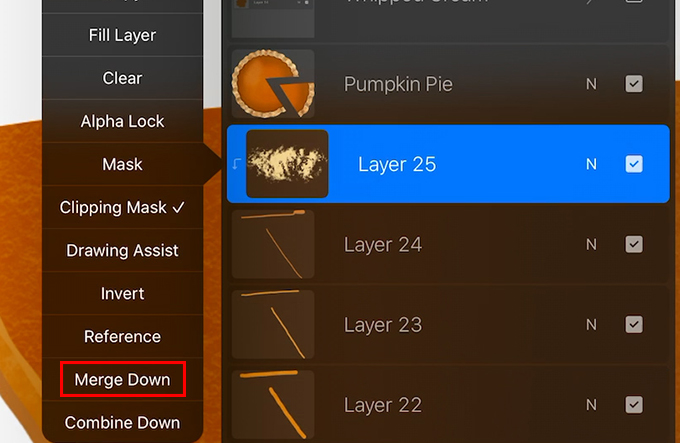
Then tap on the upper crust texture layer and tap Merge Down to merge it with the crust layer.
Pinch the rest of the pie layers together to merge them. Don’t merge the whipped cream group layer or the original pumpkin pie group layer.
Create a shadow around the pie
Tap the finished pie layer and in the fly-out menu, choose Select.

Create a new layer.
Get black for the color, Hexadecimal #000000.
Tap on the new layer and press Fill Layer to fill the selection with black.

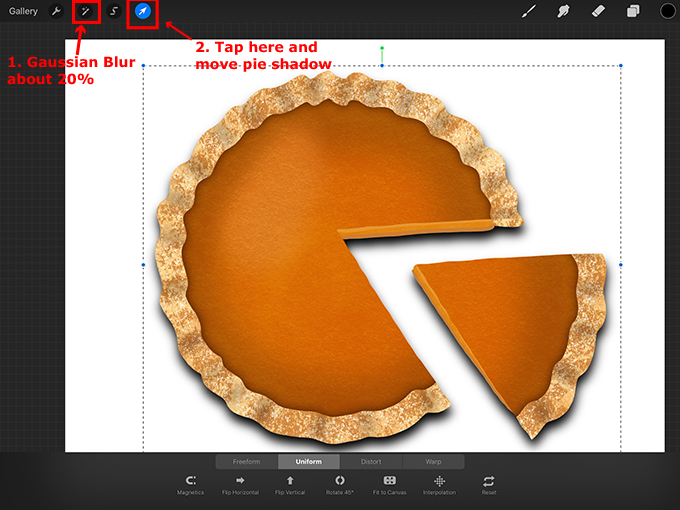
Move this layer below the pumpkin pie layer. Then tap on the adjustments button and tap Gaussian Blur to create a shadow around the pie. I made the shadow about 20%.
Now tap on the arrow and move the shadow. I moved it down and to the right a bit.
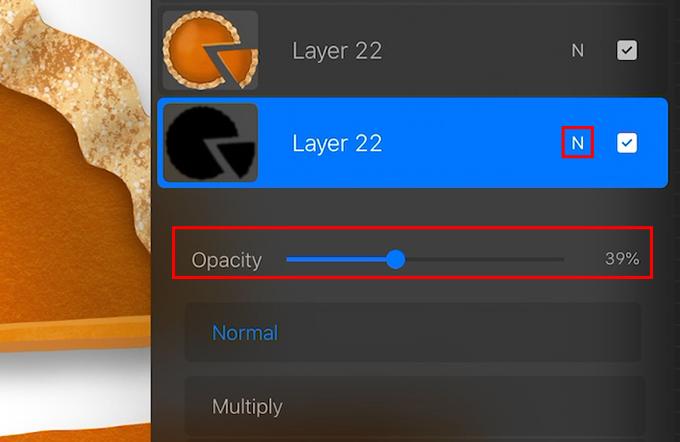
Now tap on the N on the pie shadow layer and reduce the Opacity. I made mine about 39%.
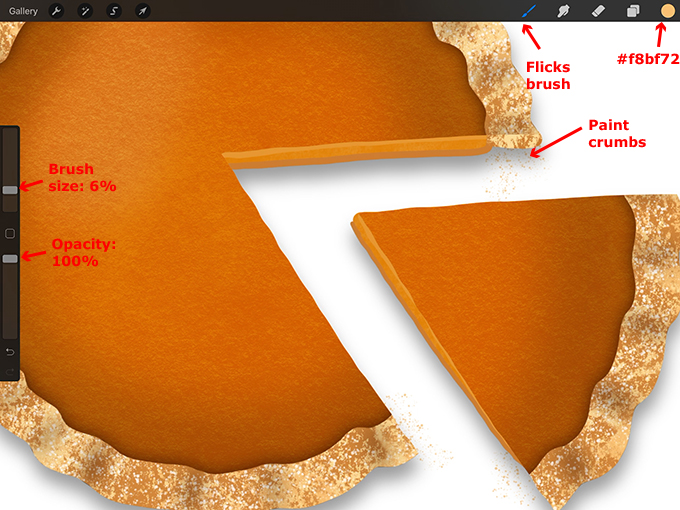
Add some pie crumbs
Create a new layer and move it underneath the pie shadow layer.
Get the original crust color, Hexadecimal #f8bf72.
And get the Flicks brush from the Spraypaints set.
I made the size 6%. Now paint some crumbs around the pie slice and around the pie.
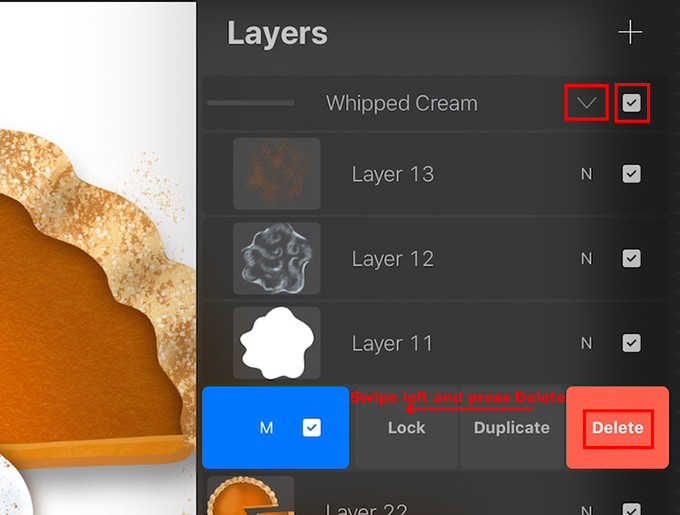
Turn on the whipped cream visibility, delete the whipped cream shadow, and flatten the group
Turn on the visibility of the whipped cream group layer and tap on the small arrow to expand the group.
I want to make a new shadow for the whipped cream and move it the same way as I did with the pie shadow, so swipe left on the whipped cream shadow layer and press Delete.
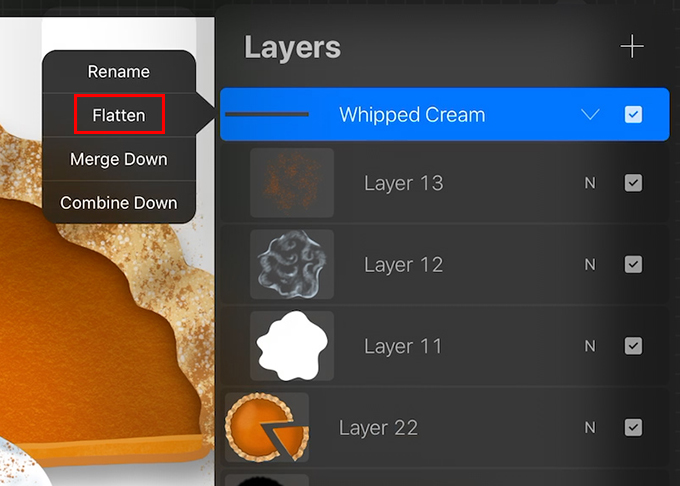
Now tap on the “Whipped Cream” group layer and tap Flatten.
Add the whipped cream to the pie
Tap on the arrow and move the whipped cream to the top of the slice. Make it smaller to fit the slice.
Swipe left on the whipped cream layer and press Duplicate.
Now move the duplicated whipped cream onto the pie. Use the green node to rotate it so it appears different from the original whipped cream.
Repeat this process until the whipped cream covers the pie.

Add a shadow to the whipped cream
When you’re happy with their placement, pinch the whipped cream layers together to merge them.
Tap on the merged down whipped cream layer and press Select.
Create a new layer and move it below the whipped cream layer. Get brown for the color, Hexadecimal #553415. Tap on the new layer and tap Fill Layer.
Tap on the N on this layer and tap Multiply.
Tap on the adjustments button and tap Gaussian Blur. Blur the shadow around the whipped cream. I made it about 17%.
Tap on the arrow and move the shadow in the same direction as you moved the pie shadow. I moved mine down and slightly to the right.
Tap on the M on this layer and reduce the opacity of the whipped cream shadow. I made mine about 66%.
The sliced pie is done!
Add Some Finishing Touches
Now let’s add some finishing touches including a plate and a background.
Make a plate
Create a new layer and move it underneath the pie crumbs layer.
Get a color for the plate. I chose a blue color, #509ceb.
Get the Hard Brush from the Airbrushing set.
Make the size 100% and make the opacity 100%.
Tap the center of the canvas to place a circle there. I used my finger instead of my Apple Pencil so that the opacity would be 100%.

Then tap on the arrow and resize the plate to fit the pie. It’s okay if it goes beyond the canvas.
Add a slightly smaller circle
Create a new layer above the blue circle layer.
Get a slightly darker blue color, #3d7ab7.
Tap in the center of the first circle to create another circle. Tap on the arrow and resize this circle so it’s slightly smaller than the first circle and move it so it’s centered on the first circle.

Then tap on the adjustments button and apply a slight Gaussian Blur so it doesn’t extend outside of the plate. I made the blur about 15.8%.
Add a third circle
Create a new layer and let’s add one more circle.
Get the first blue color, #509ceb. Tap the screen to add another circle to the canvas. Make it smaller than the first two and then move it to the center of the plate. I didn’t have to resize this circle.

Apply a Gaussian Blur to the third circle. I made mine about 26%.
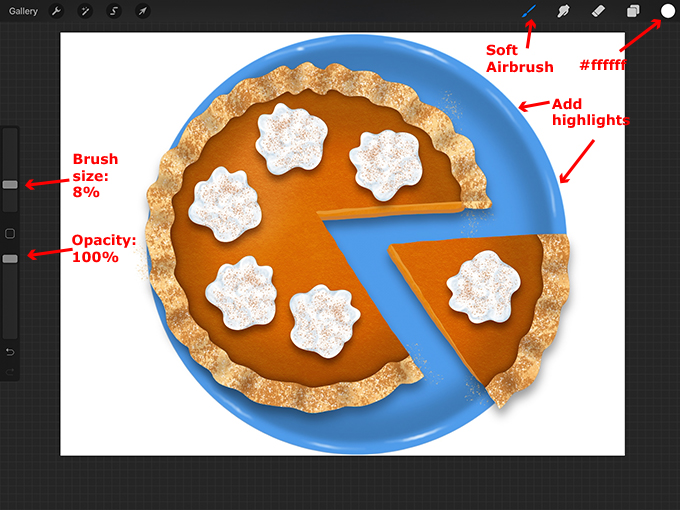
Add highlights to the plate
Create a new layer.
Get white for the color, #ffffff.
Get the Soft Airbrush from the Airbrushing set.
I made the brush size about 8% and the opacity 100%.
Now paint some thin lines on the edge of the plate for highlights. Use the Apple Pencil pressure to vary the opacity of the lines. For extra sparkle you can add a bit more white to the center of some of the lines.
Create a plate shadow
Tap on the first circle layer and tap Select.

Create a new layer and move it below the first circle.
Get black for the color, #000000.
Tap on the new layer and press Fill Layer.

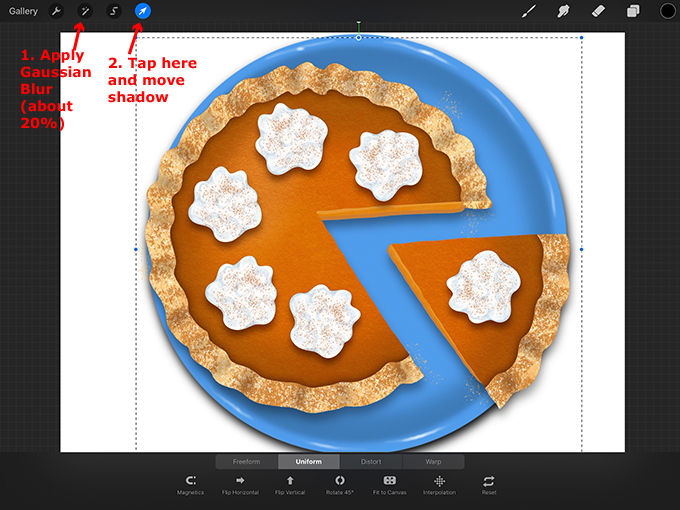
Apply a Gaussian Blur to the plate shadow. I made mine about 20%.
Then tap on the arrow and move the shadow if you want. I moved it down and to the right slightly.
Then tap on the N on the shadow layer and reduce the opacity. I made mine about 39%.
Add a background
Now let’s add a background. I’m going to use a texture brush to create a background that looks like a tablecloth.
Create a new layer and move it below the plate shadow layer and directly above the original pumpkin pie group.
Get a color for the background
I got the blue gray whipped cream shading color, #bfd3e2.
And I got the Victorian brush from the Textures set.
I made the size about 40% and the opacity 100%.
Then I painted the background. I decreased the size of my canvas to make it easier to paint and used my Apple Pencil to paint the background. Try not to lift your Apple Pencil or finger as you paint the background.

Make More Pie
Now you can use this technique to make different kinds of pies.
Thank you!
Thanks for visiting mapletreemakery.com. We hope you enjoyed this tutorial! Come back often for more information and tutorials.


Leave a Reply