
It’s almost the 4th of July, so I wanted to make some fireworks in Procreate. In this post I’ll show you a fun way to make a firework in Procreate and then go over a few other methods.
NOTE: Use an Apple Pencil for best results.
Follow the tutorial below or watch the video to learn how to make fireworks in Procreate.
How to Draw a Firework
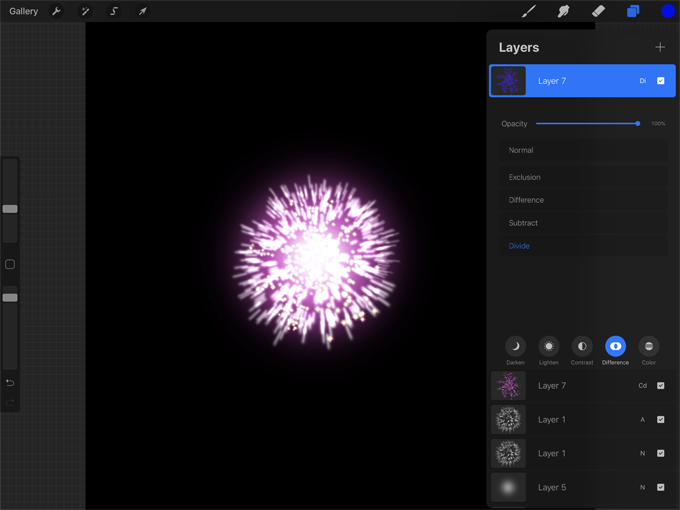
In this tutorial, I’ll show you how I made this firework:

These fireworks look different every time I make them and that’s part of the fun of this method. Sometimes they work better than others. It’s fun to experiment with different sizes, colors, and blend modes to see what looks good.
Prepare Your Canvas
Turn your iPad horizontal. Then open Procreate and create a new canvas. For this tutorial use the Screen Size.
NOTE: Square would work well too.

Tap on the layers icon and then tap on Background color.

Use a dark background. For this tutorial we’ll use black. Double tap in the black area of the color disc to get black.

Duplicate the Glimmer brush and modify it
Tap on the brush icon and scroll down to the Luminance set.
For this tutorial, I modified the Glimmer brush so that the glimmer would be spaced further apart.

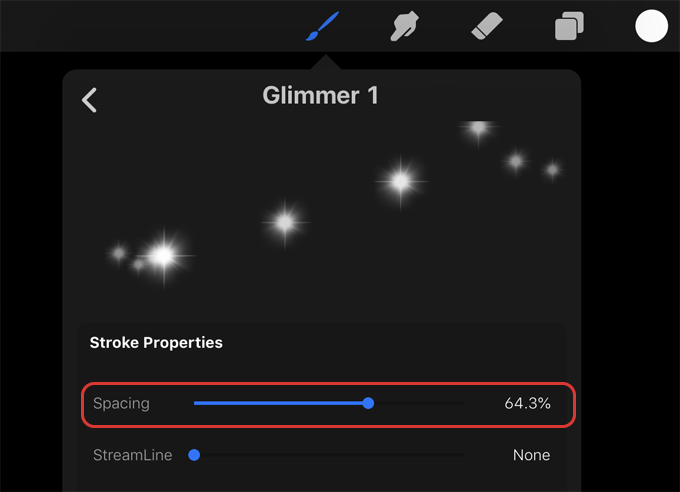
To do this, make a duplicate of the brush. Swipe left on the Glimmer brush and tap Duplicate.

Then tap on the duplicated brush and at the bottom of the brush menu tap Stroke. Then increase the Spacing. I made mine 64.3%.
Choose a color
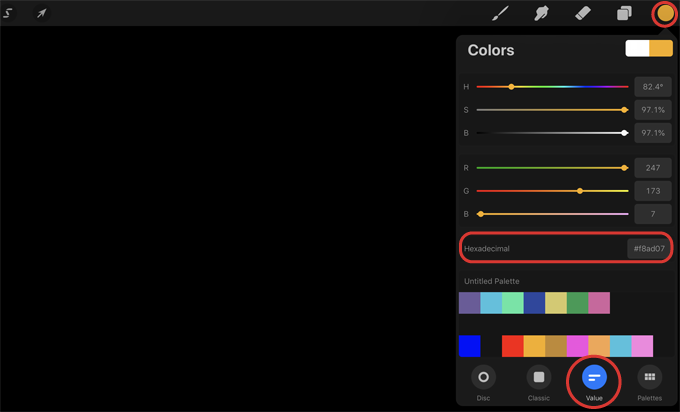
For this tutorial, I used a gold color. If you want to use the same color, tap on the color swatch and then tap on Value in the color menu. Enter the Hexadecimal #f8ad07.
Set the size and opacity of the brush
Set the size of the modified Glimmer brush using the size slider on the side of the screen. I made mine about 12%. I also used the lower slider to increase the opacity to 100%.
Create a circular shape with the duplicated Glimmer brush
Now use the brush to draw a filled in circle in the center of the canvas leaving some space around it. Refer to the screenshot below to see how I spaced the dots and how large I drew the circle.
If you press harder with the Apple Pencil the dots will become larger. Try to get the spacing of the dots even, not too close together or too far apart. The spacing and size of the glimmer dots will change how the firework looks, so you might have to redo this a few times if you don’t like the look of your firework. It can take time to get this right, but part of the fun of this method is that each firework will look different based on the dots.
To draw the dots, I started in the middle and drew a spiral outwards. You could also draw progressively larger circles as you go outward. Find a method that works for you.
If it’s still doesn’t look right, try adjusting the brush size on the side of the screen or even the spacing of the duplicated Glimmer brush.

NOTE: If your dots aren’t in the center of the canvas, tap on the arrow and move them before moving onto the next step.
Duplicate the dots layer
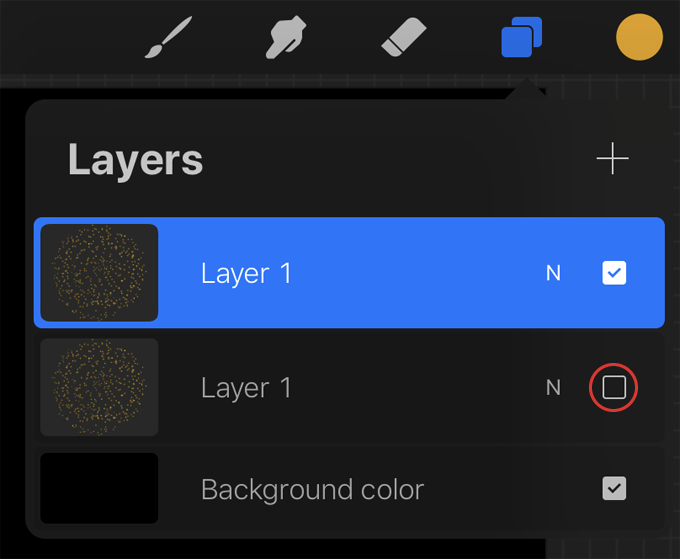
Swipe left on the dots layer and press Duplicate.

Then turn off the visibility checkbox for the original dots layer and tap on the top layer to select it.
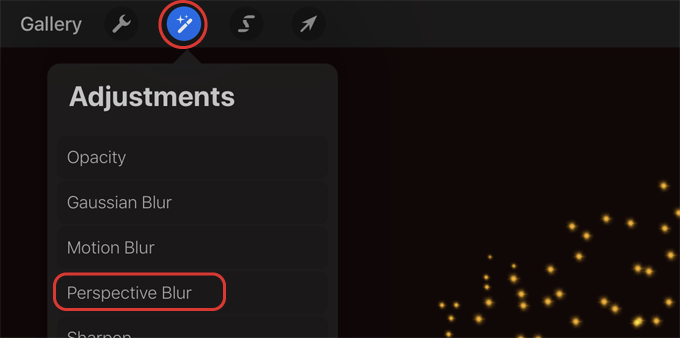
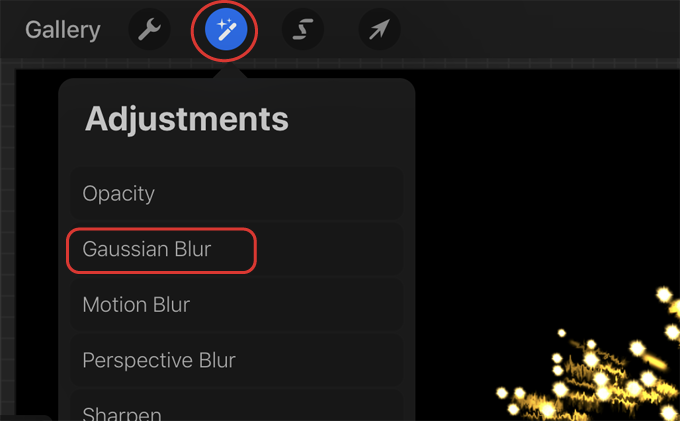
Add a Perspective Blur
Tap on the Adjustments button and then tap Perspective Blur.
You can use the Positional or the Directional blur. For this tutorial, I used the Directional blur to give the firework a bit of a downturn. At the bottom of the screen, press Directional. Move the circle. It should be about 1/4 down from the top of the image and centered horizontally as shown below. Then make the arrow on the circle point downwards. Increase the blur to 100% by sliding your finger or Apple Pencil across the canvas to the right.
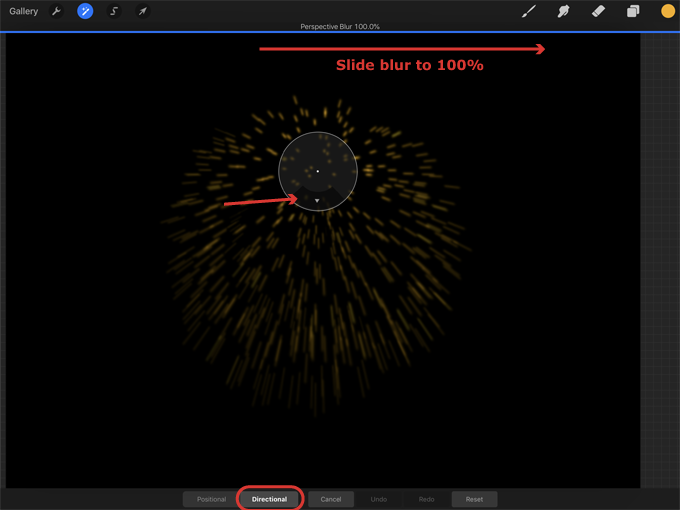
NOTE: If you want to use Positional blur instead, move the circle to the center of the firework and increase the blur to 100%. This will make the firework more rounded without a downturn.

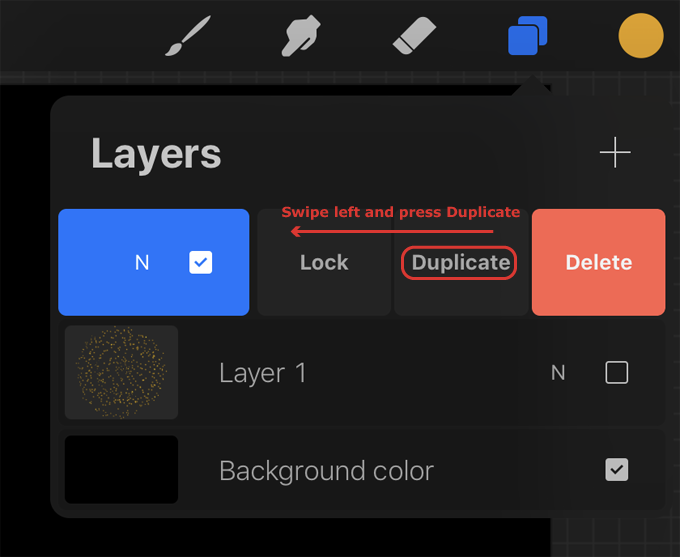
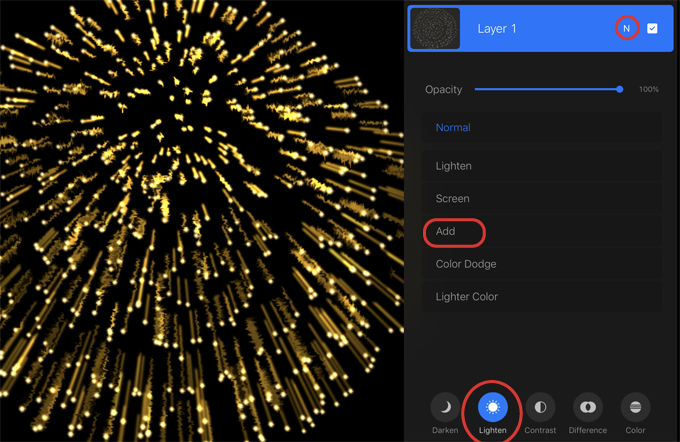
Duplicate the layer
Swipe left on the top layer and press Duplicate.
On the duplicated layer tap the N. Tap on Lighten at the bottom of the menu and choose Add for the blend mode.

Swipe left on the top layer and duplicate it a few more times to make it darker. I duplicated mine 3 more times.
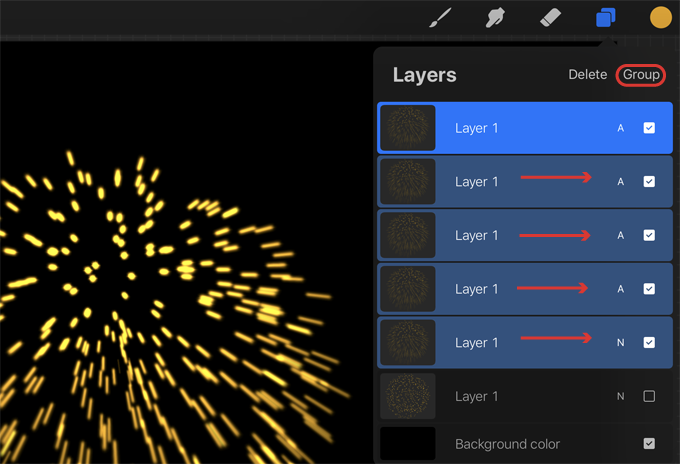
Group the layers
Tap on the top layer and then swipe right on the layers below it (except for the original dots layer). Once they’re all selected (blue) tap on Group.
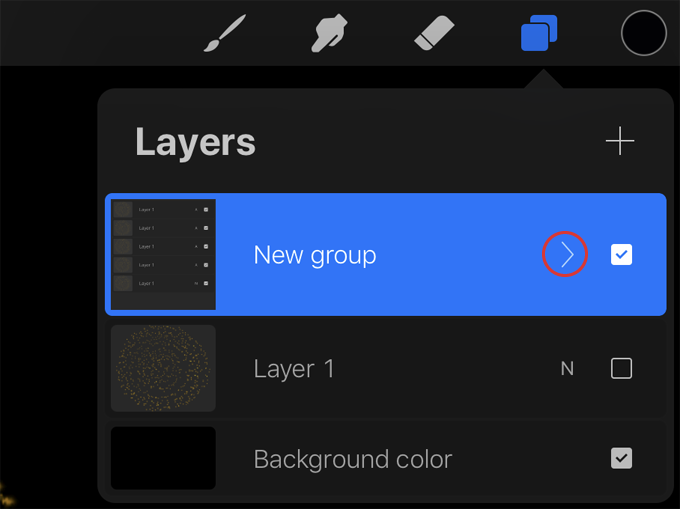
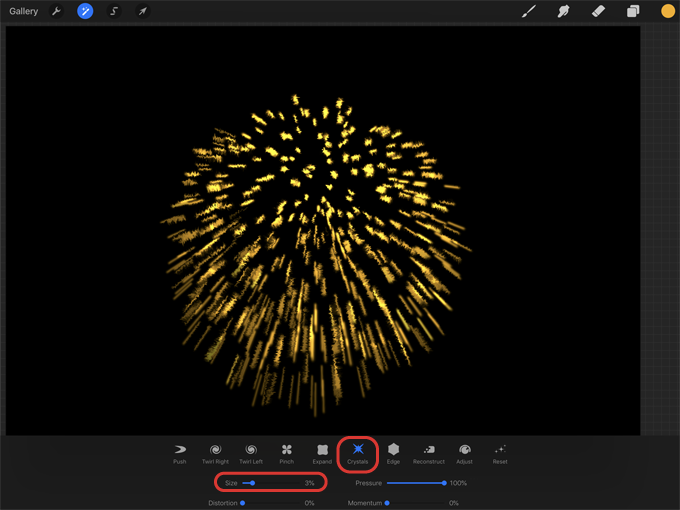
Use a crystallize effect
Tap on the layer arrow to collapse the group and then tap on the New group layer to select it.
Then tap on the Adjustments button. Tap Liquify.
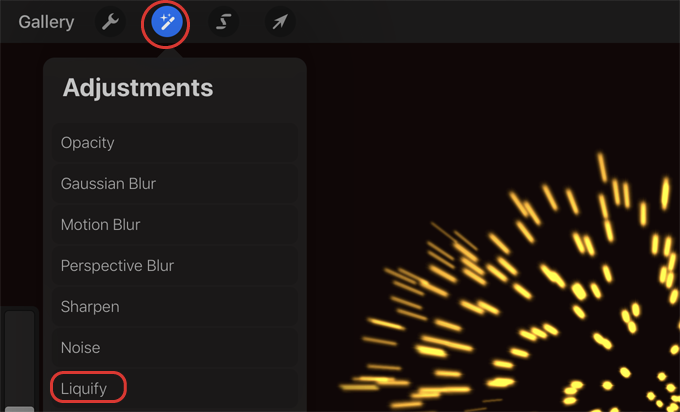
At the bottom of the screen tap Crystals. I made the size 3%. Paint over the lines of the firework to give them a bit of texture. Don’t warp the lines too much, just enough to give them some texture.
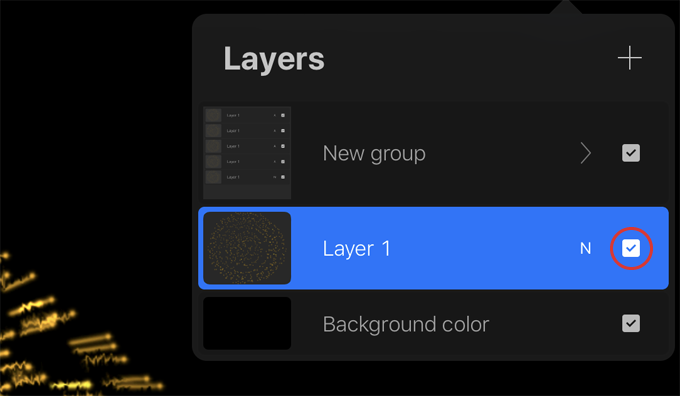
Add the original glimmer dots to the ends of the lines
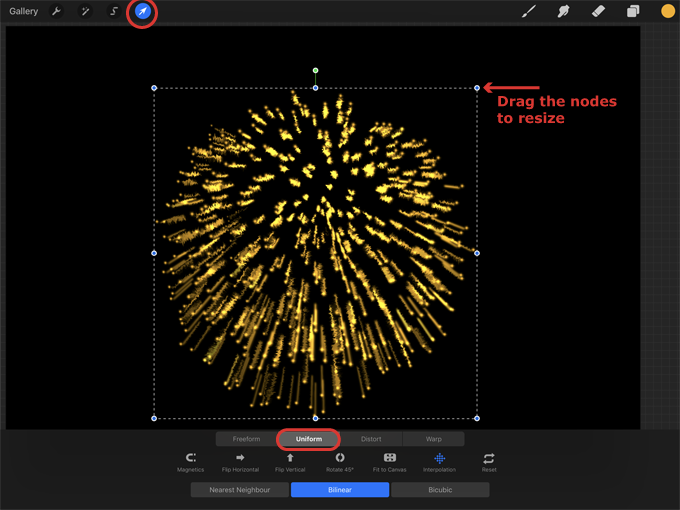
Turn on the visibility checkbox for the original glimmer dots layer and tap on the layer to select it.
Tap on the arrow and at the bottom of the screen press Uniform. Move the dots so they line up with the ends of the lines of the firework. Size them up a bit by dragging the nodes so they fit to the ends of the lines.
Duplicate the original glimmer dots layer.

Now tap on the duplicated dots layer and in the pop-out menu press Select.

Tap on the color swatch and get white for the color. You can do this by double tapping in the white area of the color disc.
Then tap on the layer that you selected and in the pop-out menu press Fill Layer to fill the dots with white.

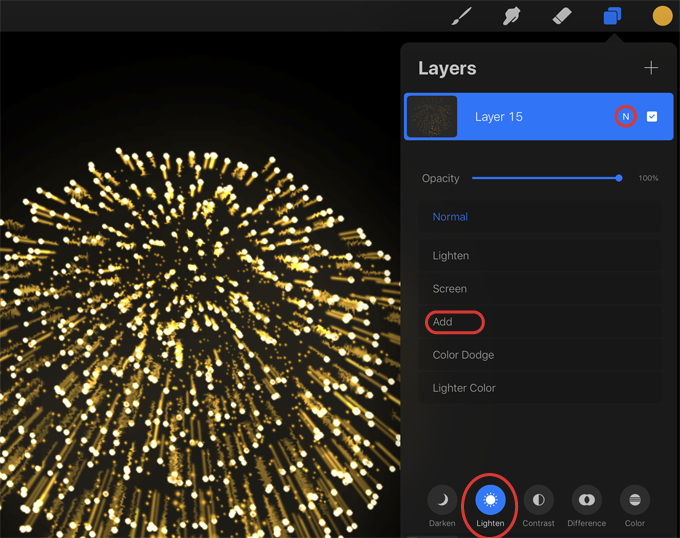
Tap on the N on this layer, tap Lighten at the bottom of the menu, and then press Add.
Duplicate this layer a couple of times to make it a bit darker. I duplicated it four times.
Then tap on the first white glimmer dots layer to select it.

Tap on the Adjustments button and tap Gaussian Blur.
Increase the blur a bit by sliding your finger or Apple Pencil across the canvas until you like how the dots look. I made mine about 47%.

Now duplicate the blurred layer a couple of times to increase it a bit more.
Add some more glimmer
Create a new layer at the top of the layer stack (above the grouped layers).

Get the gold color again (Hexadecimal: #f8ad07).
With the Glimmer brush still selected, draw some glimmer inside the firework. I drew lines with the brush starting from the center of the firework and moving outward.

Tap on the N on the glimmer layer, tap Lighten at the bottom of the menu, and then tap Add.
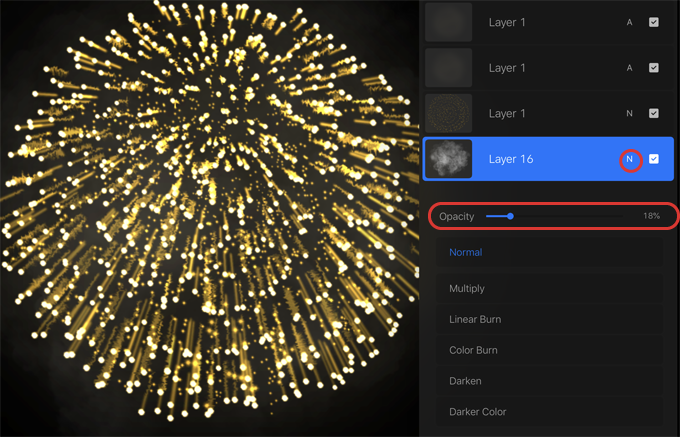
Add some clouds
Create a new layer and drag it to the bottom of the layer stack.

Choose the Clouds brush located in the Elements set.

Choose a color for the smoke. I used white. Set the size of the brush. I made mine about 57%. Now draw some clouds behind the firework.
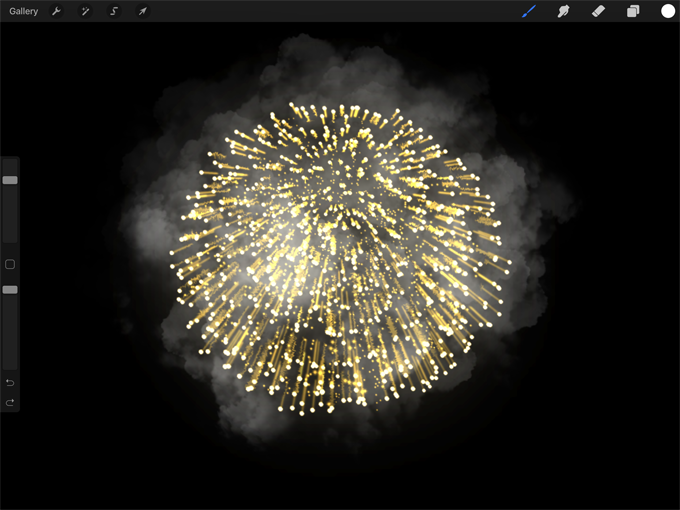
Now tap on the clouds layer and tap the N. Reduce the Opacity until the clouds are barely visible. I made mine 18%.
The firework is finished!
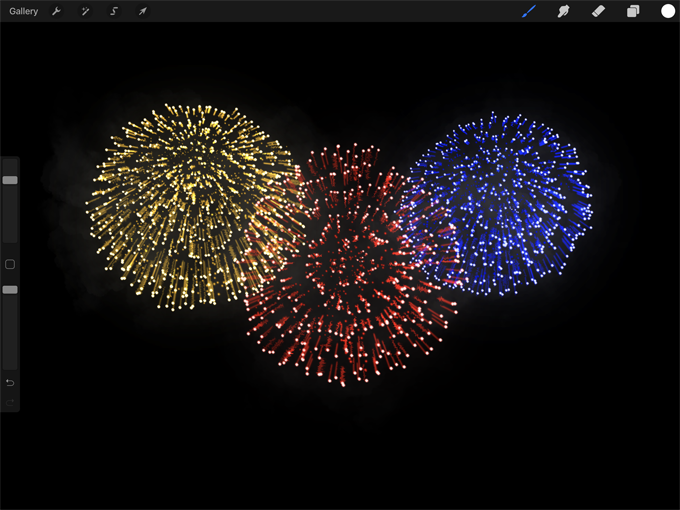
Add more fireworks
If you want to add more fireworks to the canvas, you’ll need to resize and move this firework. To do this, tap on the top layer and swipe right on all of the layers below it including the layer group. Then tap Group.

Tap on the layer arrow to collapse the group.
NOTE: If you flatten the group or merge the layers you may lose the blend modes. But this may make it easier to copy the firework if necessary.

Now tap on the arrow and tap Uniform at the bottom of the screen. Now you can move the firework or resize it by dragging the nodes.
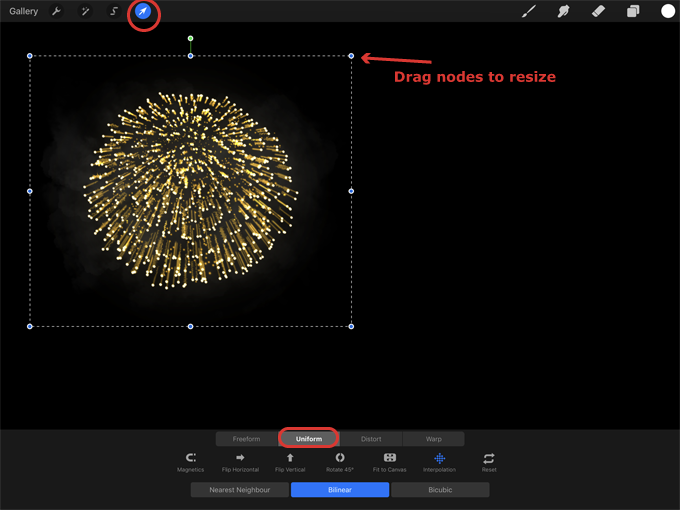
Then just duplicate the grouped firework layer to duplicate the firework or create a new layer and draw another firework. Make sure to draw it in the center of the canvas. It may help to turn off the visibility of the first firework while you work on a new one.
Some Other Ideas for Making Fireworks
Here I’ll briefly explain a couple of other methods for making fireworks in Procreate.
Colorful fireworks
This is a simple method to add a small burst of color to the canvas. It uses a similar method to the one above.
First get the Glimmer brush located in the Luminance set. This should be the original Glimmer brush and not the one you modified in the above tutorial.
Set the size using the size slider on the side of the screen. I made mine 14%. Get white for the color and draw a small circle on the canvas. It doesn’t have to be perfect. Then tap on the adjustments button and tap Perspective Blur.

Use the Positional blur. Drag the circle to the center of the glimmer dots and slide your finger across the screen until the blur is 100%.

Duplicate the layer and tap the N. Tap Lighten and change the blend mode to Add.
Create a new layer and drag it to the bottom of the layer stack.
Tap on the brush icon and under Airbrushing choose the Soft Airbrush. Then get a bright color.
Paint the color behind the dots. Then tap on the adjustments button and tap Gaussian Blur. Slide your finger across the canvas to increase the blur.
It looks nice to keep the color subtle, but if you want you can duplicate this layer to make the color brighter. You can also add another layer and add white to the center of the firework and give it a blur as well.
Now you can create a new layer, get the same color or a different color, and add some extra glimmer to the firework. Then give this a blend mode.
You can keep adding different colors of glimmer with different blend modes to achieve different effects. You could also add a clouds layer to finish the firework.
Here’s another example using a similar method and playing with blend modes:

And another:

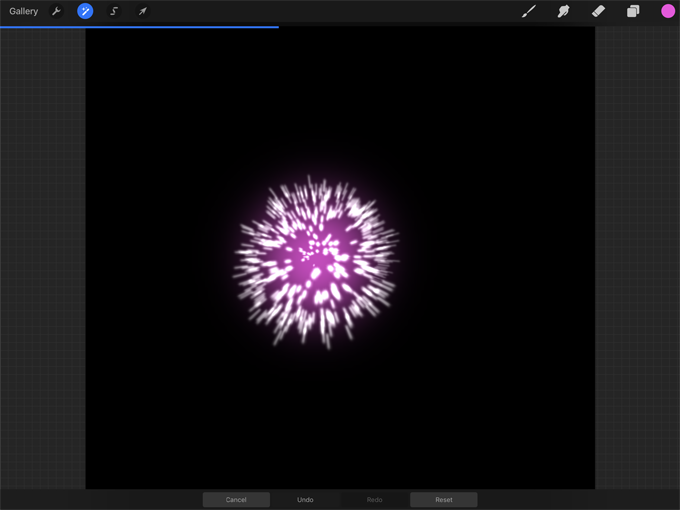
Spicule firework
The Spicule brush located in the Abstract set can make an interesting firework. Just set the size (I used about 30%) and then tap on the center of the canvas a few times to make the lines radiate as shown in the screenshot below:

Duplicate the layer, tap on the arrow, and drag the green node to rotate the duplicated layer a bit to fill in any gaps. Group these two layers or merge them together. Then tap on the arrow and tap Warp at the bottom of the screen and you can warp the lines into a firework shape.

Use some of the methods above to add to this firework such as the Crystals liquify effect to add texture to the lines and adding some glimmer between them. For this firework I used the Lightbrush located in the Luminance set and used the smudge tool to smudge it from the center. Using different blend modes really adds to the look.

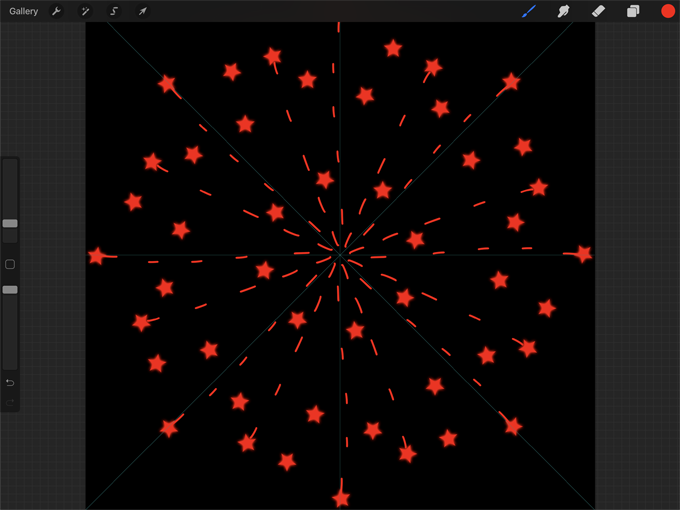
Symmetry Firework
Another method is to use the symmetry tool to create some stylized illustrated fireworks.
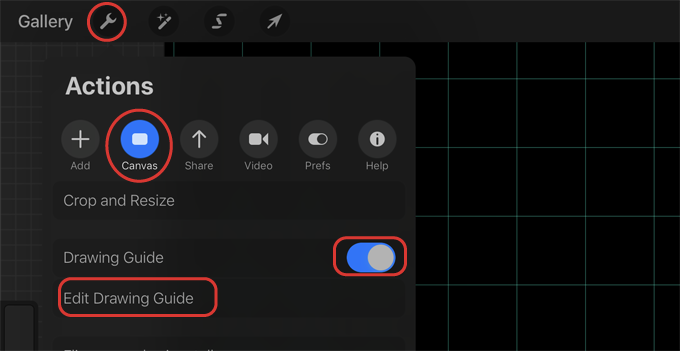
To turn on the symmetry, tap on the wrench, tap Canvas, toggle the Drawing Guide on and then tap Edit Drawing Guide.
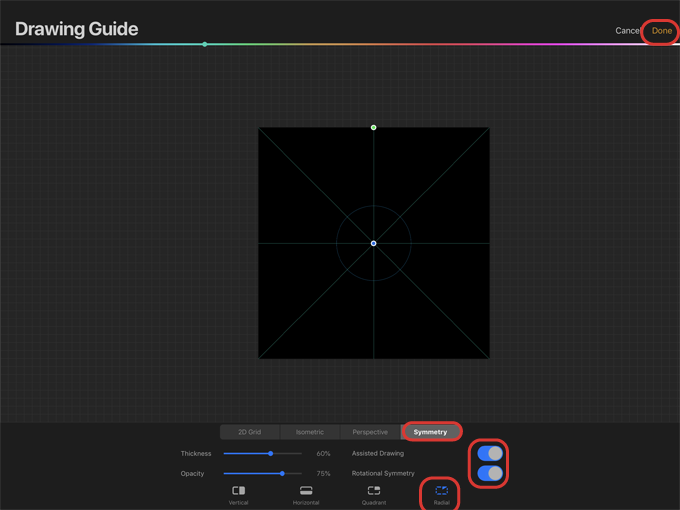
At the bottom of the Drawing Guide tap Symmetry and then Radial. Turn Assisted Drawing on and Rotational Symmetry on and then tap Done.
Now you can choose a brush such as the Monoline brush located in the Calligraphy set and draw some stylized fireworks.
There are lots of ways to draw fireworks. Try different brushes, colors, and blend modes to achieve different looks.
Thank you!
Thanks for visiting mapletreemakery.com. We hope you enjoyed this tutorial! Come back often for more information and tutorials.


Leave a Reply