
I wanted to find a way to make glitter in Procreate on the iPad without having to import any outside textures. After trying out lots of different brushes, I found a method that I really like. In this post I’ll show you how to:
- Create a custom brush and use it to make the glitter texture
- Change the color of the glitter texture
- Add extra sparkles to the texture
- Add your glitter texture to text
- Make your text glow and add a few more sparkles
- Do all of this entirely in Procreate!
Here are some examples of how I’ve used the glitter texture:

A heart shape filled with glitter with “love” lettering on top of it.
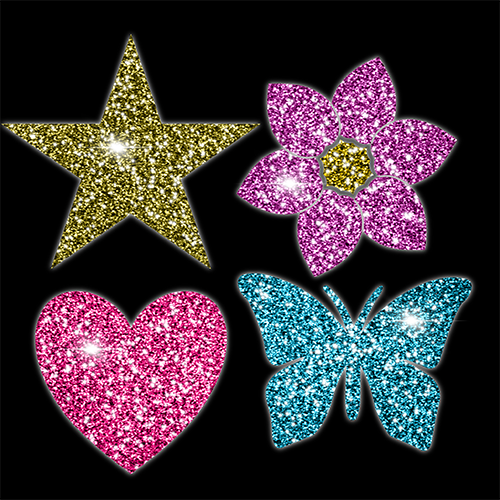
Here I used a similar technique to create shape stamps filled with the glitter texture.

Here I used the glitter texture to create glitter lettering surrounded by glittery confetti.

Here I filled the text with a multicolored glitter texture and then used a similar method to create the glitter border.
Let’s get started!
Watch the video or read the post below to learn how to make a gold glitter texture and apply it to text.
Prepare Your Canvas
Open Procreate and tap on the (+) to create a new canvas. For this tutorial, choose the Square.

Create a New Brush
To create the glitter texture, we’ll make a new brush.
Create a new brush set and a new brush
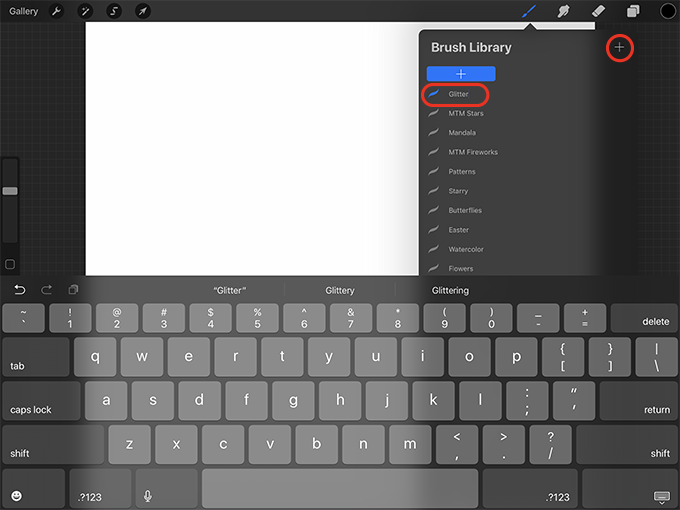
Tap on the brush icon. You can add this to an existing set or make a new set. For this tutorial, I’ll make a new set. To do this, scroll to the top of the Brush Library and then tap on the (+) to create a new brush set.

Give the brush set a name such as “Glitter” and then tap on the (+) in the upper right corner of the Brush Library to create a new brush in this set.
Choose Short Hair for the Shape Source
Under Shape Source tap Swap from Pro Library.
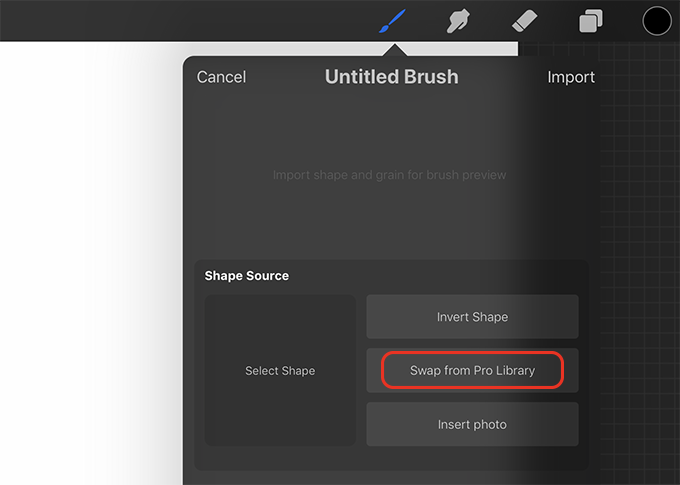
Find the Short Hair shape and tap on that.

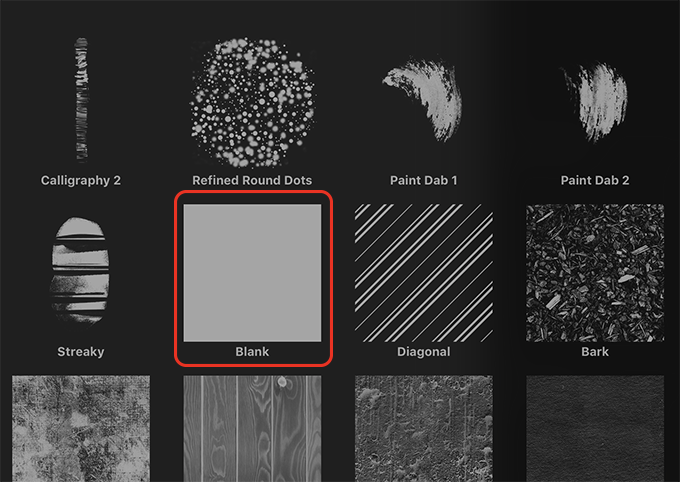
Choose Blank for the Grain Source
Under Grain Source tap Swap from Pro Library.

Scroll down to the grains and choose the Blank.
Change the spacing
Tap on Stroke at the bottom of the brush menu and increase the Spacing. This is how far apart the glitter will be. I made mine 33.4%. You can also change the Jitter. I made mine 20%.

Modify the shape settings
Tap on Shape at the bottom of the brush menu and increase the Scatter. I made mine 15%. Increase the Rotation as well. I made mine 19.1%.

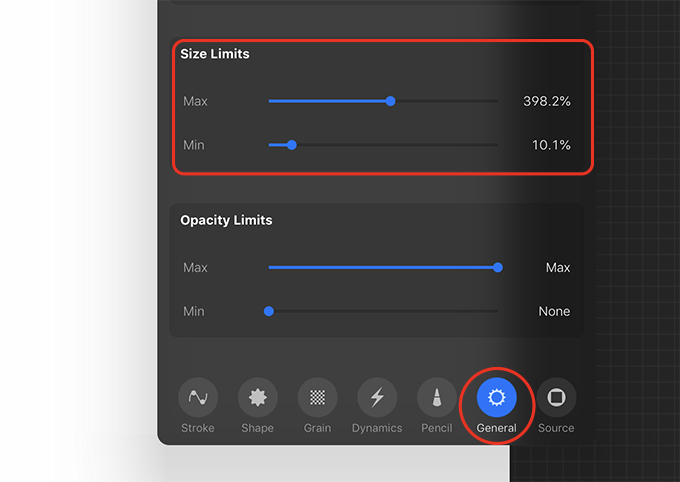
Modify the Size Limits
At the bottom of the brush menu tap General. Under Size Limits increase the Max. I made mine 398.2%. This is how big the glitter can be. If it gets too large, it will become blurry.
Increase the Min slightly as well. I made mine about 10%.
Give the brush a name
At the top of the brush menu tap on Untitled Brush and give the brush a name such as “Glitter Texture.”

Paint the Glitter Texture on the Canvas
Now that we’ve created the brush, it’s time to create the glitter texture.
NOTE: The glitter texture will look different depending on how thick you make each layer of glitter. Different colors and blend modes will also create different looking glitter.
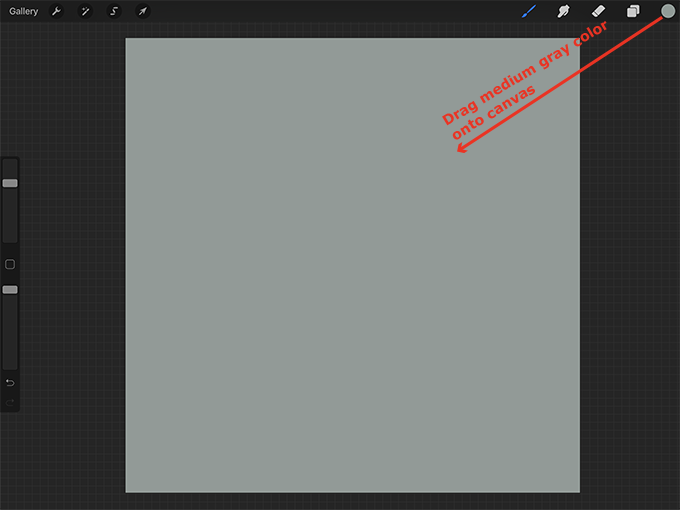
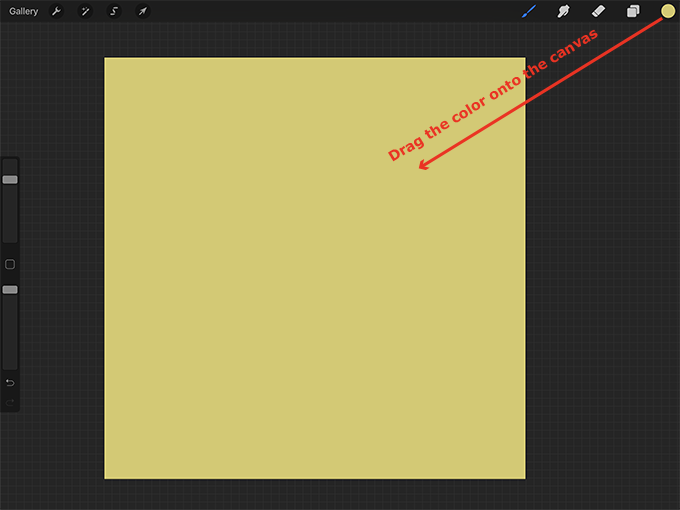
Get a medium gray color and fill the background with it
Tap on the color swatch. At the bottom of the Colors menu tap Value. Enter the Hexadecimal #909b97 to get a medium gray color.

Then drag the color from the color swatch onto the canvas to fill it with that color.
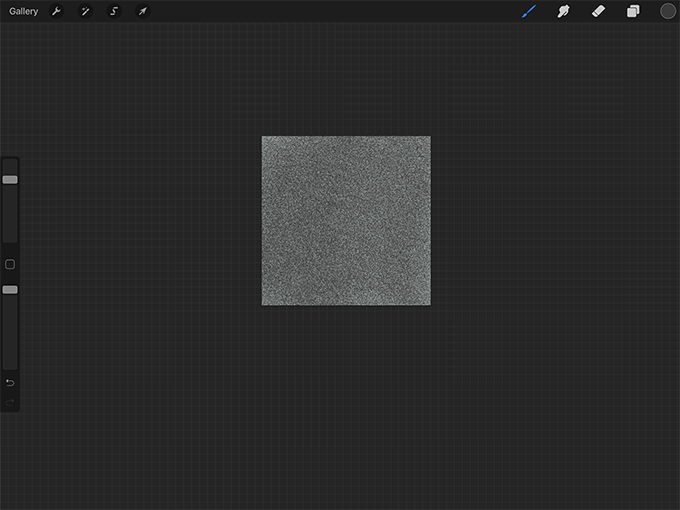
Add some dark glitter
Tap on the layers button and tap the (+) to create a new layer.

Tap on the color swatch and enter the Hexadecimal #3a3a3a to get a dark gray color.

Use the size slider on the side of the screen to change the size of your glitter. I made my brush about 58%. Now paint over the canvas with your glitter texture brush until the dark glitter is evenly distributed and fairly dense.

TIP: It may help to pinch in with your forefinger and thumb to make the canvas smaller before you paint. Then pinch outwards to enlarge the canvas again.
Now tap on the layers icon. Tap on the N on the top layer and then tap Darken at the bottom of the blend mode menu and Multiply to make the glitter darker.

Add some more glitter
Create a new layer.
Tap on the N on the new layer and tap Linear Burn.

Now paint lightly over the canvas again with the dark gray. Evenly distribute the glitter. The more you paint, the darker the glitter will be.

Add some light glitter
Create a new layer.
Tap on the color swatch and enter the Hexadecimal #c6d0cd to get a light gray.

Now paint over the canvas to add some lighter glitter. The more you add, the brighter it will be. Now tap on the layer icon and tap on the N on the light gray layer. Tap Lighten at the bottom of the menu and then Add.

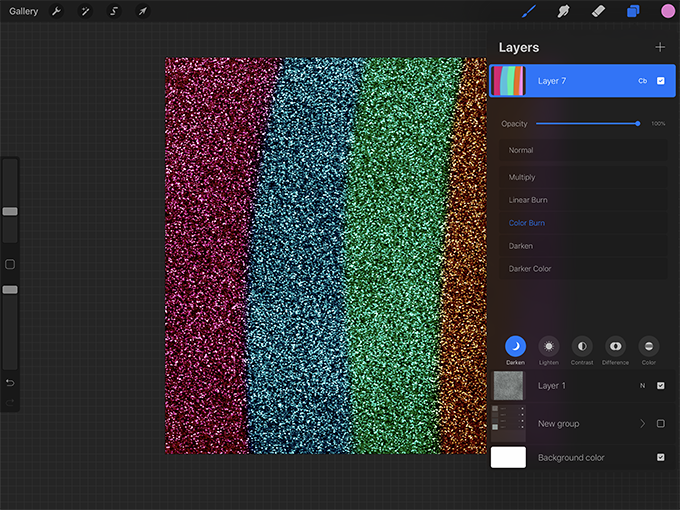
Group, duplicate, and flatten the layers
Tap on the top layer and then swipe right on all of the layers below it. Then tap Group.

Now tap on the small arrow to collapse the group.
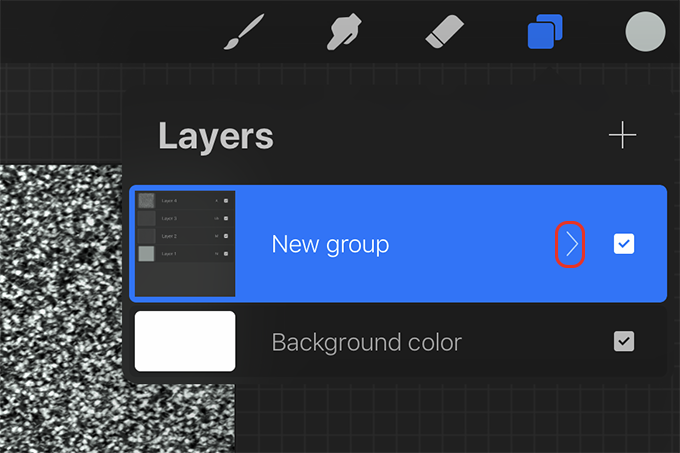
Swipe left on the New group layer and press Duplicate.

Now you have a copy of the glitter texture if you want to edit it or use it later. Tap on the visibility checkbox of the original group layer to turn it off.

Tap on the duplicated glitter texture group and in the pop-out menu press Flatten.

Change the Color of the Glitter Texture
To change the color of the glitter texture, create a new layer above the flattened glitter texture layer.

Get the color you want such as a gold color like Hexadecimal #d6c967.

Now drag the color from the color swatch onto the canvas.
Tap on the N on the color layer to give the color a blend mode. For this tutorial, tap the Color button at the bottom right of the blend mode menu and then tap Color. Now your glitter should be filled with the color.
NOTE: Depending on what colors you use, you may want to use a different blend mode. Try out other blend modes with different colors such as Overlay or Color Burn.

If you want multicolored glitter, instead of filling the color layer with one color, paint over it with multiple colors using a brush such as the Medium Brush located in the Airbrushing set.

Then give the color layer a blend mode such as Color Burn, Overlay, or Color.
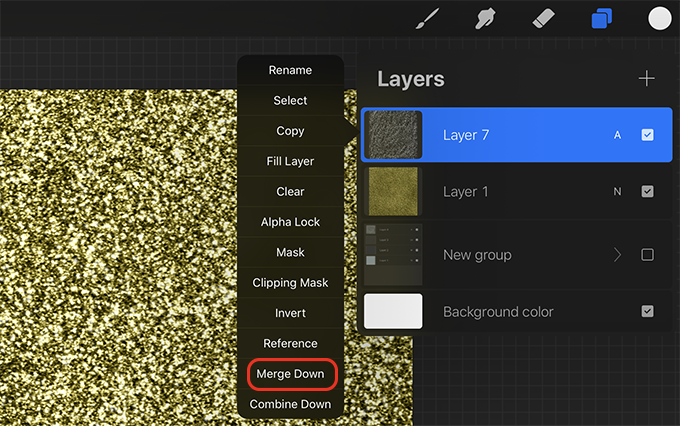
Once you’ve chosen your color and given it a blend mode, tap on the color layer and in the pop-out menu press Merge Down.

Make the Glitter More Sparkly
To make the glitter texture more sparkly, create a new layer on top of your glitter texture.

Choose white for the color. Hexadecimal: #ffffff
Tap on the brush icon and scroll to the Luminance set. I like to modify the Glimmer brush so that it is more spread out.
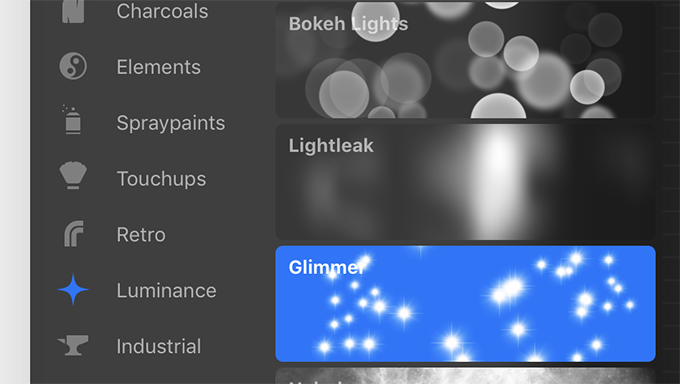
To do this, swipe left on the Glimmer brush and tap Duplicate.
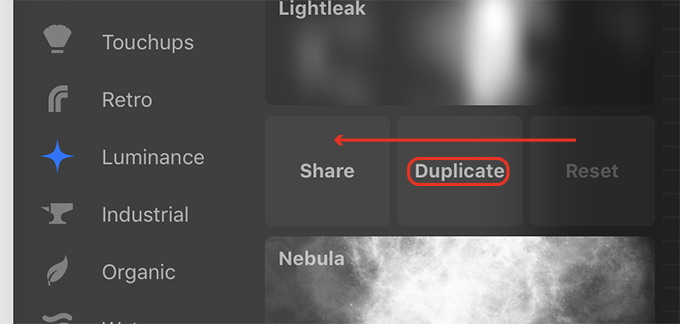
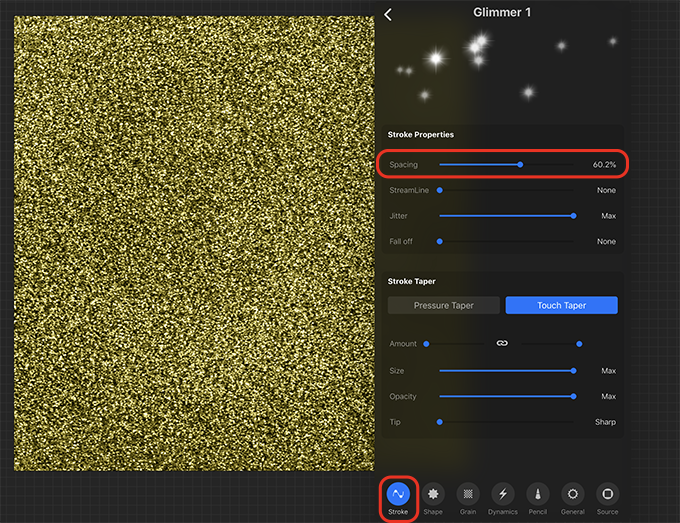
Then tap on the duplicated Glimmer brush, it should be Glimmer 1 if you haven’t duplicated it before. In the brush settings, tap on Stroke and increase the Spacing. I made mine about 60%. If you want more sparkles, make the spacing less.
Use the slider on the side of the screen to change the size of the duplicated glimmer brush. I made mine about 12%. Then paint over the glitter texture to add some sparkles. Add as many sparkles as you want. It may help to make the canvas smaller while you paint.

Once you’re done adding the sparkles, tap on the N on the glimmer layer, tap Lighten at the bottom of the menu, then tap Add. Now you can reduce the Opacity if you want. I made mine about 70%.

When you like how the sparkles look, tap on the sparkles layer and in the pop-out menu tap Merge Down to merge them with the glitter texture.
Add Text
For this tutorial, make some text to fill with glitter.
NOTE: If you want to add hand drawn lettering or a shape, create a new layer on top of the glitter texture and then follow this same method. Adding text will automatically create a new layer on top of the glitter texture.
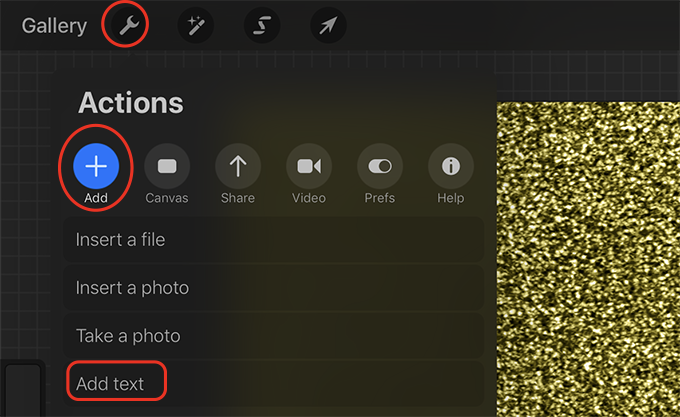
Tap on the wrench, tap Add, then tap Add text.
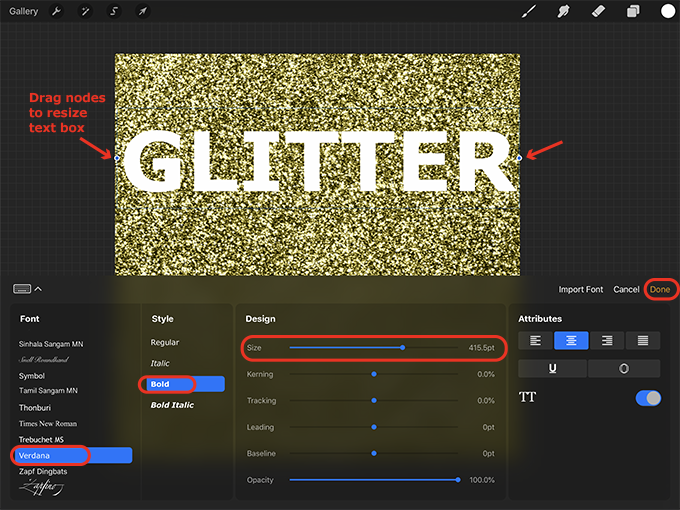
Tap caps lock and then type the word “GLITTER” in all caps. When you’re done, tap Edit Style.

Choose a Font such as Verdana and under Style make it Bold. Drag the left node on the text box until it reaches the left side of the canvas. Drag the right text box node so it reaches the right side of the canvas. Then at the bottom of the screen under Design use the Size slider to increase the size of the word. I made mine about 415pt. When you’re done, tap Done.
If you want to learn more about using text in Procreate, click here.
Fill Your Text with Glitter
Tap and hold on the layer your text appears on until you can drag it underneath the glitter layer.

Now tap on the glitter layer and in the pop-out menu press Clipping Mask. This should fill your word with glitter.
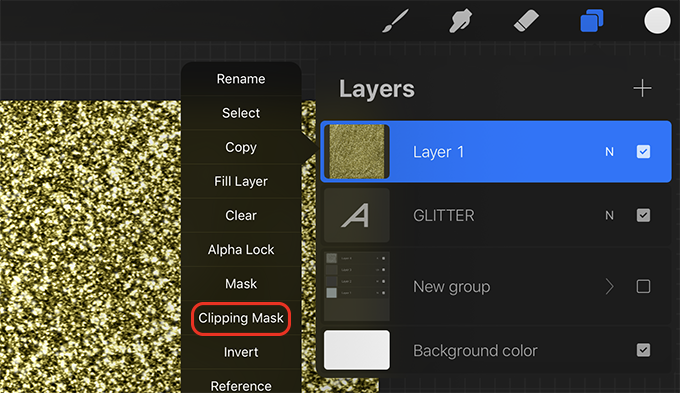
If you’re happy with how it looks, tap on the glitter texture layer and in the pop-out menu tap Merge Down to merge it with the text layer.

Add Some Finishing Touches
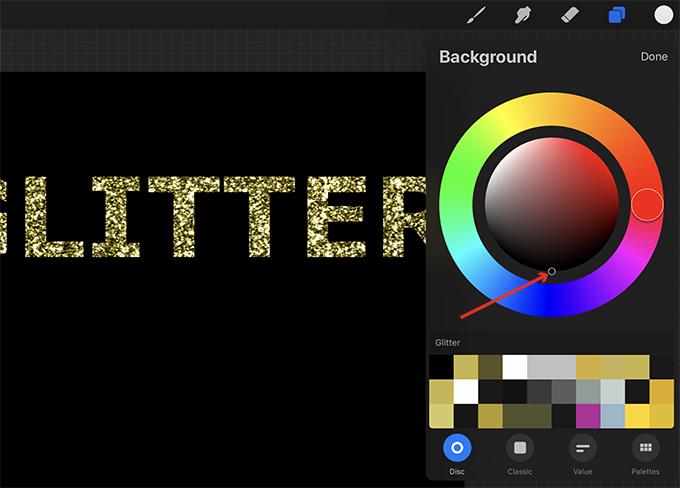
Change the background color
In the Layers menu tap on Background color.
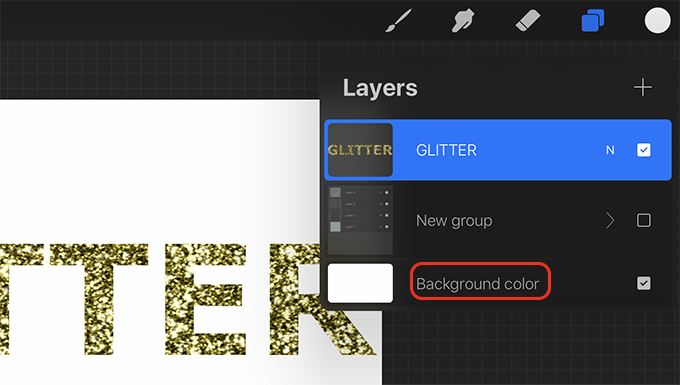
Double tap in the black area of the color disc to change the background color to black.
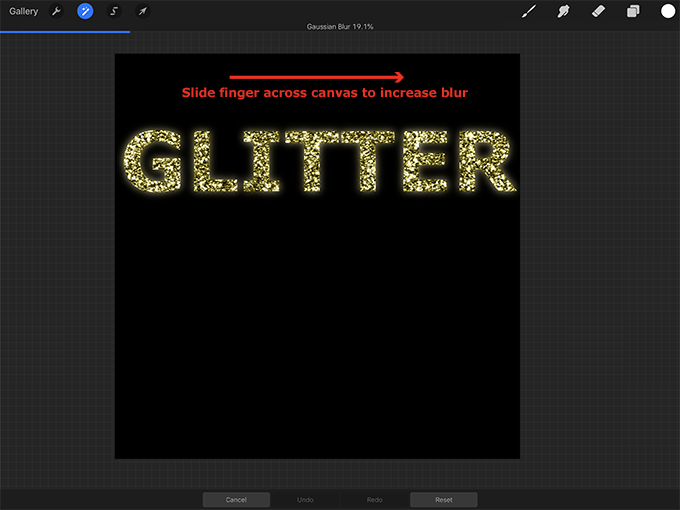
Make the word glow
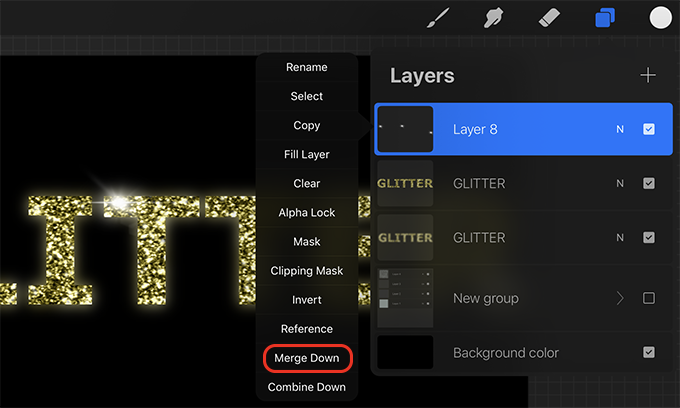
Swipe left on the glitter text layer and press Duplicate.

Then tap on the lower text layer to select it.

Now tap on the Adjustments button and tap Gaussian Blur.

Slide your finger or Apple Pencil across the screen from left to right to increase the blur. I made mine about 19%.
Add some large sparkles
Tap on the top layer and then tap (+) to create a new layer at the top of the layer stack.
Now open the Brush Library and scroll down to the Luminance set. Tap on the Flare brush.
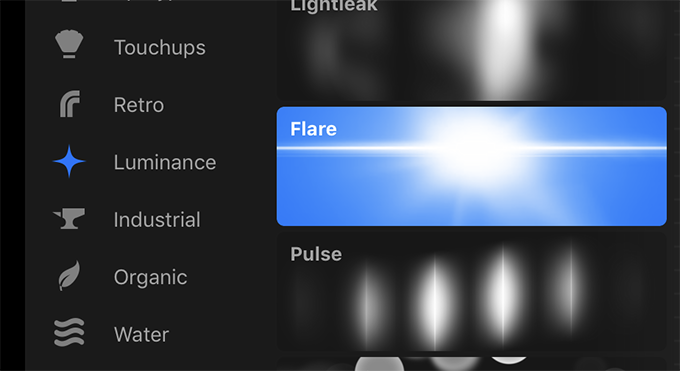
You should still have white selected as the color, Hexadecimal: #ffffff .
Change the size of the brush using the size slider on the side of the screen. I made mine about 10%.
Now tap on a couple of letters to add a few extra large sparkles to those letters.

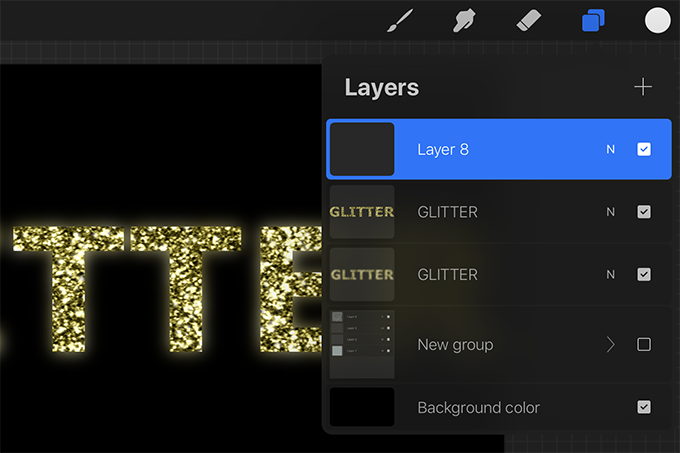
Merge the glitter text layers together
Tap on the top layer and in the pop-out menu press Merge Down. Then do this again so that the large sparkles layer, the glitter text layer, and the text glow layers are all merged. (The original glitter group layer should not be merged)
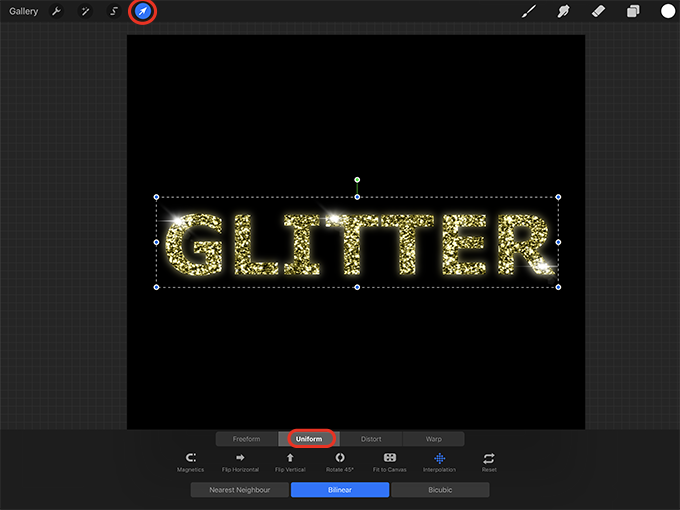
Now you can tap on the arrow at the top of the screen and move the text or tap Uniform at the bottom of the screen and drag the nodes to resize it.
That’s it! The glitter is done. Now you can duplicate the original glitter group layer and repeat this process to add more items to the canvas if you want.

Here I duplicated the original glitter group layer, flattened it, gave it a new color, and added it to some confetti. Then I repeated this process to add more confetti.
You can use this glitter technique to make glittery text, lettering, or shapes.
Thank you!
Thanks for visiting mapletreemakery.com. We hope you enjoyed this tutorial! Come back often for more information and tutorials.


I literally just received an iPad today and downloaded procreate and I was able to follow your directions perfectly!!!
This was so fun thank you!!
That was so informative and such fun! Thanks so much!!!
I’m glad it was helpful!
Thank you SOOOO so much for this!! I truly appreciate text/photo tutorials vs youtube. And even though I’m using Procreate 5 it was still effortless to follow your instructions.
Hi, I absolutely love this tutorial but when I add a new brush and go to shape source, there is no ability to swap from pro library or any of the different types. Just a large round circle. It goes straight to shape behaviour and then shape filtering. What am I doing wrong?
Because Procreate has updated to Procreate 5, the steps are a bit different. If you’ve tapped Shape in the Brush Studio, tap Edit next to Shape Source. In the Shape Editor screen tap Import and then Source Library. Then tap Done. While still in this area of the Brush Studio, you can change the Scatter (I made mine 15%) and the Rotation (I made mine about 19%). Under Stroke path you can change the Spacing (33%) and Jitter (20%). Under Properties you can change the Maximum Size (398%) and Minimum Size (10%). You may also want to tap Apple Pencil in the left column and reduce the Opacity slider to None. I hope this helps!