I wanted to find a way to draw a perfect 5-pointed star in Procreate, and after lots of experimentation I managed to create a method that works well. In this post, I’ll show you how to draw a star in Procreate, and then I’ll describe how you can make the star into a stamp brush so you can use it whenever you want.
Read the tutorial below or watch the video to learn how:
NOTE: The written tutorial has been updated for Procreate 5X. The update allows you to rotate objects to specific angles without having to rotate the canvas making the process easier.
Prepare the Canvas and Choose the Monoline Brush
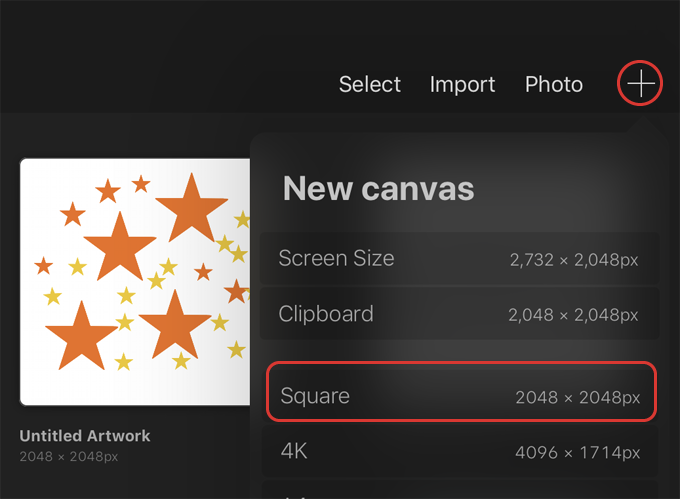
Create a square canvas
Tap on the plus sign and choose the preset Square canvas.
Choose the Monoline brush and choose black for the color
Tap on the brush icon and choose the Monoline brush located in the Calligraphy set.

Tap on the color swatch and double tap in the black area of the color disc to get black for the brush color.
NOTE: If you’re not planning to make a brush out of the star you can use any color you want.

Draw the Star
For best results, use an Apple Pencil to draw the star.
Draw a vertical line
Use the size slider on the side of the screen to resize your brush if necessary. I made mine about 60%.
Draw a vertical line down the center of the canvas. When you’re done drawing the line, hold your finger or Apple Pencil down until a perfect line is created. Then continue holding the pencil down and tap one finger on the screen to make sure the line is perfectly vertical.

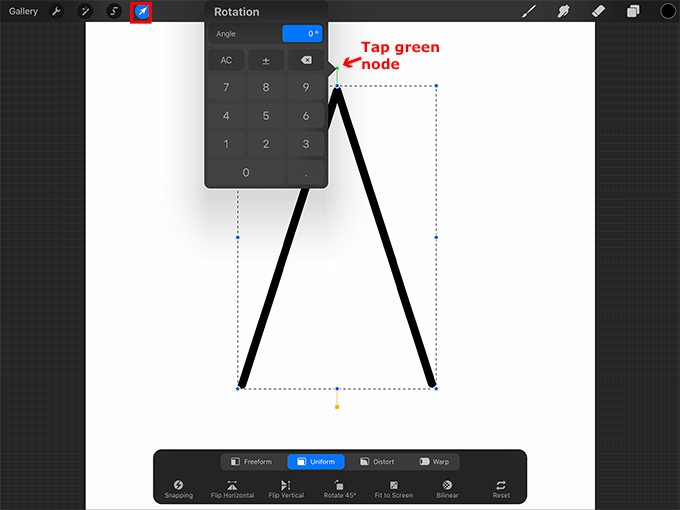
Rotate the line
In order to make a star, we need a custom angle. Tap on the arrow at the top of the screen. Tap on the green node to access the Rotation menu.
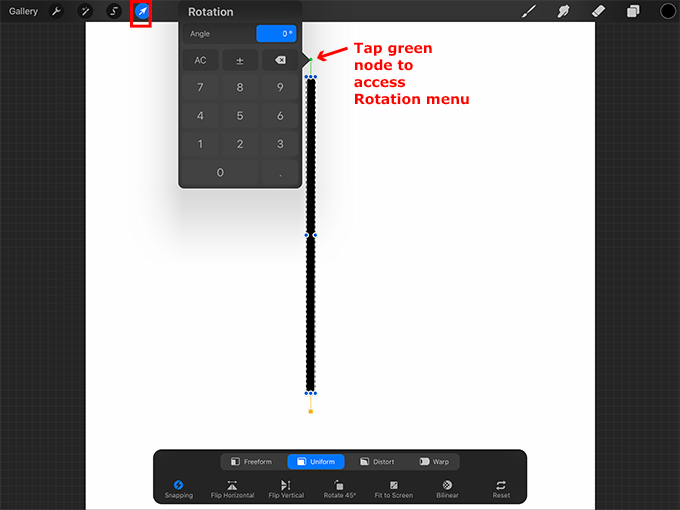
Make the Angle 18 degrees. This should rotate your line to the left.

Move the line slightly to the right leaving some space on the right side of the canvas.

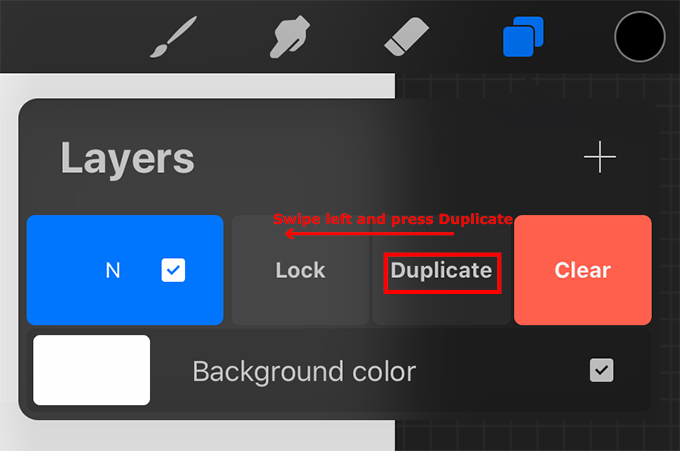
Duplicate the line layer and flip it
Tap on the layers icon and swipe left on the line layer. Press Duplicate.

Tap on the arrow to select the duplicated line. At the bottom of the screen press Flip Horizontal. Move the duplicated line so that the two lines join to form the top point of the star.

NOTE: You can tap on the screen in the direction you want the line to move to move it incrementally in that direction in order to line it up perfectly. If your line is snapping into place incorrectly, tap Snapping at the bottom of the screen and toggle Snapping off.
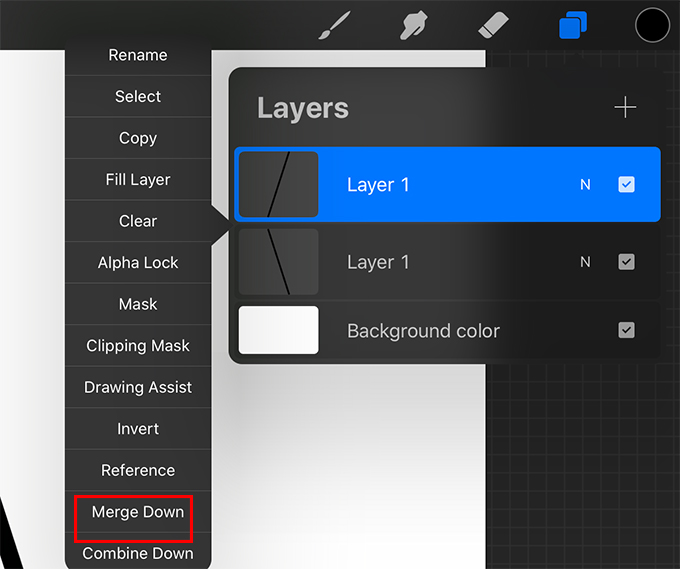
Now tap on the layers icon again. Tap on the top line layer and press Merge Down in the pop out menu to merge the two lines together.
Duplicate the star point
Swipe left on the star point layer and press Duplicate.
Tap on the arrow. Tap on the green node to access the Rotation menu.
Make the Angle 72 degrees.

Move the star point into place so that the bottom right corner lines up.

Duplicate the second star point
Swipe left on the second star point layer and press Duplicate.

Tap on the arrow. At the bottom of the screen tap Flip Horizontal. Move the star point into place to complete the star.

Merge the layers together
Merge all of the layers together. You can do this by pinching them together or by tapping on each layer and pressing Merge Down in the fly-out menu.

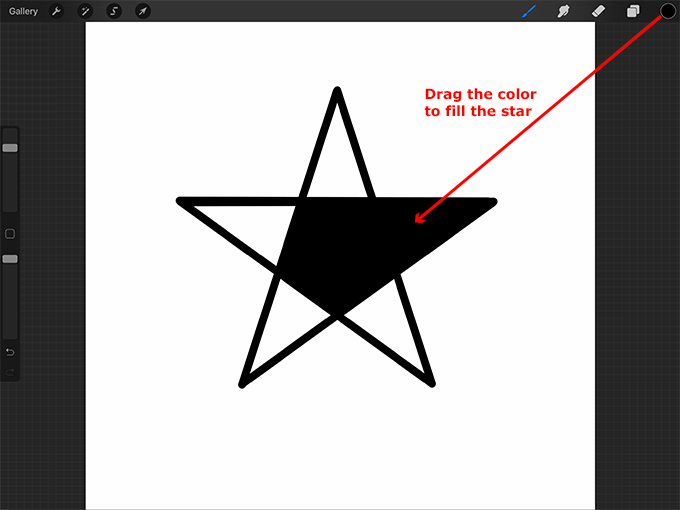
Fill the star with black
Drag black from the color swatch into each area of the star until it’s filled.
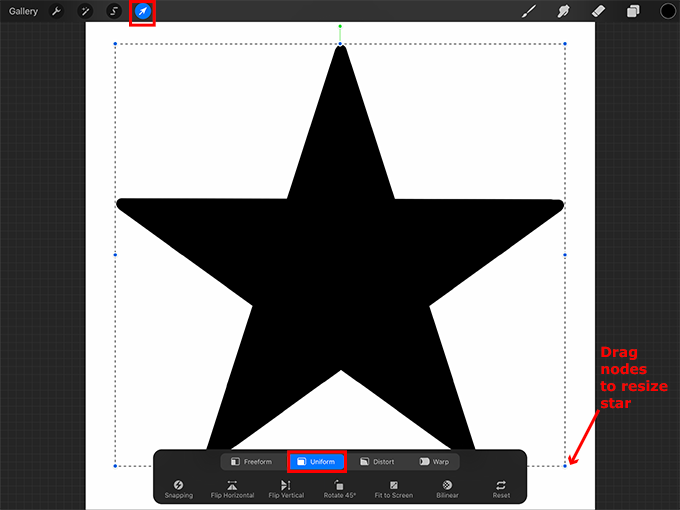
Resize and move the star
Tap on the arrow. Now you can tap Uniform at the bottom of the screen and resize the star if you want. When you’re ready, move the star to the center of the canvas.
Now you can use the star as is or you can make a brush out of it so you can use it whenever you want.
Create the Star Brush
Copy the canvas
Tap on the wrench, tap Add, then tap Copy Canvas.

Create a new brush set and a new brush
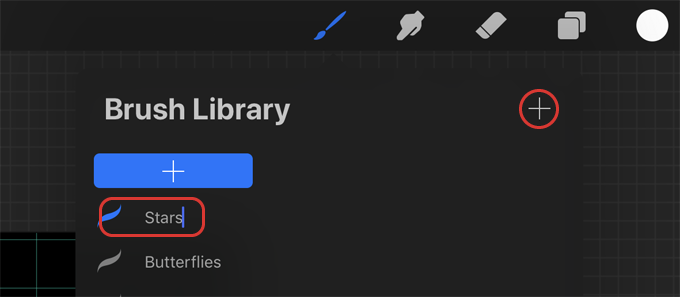
Tap on the brush icon. Scroll up and press the plus sign (+) to create a new brush set.

Give the brush set a name such as “Stars.” Then tap on the plus sign in the upper right corner of the brush menu to create a new brush in this brush set.
Use the copied star for the Shape
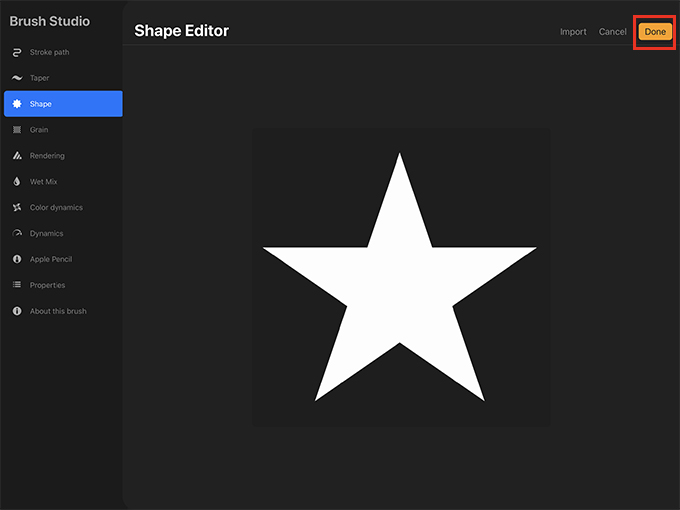
In the Brush Studio, tap Shape. Then tap Edit.

Tap Import and then Paste.

Tap two fingers on the star shape to invert it.

The background should now be black and the star should be white. Tap Done in the upper right corner of the Shape Editor.
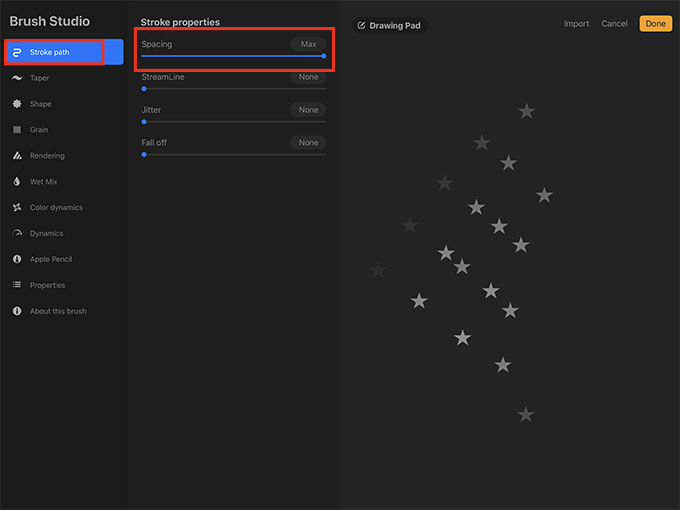
Set the brush spacing
Tap Stroke path. Increase the Spacing. I made mine Max.
Apple Pencil settings
Tap Apple Pencil on the left side of the screen. I don’t want the brush to change opacity based on the pressure of the Apple Pencil. Reduce the Opacity slider to None.

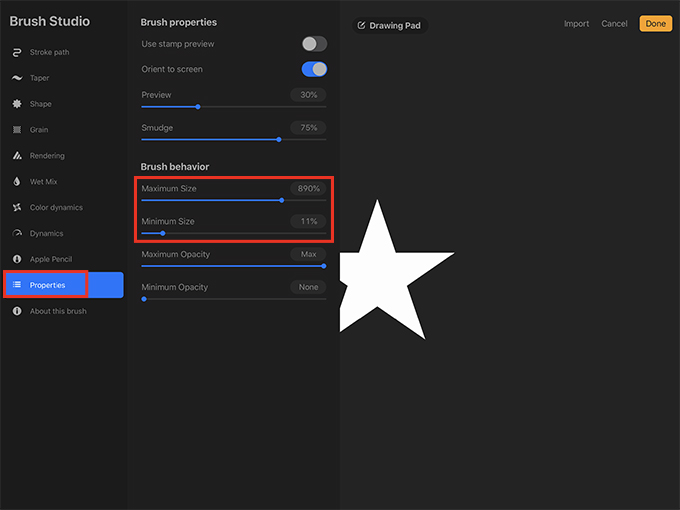
Set the minimum and maximum size of the brush
Tap Properties. Under Brush behavior increase the Maximum Size of the brush. This is the largest the brush can be. I made mine 890%. Increase the Minimum Size slightly as well. This is the smallest the brush can be. I made mine 11%.
Color dynamics (optional)
If you want your stamp brush to randomly change color each time you stamp it on the canvas, tap Color dynamics on the left side of the Brush Studio. Under Stamp color jitter increase the Hue slider.
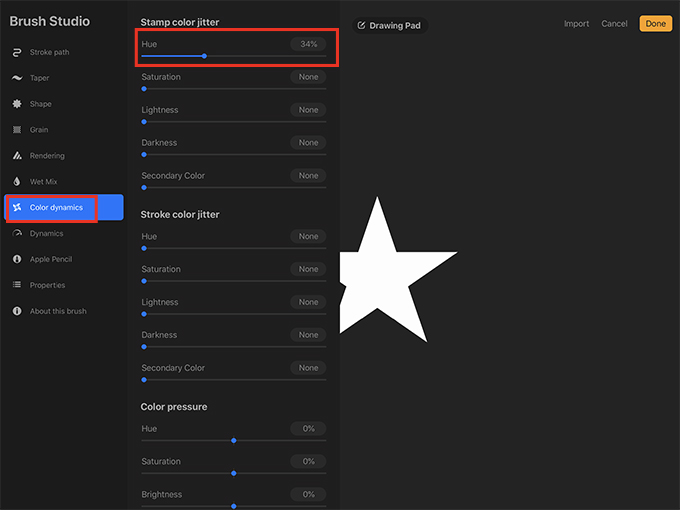
In order to test the color settings, it’s helpful to use the large drawing pad on the right side of the screen. Tap Drawing Pad and you can clear the drawing pad or choose different colors to test your brush.

Choose a color and stamp the star brush on the drawing pad a few times. Now you can see how the Hue slider changes the brush. If you increase the Hue slider slightly, the brush will only vary slightly from the color you used.

As you increase the Hue slider, the brush will become more colorful.

Name the brush
When you’re done modifying the brush settings, tap About this brush on the left side of the screen. Tap Untitled Brush and give the brush a name such as “Star Brush.” Then tap Done in the upper right corner of the screen.

Test the brush
Create a new layer above your star layer and turn off the visibility checkbox of the star layer.

Now choose a different color and tap on the screen to test the brush out. Use the size slider on the side of the screen to change the size of the brush. If you want, you can tap on the brush to go back into the Brush Studio and modify the settings.

Now you can fill the canvas with stars or just place a single large star in the center of the canvas and add some words to it. You can also use the method described above to make all sorts of different star brushes!
Thank you!
Thanks for visiting mapletreemakery.com. We hope you enjoyed this tutorial! Come back often for more information and tutorials.


THANK YOU so much for this tutorial! Super helpful and informative!
Really helpful tutorial. Thank you! Everything works for me, except for the precise rotation of the canvas. I’m using an Apple Pencil, and no matter how hard I try, I can’t get the degrees to show a whole number (i.e., only 17.9, 18.1, 35.9 and 36.1), and it unfortunately results in an imperfect star. Do you know if there’s a setting I can adjust or some trick I’m missing? Thanks for your help!
It is difficult to rotate the canvas perfectly. If you hold your Apple Pencil farther away from the slider while you slide it, you can adjust it in smaller increments which should give you more control. I hope this helps!
Awesome tutorial.. I just couldn’t figure out why my star was slightly mis-shaped once I copied it into the shape editor.. So it then turned out still cute but not perfectly aligned like the star I finished drawing with your help..
Hi Petra, I’m glad your star drawing turned out well! When you set up your canvas, did you use the preset Square? If not, this might be why your star became misshapen when you made it into a brush. Another thing that could have happened is that you might have accidentally cropped the canvas when you rotated it. You can check this by tapping on the wrench to open the Actions menu, tapping Canvas, and then tapping Canvas information. In the Dimensions, the Pixel width should be 2048px and the Pixel height should be 2048px. I hope this helps!