
Procreate has an excellent symmetry tool that lets you create perfectly symmetrical shapes and beautiful, complex mandalas. So it was the first thing I thought of when I wanted to draw a traditional six pointed snowflake. But while these types of snowflakes rely on 30 and 60 degree angles, Procreate’s symmetry tool doesn’t have these!
The good news is that you can combine Procreate’s symmetry function with other common tools to easily create traditional snowflakes.
In this tutorial I’ll describe one method for creating a simple six-pointed snowflake. Once you’ve learned this method, you can create lots of variations on the traditional snowflake.
In the last portion of the tutorial, I’ll explain how to turn your snowflake into a stamp brush so it’s always available to use in your seasonal projects!
Anatomy of a Six-Pointed Snowflake
Before we begin, let’s analyze the snowflake we’re going to draw.
Points and angles
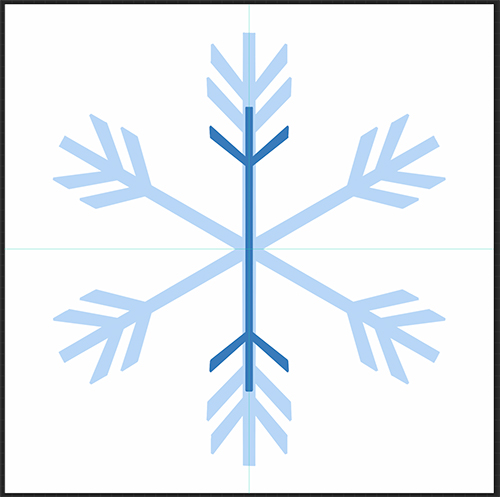
A traditional snowflake design can be thought of as a set of six sided points. However, it often has a set of 6 secondary points and other details between the points or in the center. The key to drawing a snowflake is understanding the angles between the points. Here’s the snowflake we’ll draw in this tutorial. It’s labeled with the points and the angles between them.

In this tutorial, we’ll start by drawing the the set of primary points and then the secondary points. We’ll add details in the center to finish off the snowflake. Once the snowflake is complete, it’s easy to turn the snowflake into a Procreate stamp brush.
Let’s get started!
Draw the Primary Points
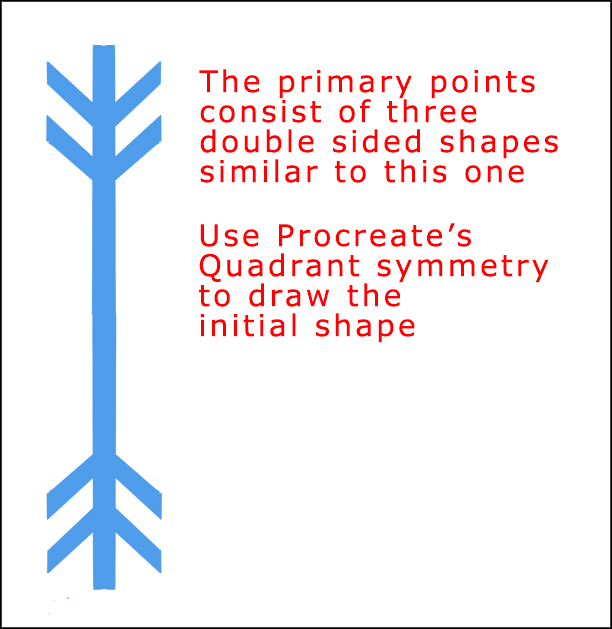
The six primary points are three double sided shapes that look something like this one.
Start a Project and Create a Drawing Guide
Start a new project and select Procreate’s Square canvas.

Prepare to draw
Choose a color for your snowflake. I started with a light blue color (hexadecimal #4f9deb). If you want to choose a color by typing in the hexadecimal, tap your swatch icon and tap Value at the bottom of the Colors panel.

For drawing, choose the Monoline brush from the Calligraphy set. I made the size of my brush 12%.
Set up the Drawing Guide
We want to draw a perfectly symmetrical shape with a tall rectangle in the middle and vertically mirrored elements on the ends. The symmetry tools under Procreate’s Drawing Guide are perfect for that. Tap the wrench icon. In the Actions panel, tap Canvas and toggle the Drawing Guide on.

Tap Edit Drawing Guide and select Symmetry the bottom of the screen. Toggle on the Assisted Drawing button on. Choose Quadrant. Then tap Done.

Draw your first shape
Your canvas will be divided into four quadrants. If you haven’t worked with symmetry before, try drawing in one of the quadrants and notice how the symmetry works. Delete or erase your test lines.
We’ll draw a tall thin rectangle along the vertical guide. To do this, start a bit down from the top of the canvas and a bit to the right of the vertical guide. Draw straight down until the top lines meet the bottom ones. Hold down your Apple Pencil until Procreate straightens the lines. Keep holding it down as you adjust them so they are parallel with the vertical guide.
TIP: After the line snaps into a straight line, with your Apple Pencil still held down tap one finger on the screen and the line will become perfectly vertical. Then lift up your Apple Pencil first and then your finger.
Keep your rectangle fairly thin. Here’s what mine looks like.

With symmetry still turned on, finish drawing the shapes. I found it’s easiest to do this by drawing each line separately while holding down my pencil to let Procreate straighten the line.
If you do plan to add secondary points, draw the horizontal detail should be close to the ends of the shape in order to make room for the secondary points.
Here’s my drawing process (showing only the top portion of the shape):
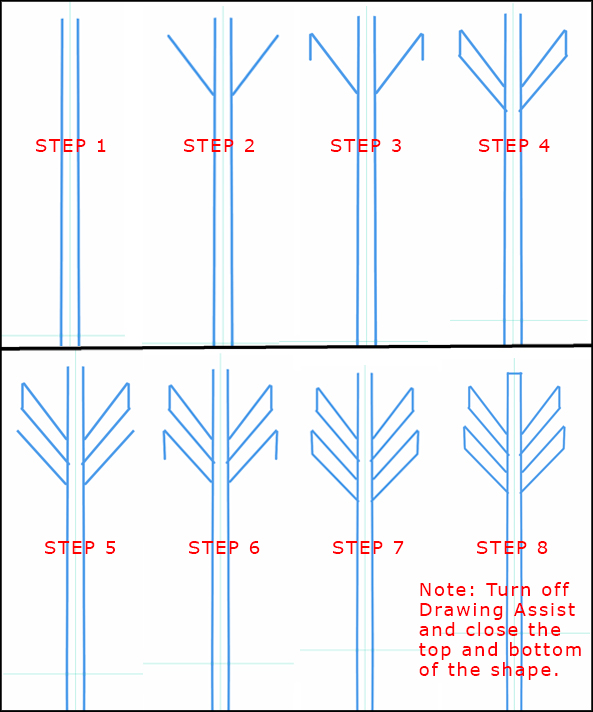
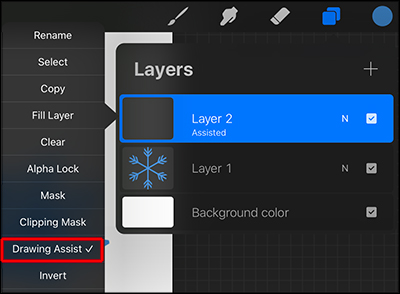
Once the main lines are drawn, turn off symmetry by tapping on your layer and deselecting Drawing Assist.

Complete your shape by drawing a straight line at the top and and one at the bottom of it.
Fill the shape
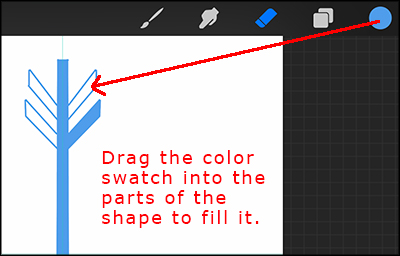
Make sure there are no gaps in your shape, clean up the corners with the eraser, then drag from the color swatch into the parts of the shape to fill it.
Your first shape is complete. We’ll need two more of these.
Create your second two shapes and rotate them
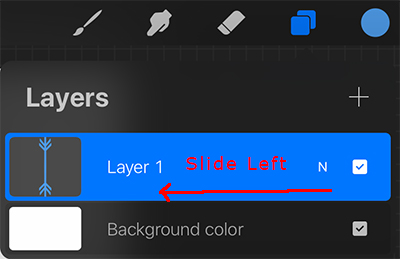
We’ll duplicate the first shape to create the other two. Swipe left on your shape layer.
Select Duplicate.

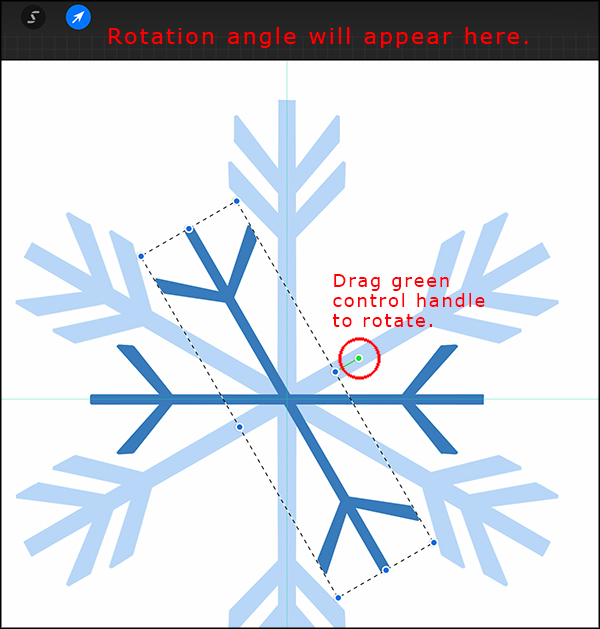
Select the duplicated layer. Tap your arrow tool to select the duplicated shape. At the bottom of the screen, tap Uniform. Make sure Magnetics is turned on. It will appear blue if it’s on.

Use the green control handle at the top of the shape to rotate the shape. Drag it to the right until the angle of rotation shown at the top of the screen is at 60 degrees.

Duplicate the rotated layer. Select the layer with the duplicated shape. Tap the arrow icon to select it. At the bottom of the screen tap Uniform and Flip Horizontal.

The primary points of the snowflake are complete. All that’s left to do on them is to merge the layers. To do this, select the top layer and tap Merge Down in the fly out menu. Tap the resulting merged layer and tap Merge Down in the fly out menu again.
This is a traditional design for a 6 pointed snowflake, but they often have secondary points as well. Let’s create some secondary points.
Draw the Secondary Points
Drawing the secondary points follows the same process as the primary points. There’s just one additional angle to pay attention to. Start by creating a new layer above your primary points layer. Tap the new layer, and in the fly out menu tap Drawing Assist to turn it on for this layer.
Change your swatch color to a darker blue color. I used hexadecimal #397bbb.
Draw the first secondary shape
Draw directly over the top primary element.
You’ll draw over your original shape. This will help you determine the right size and proportion for the secondary points. Tap the N on Layer 1 (your primary points layer) and slide the Opacity down so you can better see what you’re drawing (40 percent works well).

Select Layer 2. Use the same method as before creating individual lines to form the shape. This time draw a tall thin rectangle smaller than the first one you made. For this shape, I only added one horizontal arm. Your shape should be small enough so that when it is rotated it will fit between the primary shapes. Here’s my drawing process.

Once the main lines are drawn, turn off symmetry by tapping on your layer and deselecting Drawing Assist. Complete your shape by drawing straight lines at the top and bottom to close the shape. Make sure there are no gaps in your shape then drag from the color swatch to fill it. Your drawing should now look something like this.
Rotate the first secondary point
Tap the arrow icon to select the shape. At the bottom of the screen, tap Uniform. Tap Rotate 45 degrees twice to rotate your shape 90 degrees.
Note: If you don’t like the way it looks in relation to the primary points, this is the time to edit it. Turn Drawing Assist back on (tap the layer and select Draw Assist from the fly out menu. Rotate it back to vertical to change it or delete it and try drawing it again.

Duplicate this layer (Layer 2). Tap the arrow to select your shape and use the green control handle to rotate it 60 degrees.
Duplicate the current layer. Select the duplicated layer. Tap the arrow icon. At the bottom of the screen make sure Uniform is selected then tap Flip Horizontal.

Merge the secondary shapes layers
Tap the top layer in your layer stack and in the fly out menu, select Merge Down. Select the resulting layer then tap Merge Down again. Your three secondary shapes should now be on one layer.

Recolor the secondary shapes
Change the color of your swatch to the original blue you used for the primary snowflake points. In my case, I’ll enter the hexadecimal #4f9deb. Drag the color from the swatch into the secondary shapes to recolor them.
Select Layer 1 (the primary points layer). Tap the N and change the opacity back to 100%.
All of the snowflakes points are complete. Here’s what my snowflake looks like now:

Add Details to the Snowflake
The snowflake looks pretty good as it is, but you could add a different center, such as a larger circle, other shape, or additional points.
You can add a circle to the center with using symmetry simply:
- Add a new layer
- Draw a circle (hold down your pencil to let Procreate perfect it)
- Use the existing snowflake points to help you center it
- Drag from your color swatch to fill it with the same color as the snowflake.
But if you really want to have some fun, use the symmetry process to make another set of points.
Create additional points
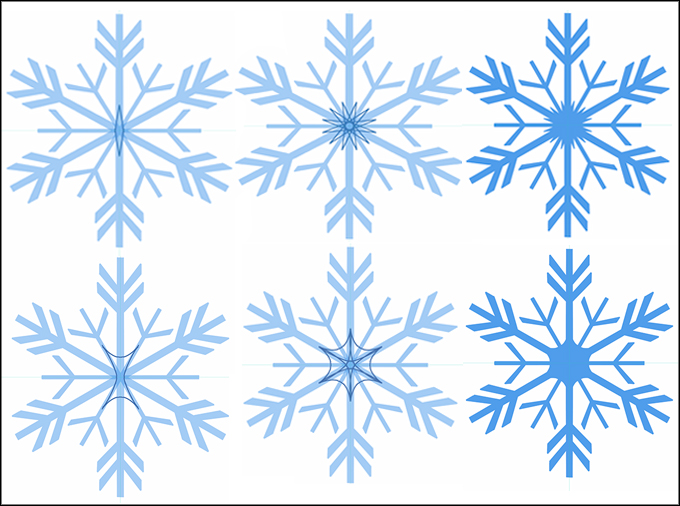
You can create additional points using the same draw, fill, duplicate, and rotate process. This third layer of shapes adds twelve points to the snowflake.
For the top version shown below, I used quadrant symmetry to draw a tall, thin diamond shape then I filled it with the snowflake color. I used the control handle to rotate the diamond shape between the primary and secondary points. I duplicated and rotated the layer multiple times create a starburst shape then I merged these layers together.
I also tried another shape that created a scooped effect shown in the second row below.
It’s fun experimenting with various symmetry tools and shapes to create the center.
Group your layers and save a copy
You should have 3 layers: the primary points, the secondary points, and the details at the center. Delete other layers or if you want to keep some of them just make sure these three are stacked together

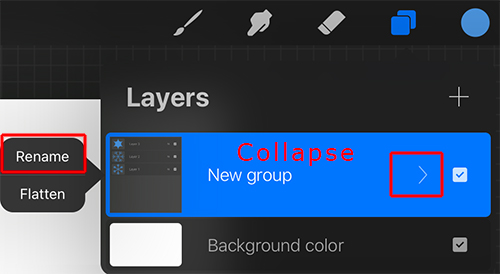
To group your 3 layers, select the top layer then swipe right on the two layers beneath it. Tap Group at the top of the Layers panel.

Collapse your group by tapping the arrow on the New group layer. Tap on the group and on the fly out menu, select Rename. I named mine Final.
Swipe left on the group and tap Duplicate to make a copy of it.

Select the duplicated group. On the fly out menu, tap Flatten.

Now the first Final group consists of the 3 original layers that you can revisit at any time to modify. Flattening the second Final group made the snowflake into a single shape.
Turn your Snowflake into a Procreate Stamp Brush
Having a beautifully drawn traditional snowflake is great, but having it as a stamp brush you can use at any time is even greater. Here’s how to turn your snowflake into a stamp brush.
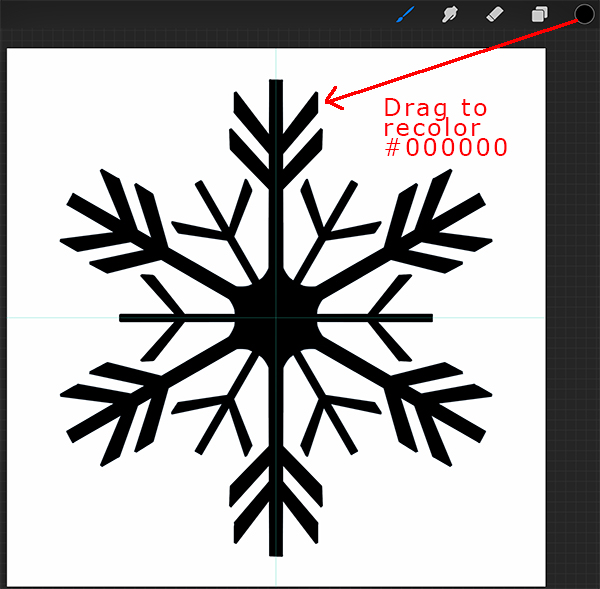
Recolor the snowflake
Select the layer with the flattened snowflake. Change your color swatch to pure black (hexadecimal #000000). Drag the color from the swatch to the shape.
Create the brush
Tap the wrench icon. Tap Add and select Copy canvas.

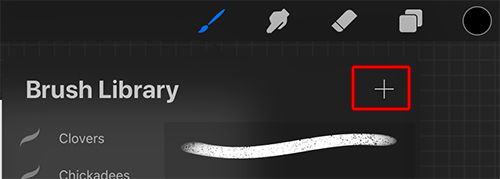
Tap the brush icon and scroll to the top of the Brush Library and tap the blue plus sign to create a new brush set. Give it a name such as “Snowflakes.” Then tap the plus sign at the top right of the Brush Library to create a new brush.
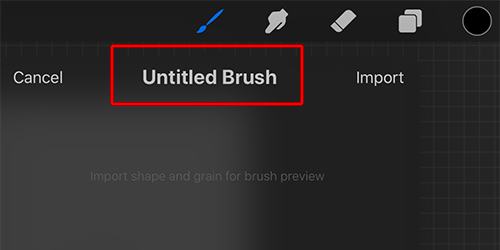
Tap Untitled Brush and type a name for your new brush. I named mine “Snowflake 1.”
Press down with your finger in the Select Shape square in the Shape Source area until the Paste button appears. Tap the button to import your copied canvas with the snowflake into the brush.

Your snowflake will appear in the Shape Source area. Now you need to add a Grain Source to your brush. In the Grain Source section, tap Swap from Pro Library.

Scroll down until you find the white square called Blank. Tap it to insert it into your brush.

You may need to tap Source at the bottom of the brush menu to get back to the screen we were just working on. If your Shape Source preview shows the snowflake as black on a white background, tap Invert Shape so it appears as white against a black background.
Adjust the settings for your brush
Now you’ll define how your brush acts when you use it. For this tutorial, we’ll create a simple stamp brush.
At the bottom of your brush panel, tap Stroke. Set the Spacing slider to Max (100%).

At the bottom of the brush panel, tap General. This is where you’ll define a range of how large and small your brush can be when you’re using it. In the Size Limits section, I set my Max size to around 850% and my Min size to about 25%. You can always go back and change these settings.

That’s it!
Try Out Your Brush
You can use your new brush to tap snowflakes on the canvas. Add a new layer to the top of your layer stack. Choose a new swatch color for your brush and select your new brush from the brushes library. Experiment with with the size slider at the left of the canvas to create different sizes of snowflake. Change the swatch color for variation in color. Play with how the snowflakes look overlapped when you change the opacity settings.

Purchase our Complete Set of Snowflake Brushes on Etsy
We created a whole set of Procreate snowflake brushes which you can purchase from our Etsy shop. Click here to go to the listing on Etsy.

Thank you!
Thanks for visiting mapletreemakery.com. We hope you enjoyed this tutorial! Come back often for more information and tutorials.


Leave a Reply