
In my previous blog post, I gave an overview of how Procreate GIFs work, explained some methods for making GIFs, and included examples. Since I wrote that post, Procreate has added the ability to make animated PNGs and animated MP4s as well. The basics for creating the animations are the same.
Here’s the video I included in that post. If you want to review the basics of how to make animations in Procreate, you can view the video. It also incorporates the tips and tricks described in this article.
Once you’ve covered the basics and are ready to make your own animations in Procreate, here are a few tips that I find useful for making better animations including working with layers, adding transitions, animating multiple objects at once, cropping the canvas, and more.
NOTE: The Procreate 5 update includes some new animation features. You can read more about these new features here.
Let’s get started!
Preview Your Animation as You Go
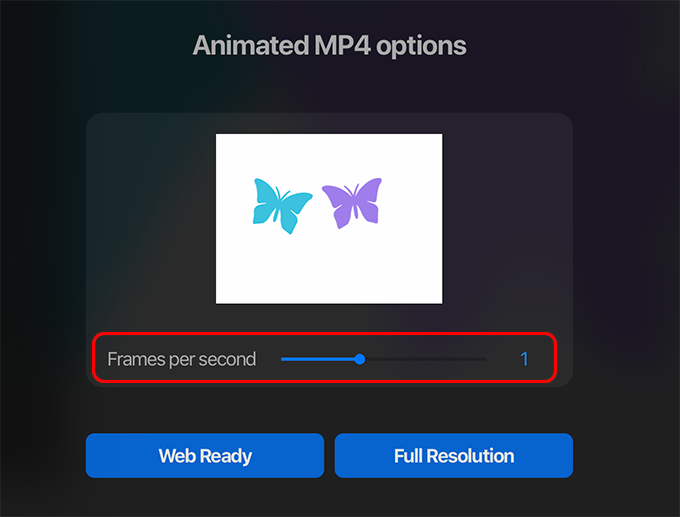
Previewing your animation before it’s done can save you a lot of trouble. If there’s an error with the animation you can catch it early and fix it. Just tap on the wrench, tap Share, and then tap Animated GIF, Animated PNG, or Animated MP4 to access the preview screens.

Use these screens to consistently test your animation as you work on it to make sure it’s working correctly. Try different frame rates and see if there are any errors as you watch the animation play.
You can also analyze your work for errors by looking at the layers menu to see if the layers seem to be progressing correctly.
Working With Layers
Know how many layers you have to work with
Making animations can get complicated and require lots of layers. The number of layers you can use depends on your canvas size. The smaller your canvas is, the more layers you’ll have available.
If you want to know how many layers you can use and how many you’ve used so far, tap on the wrench, tap Canvas, then tap Canvas information.

On the Canvas information screen you’ll see lots of information including how many layers you’ve used so far and how many you can use. For instance, the preset screen size has a maximum of 91 layers.
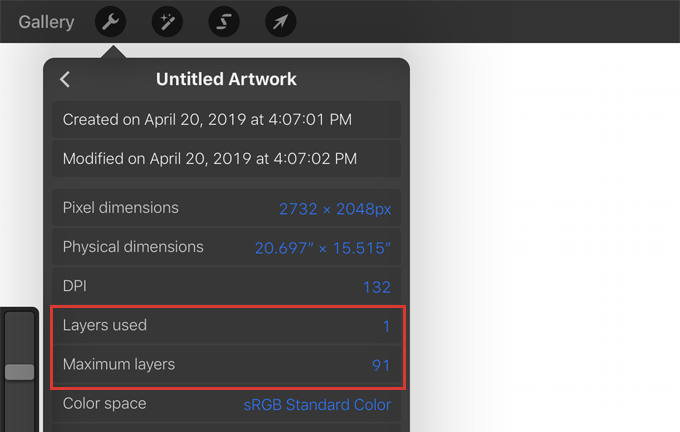
Knowing how many layers you’ve used so far can be useful to determine how many layers you have left to complete a complicated animation.
Add blank layers
If you want the animation to pause on a blank screen for a moment, tap the plus sign to add an empty layer. For instance, if you want the animation to start with a blank screen or end with a blank screen, have an empty layer at the beginning and at the end of the layer stack.

Duplicate layers
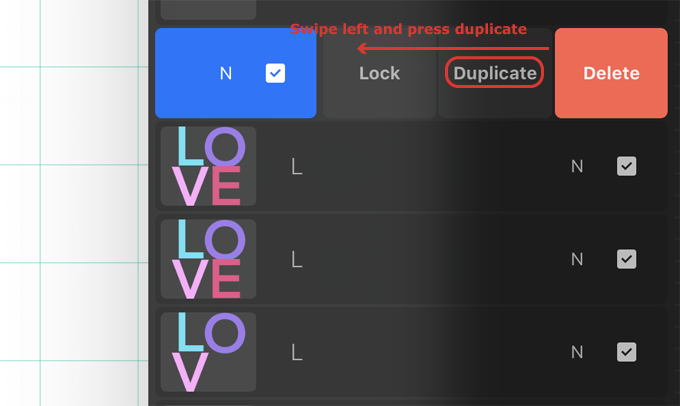
If you want an image on the screen to stay on the screen for a longer period of time, swipe left on the layer that it appears on and press Duplicate. You can continue to duplicate until you like the look of the animation. This is particularly useful at the end of the animation if you want the object to stay on the screen for a moment before disappearing.
You can also duplicate layers to preserve them. For instance, If you’re using a piece of artwork, make sure to duplicate it and keep the layer turned off. This way if you mess up the animation you have a backup copy of the artwork.

View just one layer at a time
In order to view just one layer, tap and hold on the visibility checkbox until all of the other layers are deselected. When you’re done, tap and hold on the visibility checkbox again to reselect all of the layers which were previously turned on.

Name layers
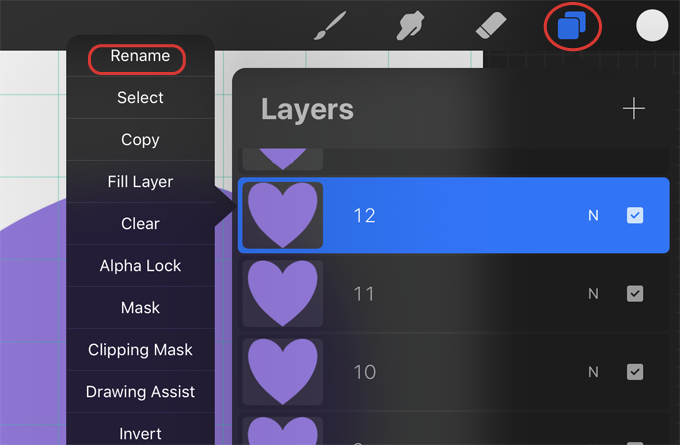
Making animations can get a bit complicated. Naming your layers can help with this. Tap on a layer and in the pop-out menu tap Rename to give it a name. For instance, you could name a layer “Purple” if you changed the color to purple on this layer. You could also name the layers with numbers so you can easily figure out where they fit in the sequence.
Once your layers are organized, you can more easily locate a part of your animation.
Moving multiple layers at once
If you need to move multiple layers to the top of a large stack of layers, select them all and move them. You can do this by selecting the top layer you want to move and then swiping right on the layers underneath it until they all turn blue.
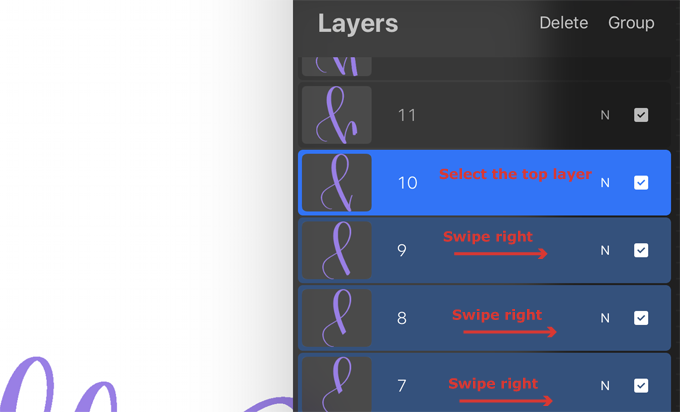
Group the selected layers so they’re easier to move by tapping Group at the top of the layers panel. After moving the group, make sure to drag each layer out of the group layer so that the layers will appear as separate layers in the animation. When the group layer is empty, delete it.
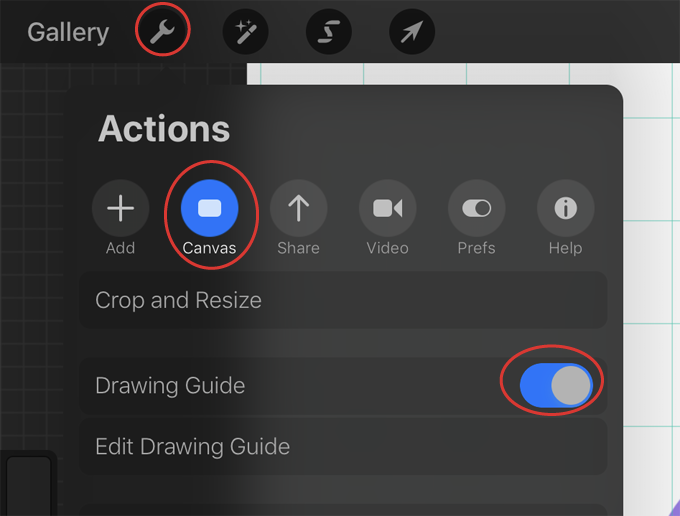
Use the Drawing Guide When Moving Objects on the Canvas
When moving objects around the screen, you may want to use a guide to help place them. To do this, tap on the wrench, tap Canvas, and toggle the Drawing Guide on. Use the grid to keep objects in one place as you modify them, for instance if you want to move an object across the canvas in a straight line.
Use Transitions to Make Graphics Appear or Disappear
Reverse animation
One transition is to duplicate the layers and drag the duplicated layers one by one to the top of the layer stack in reverse order. This will make the final animation appear to animate in and animate out.
For example, If your animation has 4 layers labeled 1-4, then to reverse it you’d duplicate the “3” layer and tap and hold on it until you could move it above the “4” layer. Then you’d duplicate “2” and drag it above “3.” You’d continue this process until the animation counted down to 1. Then you might want to add some blank layers at the beginning and end of the animation to have the canvas stay blank for a moment.

In this example I duplicated the layers in reverse order and dragged them to the top of the layer stack.

In this GIF, I duplicated the layers and added them to the top of the layer stack in reverse order to reverse the animation.
Fade in or out
Another transition is to have a graphic fade in and out. For instance, to make an object fade in, tap on the N and reduce the first layer’s opacity to 0.

Then duplicate the layer and increase the opacity slightly. Continue to do this until the opacity is 100%.
To make an object fade out, start with the opacity at 100%. Then duplicate the layer and decrease the opacity slightly. Continue this process until the opacity is 0%.

I used a different opacity on each layer to fade this heart in and out.
Exit or enter the canvas
One more transition is to make an object move off of the canvas. For this, just continue to duplicate an object and slowly move it off the canvas. After the object starts to move off the canvas, part of the object will be deleted. If you are just moving the object off the canvas, you can continue to duplicate these layers and move them. But if you rotate the object, you’ll see the deleted part of it. In this case, you’ll need to duplicate an intact layer as you continue to move the object off the canvas.
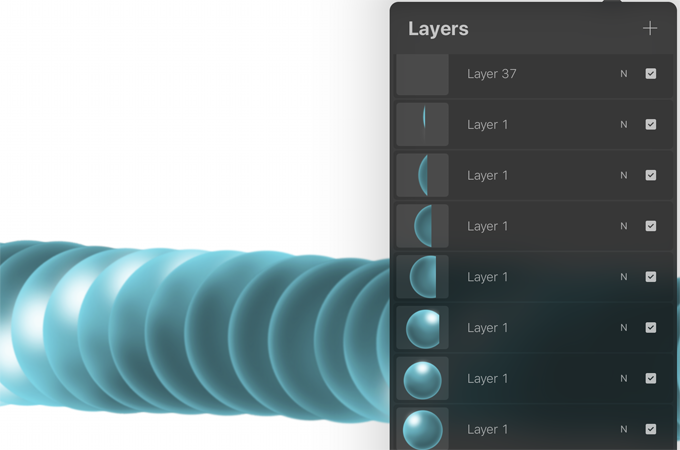
In this example part of the ball got deleted as I moved it off the canvas. You can see this in the layers. I duplicated an intact layer and moved it to the top of the stack before continuing to rotate and move the ball off the canvas.
At the end of the animation, add a blank layer.
If you want to move an object onto the canvas, follow this same procedure at the beginning of the layer stack, moving the object in the other direction. Then add a blank layer at the beginning.
Animate Multiple Objects at Once
Use the selection tool to select a single object
This is a method you can use if objects are all on one layer and easy to select separately. For instance, here I have multiple stars on one layer. If I want to rotate them each individually, I’ll tap on the selection tool. With Freehand selected at the bottom of the screen I’ll draw a circle around one of the stars.
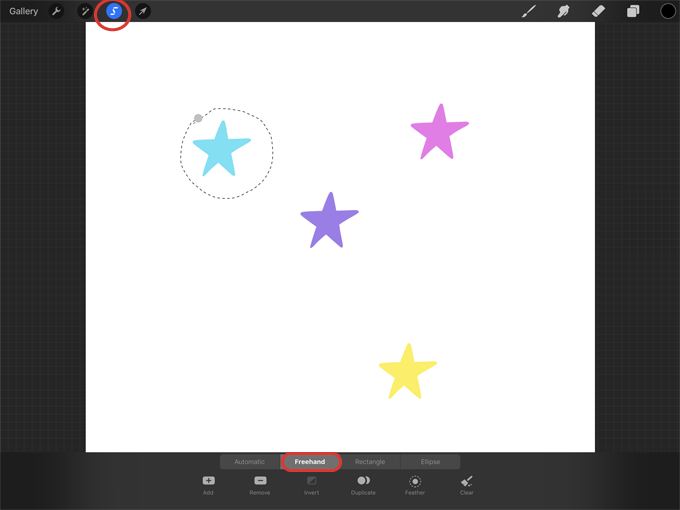
Then I’ll tap on the arrow and use the green node to rotate it slightly.

I’ll do the same for each of the stars on this layer. Then I’ll duplicate the layer and repeat this process, selecting and rotating each star separately. I’ll continue this until all of the stars rotate in a circle. Then I can use the same method to move the stars off the canvas.

Use layer groups to move objects separately
You can also make multiple objects animate at the same time using layer groups. Tap on the top layer and then swipe right on the layers below to select them. Then tap Group.

Now you can tap on one of the layers in the group and animate that object separately. When the object on that layer is done, you can select another layer in the group and animate the object on that layer.

When you’re done animating objects in the group, swipe left of the group layer and press Duplicate.

Repeat this process, animating each item in each group separately.
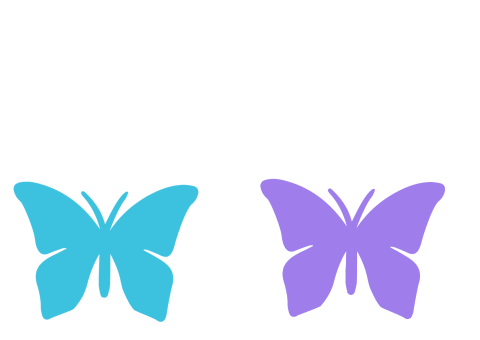
I animated these butterflies by grouping the layers together.
Animate the objects separately and then merge the layers together
A third way to animate multiple objects is to animate them on separate layers and then merge the layers down.
In this example, I animated the blue butterfly first. I duplicated the layer, moved the butterfly slightly, and continued to do this until it flew off the screen. I named each of these layers starting with 1 and ending with 10. Then I created a new layer and animated the purple butterfly the same way. I labeled the purple butterfly layers 1 through 10.

I dragged the first purple layer until it was above the first blue layer. Then I tapped on the purple layer and pressed Merge Down. Then I merged the “2” purple layer with the “2” blue layer.
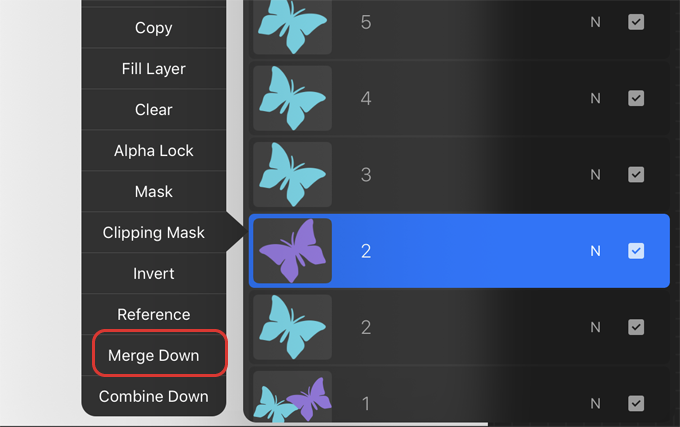
I continued this until they were all merged together.

Crop the Canvas
If the canvas is too big after you’ve created your GIF, you can crop it. Just tap on the wrench, tap Canvas, and then tap Crop and Resize.

Then you can just drag the crop tool to resize the canvas and tap Done.

These are just some useful tricks I’ve used when making animations. As you animate, find a strategy that works for you and have fun!
Thank you!
Thanks for visiting mapletreemakery.com. We hope you enjoyed this tutorial! Come back often for more information and tutorials.


Leave a Reply