
Procreate 5 is here! Procreate’s new update brings with it a lot of useful features including new brushes, Animation Assist, a new brush studio, the ability to combine brushes, color harmony, the clone tool, CMYK color profile, the ability to import Photoshop brushes, and more. I’ve been having a lot of fun playing with the new features.
In this post, I’ll briefly cover some of my favorite updates including the new Brush Studio, new Colors options, a new way to work with animation, and the new clone tool. I’ll give an overview of these and some tips I’ve discovered for using them.
Brushes
For this update, Procreate has added new brushes to some of the categories, added the ability to make colored brushes and to combine two brushes into one, and expanded the brushes Settings panel into a revised Brush Studio interface. The result is that you have more brush options and more control over your brushes.
The Brush Studio
To access the Brush Studio, tap on a brush in the Brush Library to open its Settings. Now you’ll see the Settings on the left of the screen and the large drawing pad on the right of the screen. You can draw in this area to test your brush settings. If you change a setting, you can see instantly how it affects the brush.
Tap Drawing Pad to access the drawing pad settings. You can clear the drawing pad, reset the brush’s original settings, define the preview size of the brush and give the brush a color.

Color dynamics
One of the most fun changes has been the color dynamics options. These allow you to change the color of the brush based on stamp, stroke, pressure, or tilt. Tap on Color dynamics to see all of the options.
For example, you can change the Stamp color jitter to change the color of stamp brushes each time you stamp them on the canvas. You can change the Hue, Saturation, Lightness, Darkness, and Secondary Color. Use a combination of these sliders until you get the look you want.
In the example below, I changed the Hue setting for a snowflake stamp brush.

Here I used a snowflake stamp brush and increased the Hue to Max under Stamp color jitter in the Color dynamics section. This makes the snowflakes change color when I stamp them on the canvas.
You can change the color based on stroke as well. Under Stroke color jitter you can change the Hue, Saturation, Lightness, Darkness, and Secondary Color.

Here I wrote the word “Color” in three different colors in the Drawing Pad. Then I increased the Hue to Max under Stroke color jitter. Each stroke is now a different color.
You can change the color based on the pressure of your Apple Pencil too. Under Color pressure you can change the Hue, Saturation, Brightness, and Secondary Color.

Here I increased the Hue to Max under Color pressure. This makes the color of the letters change based on the pressure of the Apple Pencil.
You can also change the color based on the tilt of your Apple Pencil under Color tilt.
You can adjust the sliders under each of these sections until you get the brush to change colors in a way that you like.
About this brush
At the bottom of the left column, tap the About this brush option.
Here you can name or rename a brush by tapping on its name at the top. You can also fill out the Made by section with your name and a graphic. You can also tap Create new reset point to define the current brush settings as its default. If you make further changes and don’t like them, you can tap Reset brush to reset the brush to the default settings.

Grain Editor
The Grain section has been modified as well. Tap Grain and then tap Edit at the top of the Grain Source menu. Now if you tap on the Auto repeat button you can use the settings at the bottom of the screen to edit your grain or make seamless textures.

Input exact numbers
One of the best things about the Brush Studio is you now have the ability to input an exact number into a field rather than just using the slider. This gives you more precise control of the settings. Just tap on the percentage to access a number pad and type in the setting.

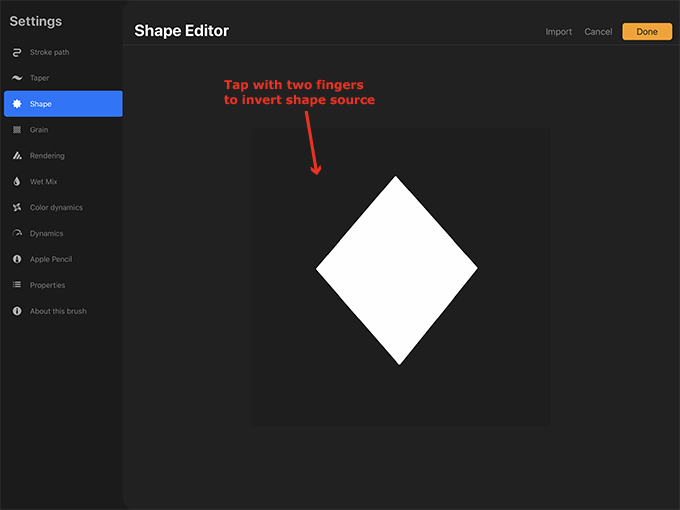
How to paste a shape source
Copying your canvas and inserting it as the shape source for your brush is slightly different. If you want to paste a shape source from your canvas, tap Edit under Shape Source and then tap Import and then Paste.

If you need to invert the shape, tap two fingers on the shape source in the Shape Editor. This will allow you to turn the background black and the shape white if you need to.
Combine brushes
Another great new feature is the ability to combine two brushes into one brush. Just tap on the brush that you want to be the Primary brush and then swipe right on the Secondary brush. Then tap Combine at the top of the brush menu.
NOTE: You may want to swipe left on and duplicate Procreate brushes before combining them.

Now you can see both of the brushes in the brush studio. You can change the Combine Mode of the brushes which will change how they react with one another. For this brush I left it Normal.

You can tap on either brush and change its individual settings. There are fewer settings for the Secondary brush, for instance you can’t change it’s Color dynamics.

If you don’t want the brushes to be combined anymore, tap on the Secondary brush and then tap Uncombine.

Colors
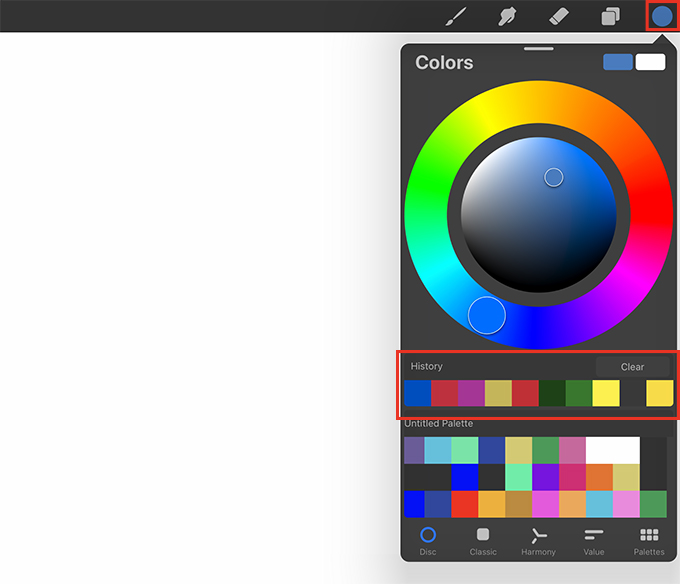
In addition to the brush studio, the Colors menu has also changed.
There is now a History area which will save your recently used colors. This is so useful if you want to get a color you recently used and didn’t add to your palette.
There is a new Harmony button. This allows you to choose colors that are Complementary, Split Complementary, Analogous, Triadic, Tetradic. This makes picking colors so much easier.

Another change is that you can move the Colors menu and it will stay on the canvas while you work. This can save time if you’re in the middle of a drawing and don’t want to have to keep opening the menu to access your colors.
 Clone Tool
Another useful new feature of Procreate 5 is the Clone tool. This works similar to Photoshop’s Clone Stamp Tool. It’s particularly useful for editing photos. It allows you to clone part of the photo or drawing and paint over another area with the sampled area that you cloned. This can be used for many reasons, for instance to hide blemishes or mistakes.
To access this tool, tap on the Adjustments button and tap Clone.

At the bottom of the screen, you can change the brush, the size, and the strength of the clone tool.
Move the circle to the area you want to clone. Now when you paint the brush will paint with the sampled area.

Here I used the Soft Airbrush for the Clone tool. I moved the circle near the line where two pieces of the red paper overlapped and then painted over the line to hide it.
Animation Assist
Procreate’s new Animation Assist feature makes it easier to create animations because the tools are right on the screen. To access them, tap on the wrench, tap Canvas, and toggle Animation Assist on.

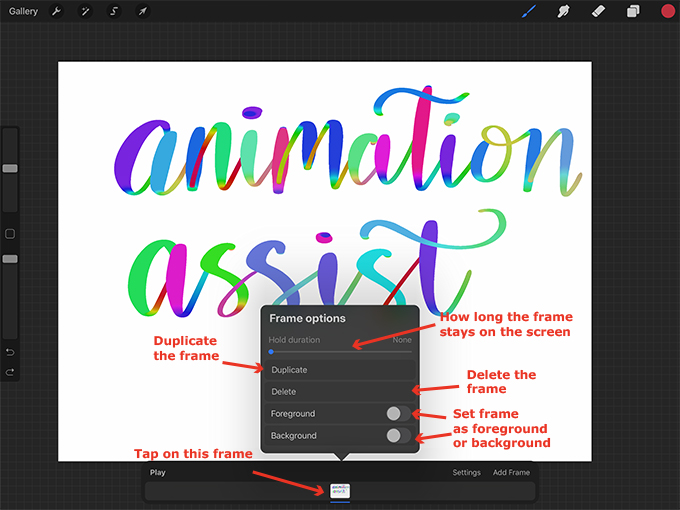
This will make the animation tools appear at the bottom of the screen. Now you can draw something on the canvas. What you draw will be the first frame of the animation. Tap on the frame to access the Frame options.
Use the slider to set the Hold duration. This is the amount of time the frame will stay on the screen, for instance if you want the animation to pause for a moment before moving on to the next frame.
Duplicate allows you to duplicate the frame. This is useful if you want to add to an animation. For instance, if you wanted to animate a tree with branches growing from it you’d draw the trunk, duplicate the trunk frame and draw part of a branch. Then you’d duplicate that frame and in the third frame add to the branch. You’d continue to duplicate the frames and add to them until you have fully grown branches.
Delete allows you to delete the frame.
If you toggle the Foreground switch on the frame will stay static in front of the animation.
If you toggle the Background switch the frame will stay static in the background as the animation plays.
Tap on Add Frame at the bottom of the screen to add a new frame. You will be able to see the previous frame but it will be faded out a bit. Now you can draw what you want on the new frame. Continue to add frames. If you want to test your animation, press Play.

You can adjust the Settings of the animation. This includes the animation speed, how many frames appear on the screen, the opacity of the other frames, and whether the animation plays once, loops, or plays forwards then backwards. There are a couple more options such as blending the primary frame and changing the color of the secondary frames.

NOTE: The frames will show up as “Frames” in your Layers menu. So if you want, you can still work with the animation through the Layers menu just like before. In this image, the Background is Layer 2, the animation starts at Frame 1 and goes to Frame 11 which is a blank frame.

The new animation features include more export options including a larger preview screen before exporting. When you’re ready to export your animation, tap the wrench icon, tap Share, and under Share Layers choose Animated GIF, Animated PNG, or Animated MP4.

Here’s an example of the finished animated GIF I made:

Additional Features
There are so many more features in Procreate 5 including the ability to import Photoshop brushes, the ability to save your selections, and the CMYK color profile. I hope to cover some of these topics later and to go into more depth on the topics I covered in this post with tutorials and projects.

I’m loving some of the new brushes from the Organic set which I used here to draw the grass, leaves, and sky. Then I tapped on the selection button, used Freehand selection to select a leaf, and then tapped Save & Load. Now the selection appears under Selections to use later, another new feature in Procreate 5.
Thank you!
Thanks for visiting mapletreemakery.com. We hope you enjoyed this tutorial! Come back often for more information and tutorials.


Leave a Reply