I wanted to challenge myself to draw a bunny in Cricut Design Space using only the Shapes tools. It takes a little ingenuity, but you can create some interesting graphics just with shapes.
I’m pretty happy with how my bunny turned out, so I want to share how to draw him. You can find step-by-step instructions below. If you’ve never tried drawing in Cricut Design Space using the Shapes tools, this is a good tutorial to get you started.
Note: If you’re interested in using the shapes to draw a cat, see my post: How to Design in Cricut Design Space using the Shapes Tools.

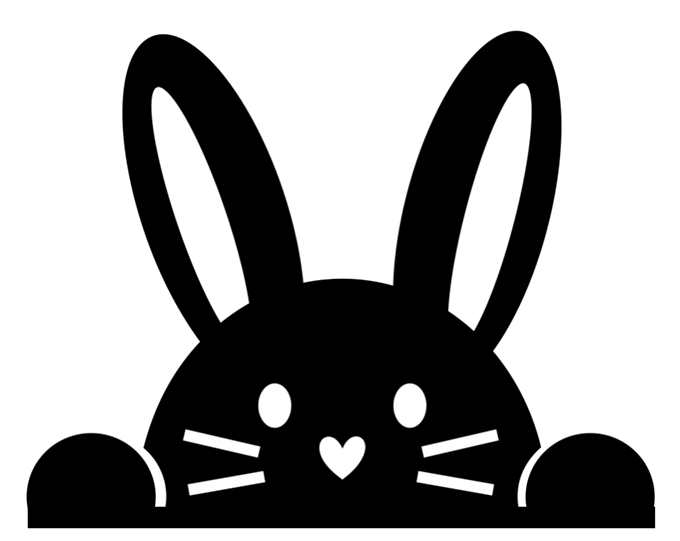
Finished bunny made with Design Space shapes
I used the bunny in a couple of different designs. I’ve included examples at the end of the post.
Drawing a Bunny
A quick review
Here’s a quick reminder of how the icons around an object work in Design Space. Pay attention to the lock icon. We’ll be unlocking shapes to resize them disproportionately.

Throughout this tutorial, I’ll be giving exact sizes for things. You’ll be working with the top menu bar to type in exact sizes and exact degrees of rotation. You’ll also use the Align, Flip, and Arrange options. Here’s a review of the top menu bar.

Once the bunny is complete, you’ll be able to make him any size you’d like.
Ready to go? Log in to Cricut Design Space. In the top right of the screen, click New Project.
Let’s start with the bunny’s head.
Start with the head
From the left menu, click the Shapes icon and select the circle.

A circle will appear on the canvas. The shapes always come in at the same size, but that’s okay. They’re easy to resize.
Use the Size fields in the top menu to change the size of the circle. Type “4” in the W (width) field. Because the circle is locked, the height (H) will automatically change to 4 inches as well.

Next we’ll cut the circle in half vertically. From the Shapes options, choose the square.

Overlap the square over the bottom half of circle. Resize it larger so it completely covers the bottom half of the circle. Hold down the shift key and select both the circle and the square. Then click Slice at the bottom of the Layers panel. Delete the scraps. (You can use the delete or backspace key on your keyboard.)

Click the lock key to unlock the half circle. Make it a little taller by typing “2.3” in the height field (H).

Make the face
The face is just two ovals for eyes and a heart for the nose.
From the left menu, click Shapes and choose another circle. Unlock the circle and type “.336” in the W field and “.448” in the H field to create a small oval.

You’ll be moving the oval over the face. In order see it better, change the color of the oval. With the oval selected, click the colored square to the right of the Linetype field then select pink from the Material colors drop-down box.

For the right eye, position the oval over the right side of the “face” a little less than halfway down. (see image below).

Select the right eye in the Layers panel and click Duplicate.
Note: Another way to duplicate an object is to simply select it and use the keyboard shortcuts to copy and paste it (Mac: command – c, command – v, PC: ctrl – c, ctrl – v).

Position this eye in the left side of the face. To perfectly align the eyes, hold down your shift key as you select them both. Then click Align->Center Vertically.

With them both still selected group them by clicking Flatten at the bottom of the Layers panel.

Hold down your shift key and click the eyes then the bunny’s head. From the top menu, click Align->Center Horizontally.

Create the nose
The bunny’s nose is a heart. It’s another built-in Design Space shape. Click Shapes on the left menu and choose the heart.

Type “.463” in the W field to resize the heart. Change the heart color to pink. Position the heart in the face.

Hold down your shift key and click the head, the eyes, and the nose to select them all. Center align them (Top Menu -> Align -> Center Horizontally). Here’s what the bunny looks like now.

Eventually we’ll slice the pink eyes and nose from the head, but we’ll do it later to leave the option open to reposition them. Right now, this bunny definitely needs some ears!
Create the ears
The ears are just circles resized into ovals. They have narrow ovals for the centers. From the left Shapes menu, select a circle. Unlock it. Set the height of the oval to 1.4 inches and the width to 3.6 inches.

Duplicate or copy/paste the oval. Unlock it and set the width to .5 inches and the height to 2.7 inches.

Color the inner ear pink so you’ll be able to see it when you drag it over the outer ear.

Position the inner ear over the outer ear. It looks best if it’s off center as shown below. Select both the inner and the outer ear. At the bottom of the Layers panel, click Slice. Discard the scraps.

This is the left ear. On the top menu, type “345” in the Rotate field. If you decide you want a different angle of rotation, you can change it later. Position the ear on the head as shown below.

Select the ear. Duplicate or copy/paste it. With the new ear selected, choose Flip ->Flip Horizontal.

Move the ear into position on the right side of the head. Select both ears. Click Align -> Align Top.

Adjust the ears until you like the way they look. If you want more rotation on the ears, you can use the rotate control icon in the upper right of the ear. When you’re happy with the ears, select them both and click Flatten at the bottom of the Layers panel to group them.

Hold down the shift key and select the ears, the eyes, the nose, and the head. From the top menu, click Align-> Center Horizontally.

The ears should now be centered on the head. Select just the ears. Click Unflatten at the bottom of the Layers panel. Hold down your shift key and select both ears and the head. Click Weld at the bottom of the Layers panel.

Your bunny’s face will disappear. It’s just behind the head. Select the head and from the top menu choose Arrange-> Send to back.

Now the bunny head and the ears are all one piece. The eyes and nose are still separate. Your bunny should look something like this.

Finish the face
Now’s a good time to finalize the position of the eyes and nose. Click the eyes and select Unflatten from the bottom of the Layers panel to ungroup them.

Make sure the eyes are where you want them. Then, hold down your shift key and select the bunny’s head and the right eye. Click Slice at the bottom of the Layers panel. Delete the scraps from the eye area.

Slicing the eye sent the other eye and nose to the back. Select the head and choose Arrange-> Send to back from the top menu.

In the same way, click the left eye and slice it from the bunny. Do the same with the nose. Each time you slice something from the bunny, the remaining objects end up behind the head. Each time, just select the head and click Arrange -> Send to back.
With the entire face cut from the head, your bunny should now look like this.

Create the whiskers
What’s a bunny without his whiskers! Let’s give him some.
From the Shapes menu, select the square.

We need small, narrow rectangles for the whiskers. Unlock the square. Type .125 into the W field and .75 into the H field. Duplicate (or copy and paste) the little rectangle. Change the color of the rectangles to pink. Rotate one rectangle 283 degrees. Rotate the second rectangle 260 degrees.

Position the whiskers over the left side of the face. When you’re happy with how they look, hold down your shift key and select one then the other until both are selected. Then click Flatten at the bottom of the Layers panel to group them.

Duplicate or copy/paste the whiskers. From the top menu, select Flip -> Flip Horizontal.

Position the second set of whiskers below the right eye. Select both sets of whiskers and click Align-> Center Vertically in the top menu.

Slice the whiskers
To slice the whiskers from the bunny, you need to ungroup them. Select the left set of whiskers and click Unflatten at the bottom of the Layers panel. Do the same for the right set of whiskers.

Select the top left whisker, hold down the shift key and select the bunny head. Then click Slice at the bottom of the Layers panel and discard the scraps. Select the bunny’s head and choose Arrange -> Send to back from the top menu.

Follow the same procedure to slice the remaining three whiskers from the bunny. Remember to send the head to back after you slice each whisker. When you’re finished, you should have something like this.

If you like the bunny as is, you could consider it done. Or, if you want to add paws, read on.
Creating the paws
From the left Shapes menu, select a circle. In the top menu under Size, type “1.25” in the W field to resize it. Position the circle on the left edge of the face. The center point of the circle should be slightly above the bottom edge of the bunny as shown below.

From the left Shapes menu, select a square. Place the square in line with the bottom edge of the bunny and make sure it overlaps the circle you just made. (Don’t worry if the square isn’t perfectly aligned with the edge.)

Select the “paw” and the square and click Slice at the bottom of the Layers panel. Delete the extra scraps.

Select the bunny and the paw. From the top menu, click Align ->Align bottom.

Select the paw and duplicate or copy/paste it. Position it to the right of the bunny. Select the bunny, the first paw and the second paw. Align them again (Align -> Align Bottom).

Select the left and the right paws and group them by clicking Flatten at the bottom of the layers panel.

Then select both the grouped paws and the bunny. From the top menu, select Align-> Center Horizontally.

Create space between the paws and the head
Select just the paws. At the bottom of the Layers panel, click Unflatten to ungroup them. Select the left paw. Copy and paste it and set the copy aside.

Then select both the original left paw and the bunny. Click Slice at the bottom of the Layers panel. Delete the scraps from the slice process

Select the paw you held in reserve and position it slightly to the left of the cut area.

The right paw ended up being sent behind the bunny. Select the right paw and click Arrange ->Send to front.
Slice the right paw
Repeat the process you did for the left paw. Start by making a copy of the right paw and holding it in reserve. Then select both the original right paw and the bunny. Click Slice at the bottom of the Layers panel. Delete the scraps. Position the copy next to the cutout area.

When you’re done with both paws, realign everything one more time. Hold down the shift key and select the paws and the head. From the top menu, select Align -> Align bottom.

Final alignment of the paws and head
Select both of the paws and click Flatten at the bottom of the Layers panel to group them. Add the head to the selection so that everything is selected. From the top menu, click Align -> Center Horizontally. Now that everything’s aligned, select the paws and click Unflatten at the bottom of the Layers panel.
Finishing touches
Let’s add a bar to the bottom of the bunny to attach the paws to the head.
From the Shapes menu, select the square. Unlock the square and use the Size fields to resize it: W= 6.1 inches, H = .2 inches.

Position the bar so it just overlaps the bottom of the bunny as shown below. You may need to make the bar wider or narrower so it extends from the edge of one paw to the other. Make sure the bar is unlocked. Use the resize icon on the bottom right of the bar to resize it.

Select the head, both paws, and the bar. Click Weld at the bottom of the Layers panel.
That’s it! The bunny is complete. Your final bunny should look something like this:

Now you can resize your bunny or give him a different color. The bunny is ready to cut or add to another project.

Customizing your bunny
This little bunny graphic could be used in so many projects. I can imagine it on a child’s t-shirt, or a bag, or incorporated into an Easter project.
Add text to your bunny project
The bunny has a flat bottom perfect for adding text. Create your text, overlap it onto the bottom of the bunny, and weld everything together. Here’s one I created for Easter.

Multiple bunnies
I duplicated the bunny and used different colors to create this cute design. The heart is included in the Shapes options.

Here’s the bunny cut out of Cricut window cling.

Thank you!
Thanks for visiting mapletreemakery.com. We hope you enjoyed this tutorial! Come back often for more information and tutorials.


Leave a Reply