Digital lettering is fun to do, and it can also be used to create unique projects. One of my favorite iPad apps to letter in is Procreate. A major benefit of using Procreate for lettering is that it’s easy to create your own custom lettering brushes by following just a few simple steps. There are a lot of options when it comes to brush making, but this tutorial will just cover what is necessary to create a simple calligraphy brush.
What I Used:
- iPad Pro
- Procreate app (this tutorial uses version 4.2.4)
- Apple Pencil
Step 1- Open Procreate and create a new canvas
Tap the plus sign in the upper right corner of the screen to create a new canvas. It doesn’t matter what size you use. I chose Screen Size.

Step 2 – Make a new brush
Tap the brush icon. Since we’re creating a calligraphy brush, tap on Calligraphy. Then press the plus sign in the upper right corner of the Brush Library. An Untitled Brush screen appears.

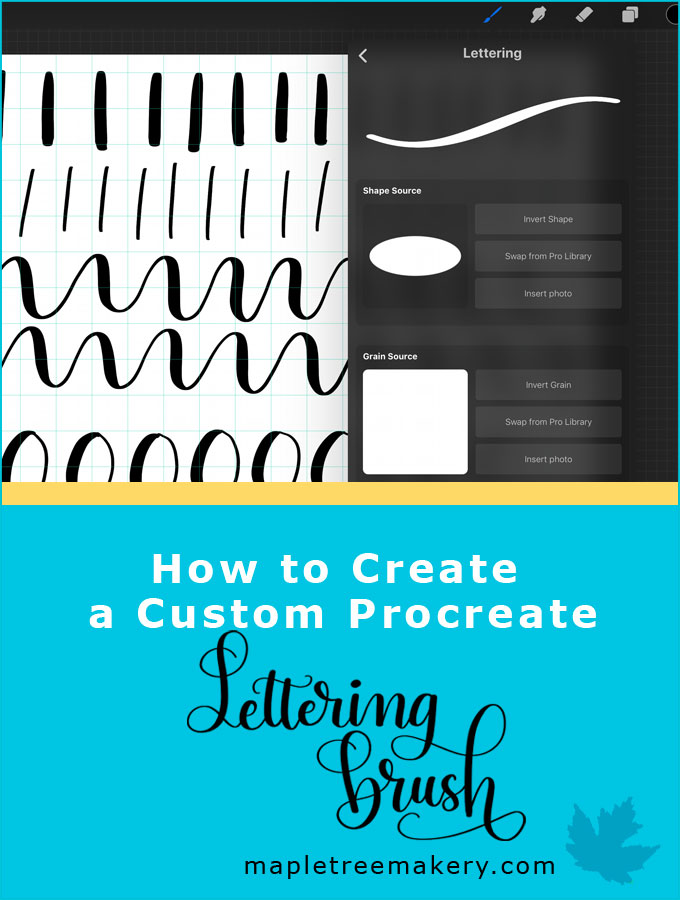
First you’ll need to define your brush’s shape. For this tutorial, we’ll select a pre-made shape. Under Shape Source tap Swap from Pro Library.

In the Pro Library scroll through the options and choose the Oval.

The Grain Source is the texture the brush will have. Under Grain Source tap Swap from Pro Library.

Scroll down and tap on the Blank.
![]()
Step 3 – Set the Stroke Properties
At the bottom of the brush menu tap on Stroke.

Under Stroke Properties set the Spacing to None. The StreamLine smooths out your lines. Set it higher so that your lettering will be smoother. For this tutorial, I set it to Max.

Streamline can help your lettering look better.

Examples of low streamline versus high streamline.
For this tutorial I left the Stroke Taper section alone. You may want to adjust these settings later.

Step 4 – Set the Pencil Settings
The other section to consider when making a calligraphy brush is the Apple Pencil Pressure. This will allow you to control how your brush acts based on the pressure of the Apple Pencil. When hand lettering you should press down on the down strokes to create thick down strokes and be light on the upstrokes to create thin upstrokes.
Tap on the Pencil button at the bottom of the brush settings.

Under Apple Pencil Pressure set the Size higher. I made mine around 62%.

Use light pressure for thin upstrokes and more pressure for thick down strokes.

Step 5 – Set the General Settings
At the bottom of the brush settings tap General.

Under Brush Behaviour make sure Orient to Screen is on. You can also turn on the Classic Taper.

The Size Limits will set how big your brush can be. Max controls the thickness and Min controls the thinness.
Set the Max a bit less. I made it about 80%. Set the Min a bit higher. I set it to 0.9%.

Step 6 – Name your brush and test it out
At the top of the brush settings, tap Untitled Brush and give your brush a name.

Make sure you have a color selected. I chose black. Test your brush out. Use the top slider at the side of the screen to see how it looks large and small.

Now that you know how to create a basic brush, you can experiment with the other brush settings to learn how they affect your brush.


Mine didn’t work either with the thin upstrokes and thick downstrokes. It is all thick. Could it maybe have needed something else since I’m using the newer version of Procreate?
Otherwise, thank you so much for the tutorials. You write them so they are so easy to follow, and I’m learning how to do things I have been wanting to do. Thank you!
I’m glad the tutorials have been helpful!
To get the brush to change size, you’ll need to be using an Apple Pencil. In the Brush Studio, tap on Apple Pencil in the left column. Under Pressure increase the Size slider. I made mine 62%, but the more you increase this slider the more variation there will be. You can also tap on the number field next to the Size slider. This will bring up a Size menu with Numeric and Pressure options. If you tap on Pressure you can have more control over how the brush responds to Apple Pencil pressure.
Another reason why the brush might not be changing size is if your Minimum and Maximum sizes are the same or too close together. Tap Properties in the Brush Studio and make sure the Minimum Size is much smaller than the Maximum Size.
You could also test out some of the pressure sensitive brushes that are already in Procreate, like Script or Streaks in the Calligraphy brush set. If you like how they work, you could compare the settings.
Did not work one light pressure for thin upstrokes and thick down strokes
Hi Juliana,
One reason the pressure might not be working to create thin upstrokes and thick down strokes is if you’re not using an Apple Pencil. I hope this helps!