
In this tutorial I’ll show you how to draw a pumpkin in Procreate.
What I used:
iPad Pro
Procreate App
Apple Pencil
Watch the video or read the tutorial below:
Draw the Pumpkin
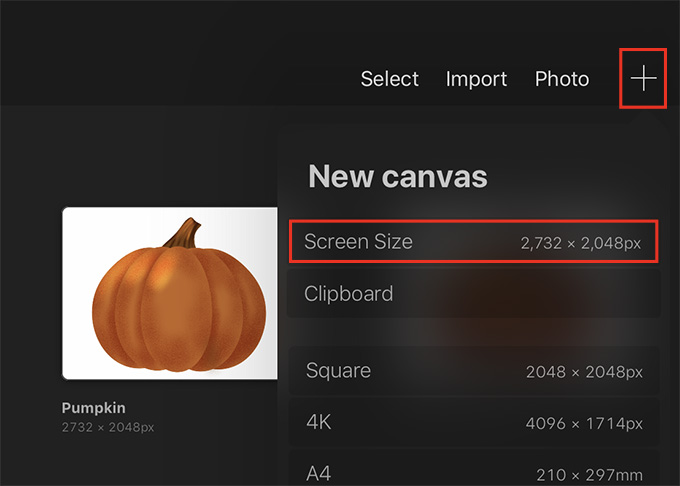
Create a new canvas
Tap on the (+) to create a new canvas. For this tutorial, choose Screen Size.
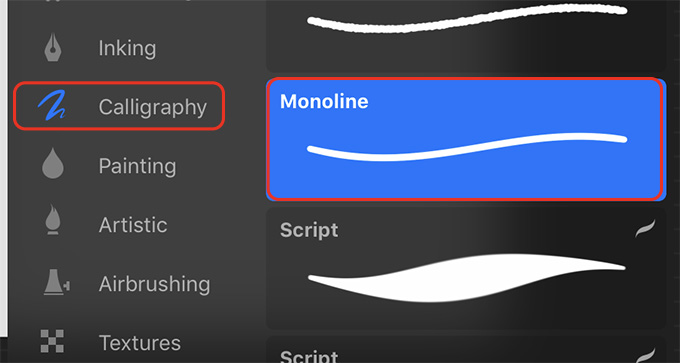
Choose the Monoline brush and get orange for the color
Tap on the paintbrush icon. Choose the Monoline brush located in the Calligraphy set.
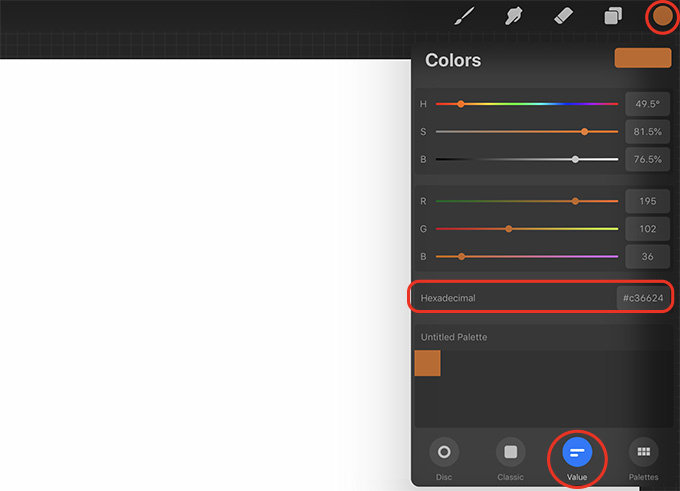
Tap on the color swatch and then tap Value at the bottom of the color menu. Enter the Hexadecimal #c36624. This should give you an orange color for the pumpkin.
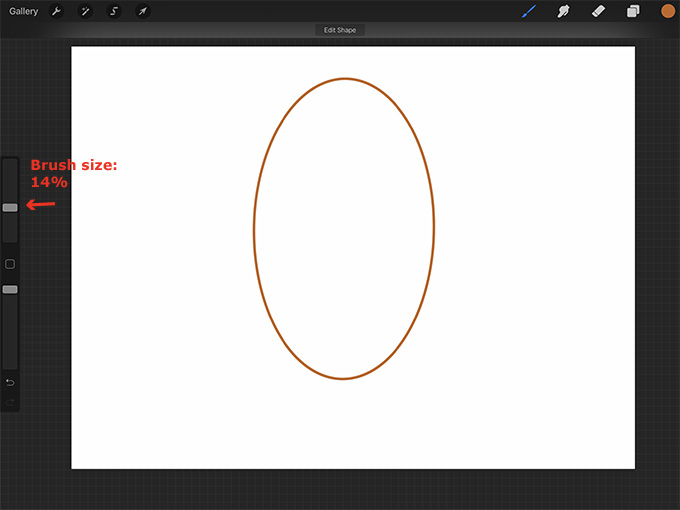
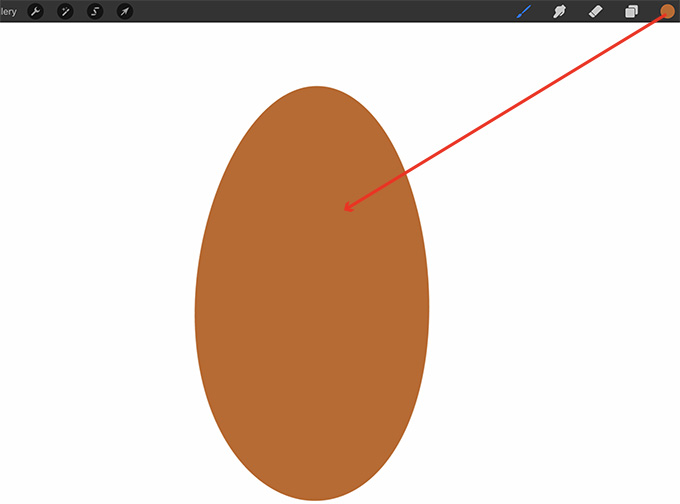
Draw an oval
Use the slider on the side of the screen to change the size of the brush. I used 14%.
Draw a vertical oval in the center of the canvas. When you’re done drawing, hold down your Apple Pencil until the oval becomes a more perfect shape.
Change the size/shape of the oval
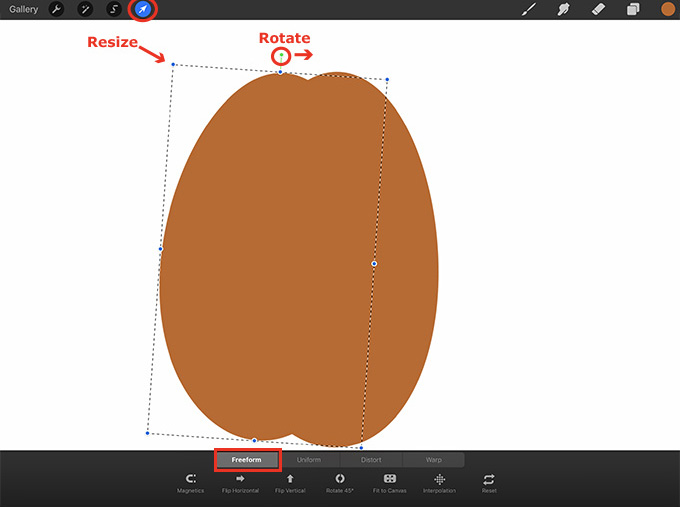
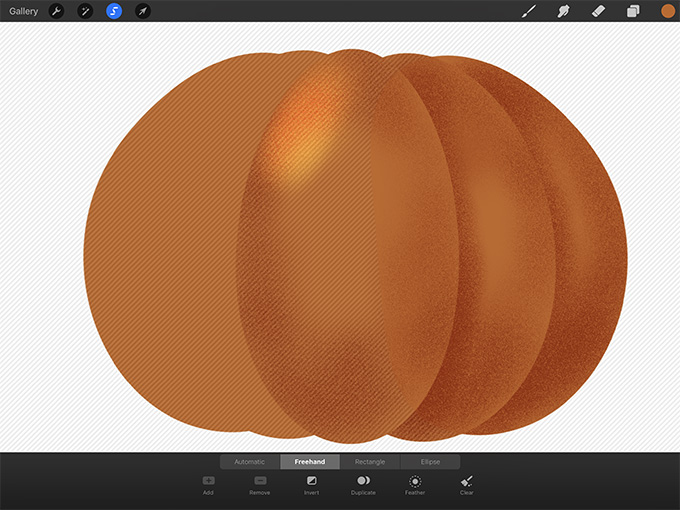
If you want to modify your oval, tap on the arrow, tap Freeform at the bottom of the screen, and then you can move the oval or drag the nodes to change the size and shape of the oval. Then you can use the green node to swivel the oval so it’s vertical.

If you want you can warp your oval into a different shape. Tap Warp at the bottom of the screen and then Advanced Mesh. Drag the nodes to warp the oval. I warped this oval to be a bit wider at the bottom.

When you’re done modifying your oval, drag from the color swatch into the oval to fill it with orange.
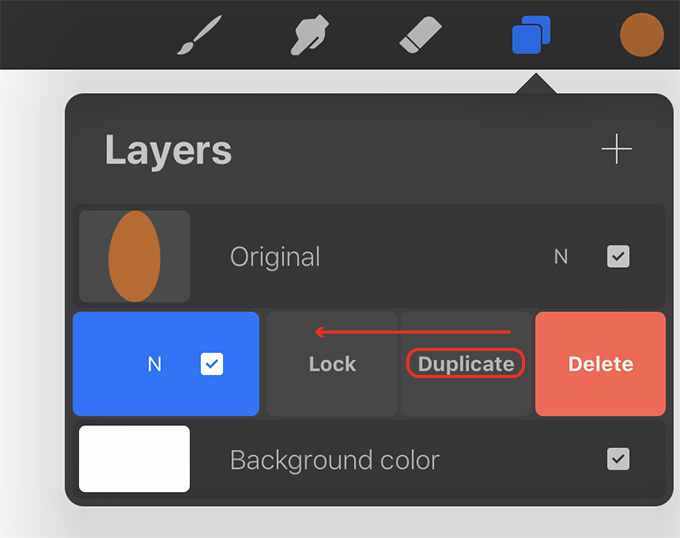
Duplicate the oval and move it
Swipe left on the oval layer and press Duplicate.

Tap on the original oval layer (the lowest layer) and in the fly-out menu press Rename.
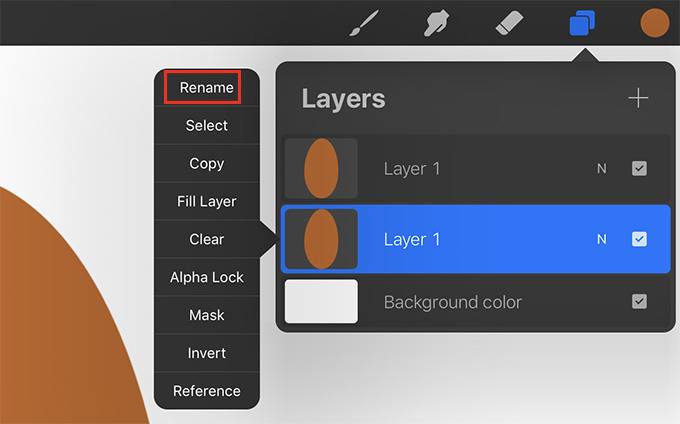
Rename it “Original.” Then tap and hold on the duplicated layer until you can drag it underneath the original layer.
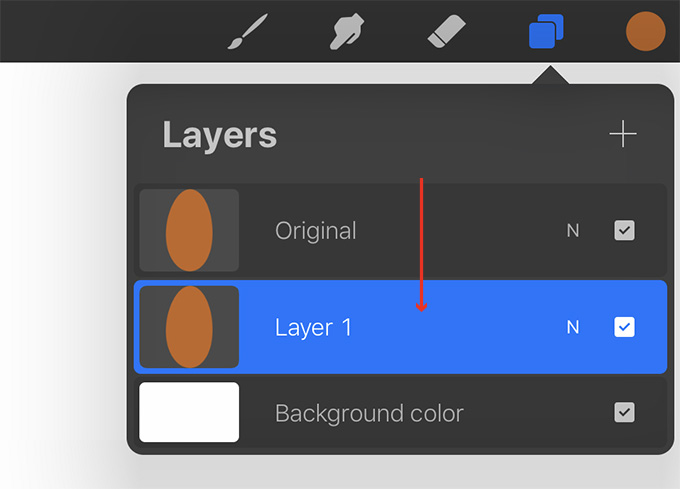
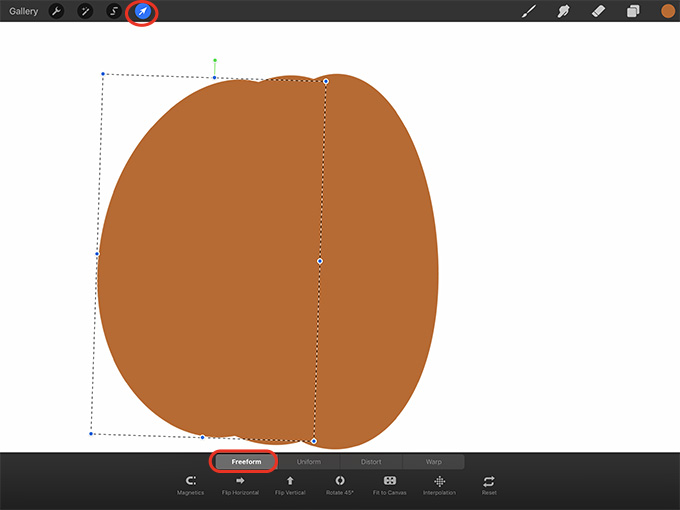
Make sure the duplicated oval layer is selected, then tap on the arrow, tap Freeform at the bottom of the screen, and move the oval to the left. Use the blue nodes to resize it a bit smaller. I also used the green node to rotate it slightly towards the original oval.
You can tap Warp and Advanced Mesh and drag the nodes to modify the shape of the oval if you want. I dragged the right corner nodes to the right to make the oval join more smoothly with the original oval. Then I made the oval a bit rounder by pulling the lower left nodes to the left.

Create the left side of the pumpkin
Now swipe left on the duplicated oval layer and press duplicate.
Tap and hold on the new duplicated layer until you can drag it underneath the lowest oval.

Now tap on the arrow, tap Freeform at the bottom of the screen, and move this oval to the left. Again, use the nodes to make it a bit smaller and rotate it if you want. I rotated it a bit towards the right and made it smaller.
Now you can warp this oval if you want. I dragged the nodes to make it a bit rounder and to make it connect more smoothly with the oval to its right.

Create the right side of the pumpkin
Tap on the oval in the middle of the layer stack and then swipe right on the oval underneath it. Tap Group. This should group the left side of the pumpkin.
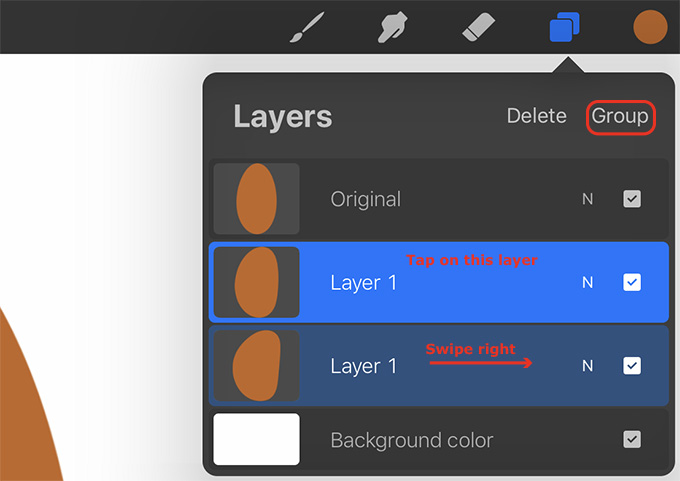
Swipe left on the layer that is named New group and press Duplicate to duplicate the group.

Tap on the arrow to select the duplicated left side of the pumpkin. At the bottom of the screen make sure Freeform is selected and then tap Flip Horizontal. Move the flipped selection to the right side of the pumpkin.

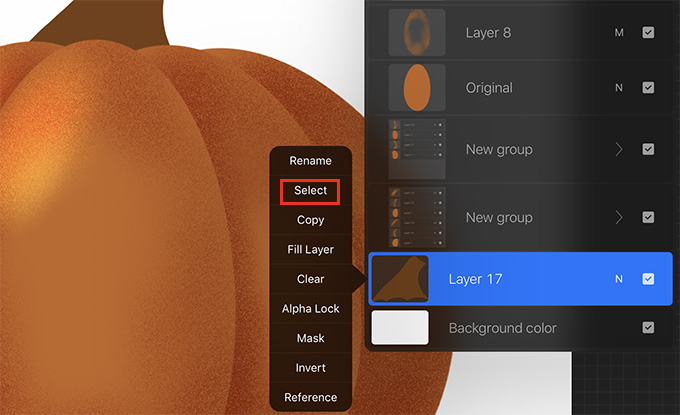
Add some shading to the original oval
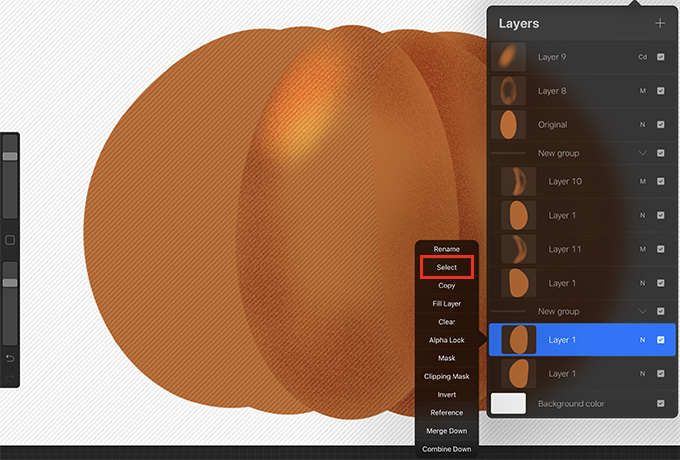
Tap on the “Original” layer and in the fly-out menu press Select.

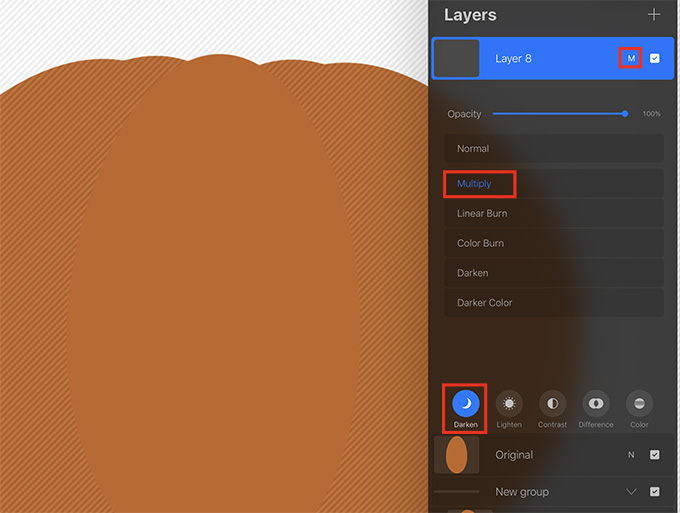
Tap on the (+) to create a new layer above the original oval.

Tap on the N on the new layer and make the blend mode Multiply. This will make the orange color darker when you paint it on the oval.
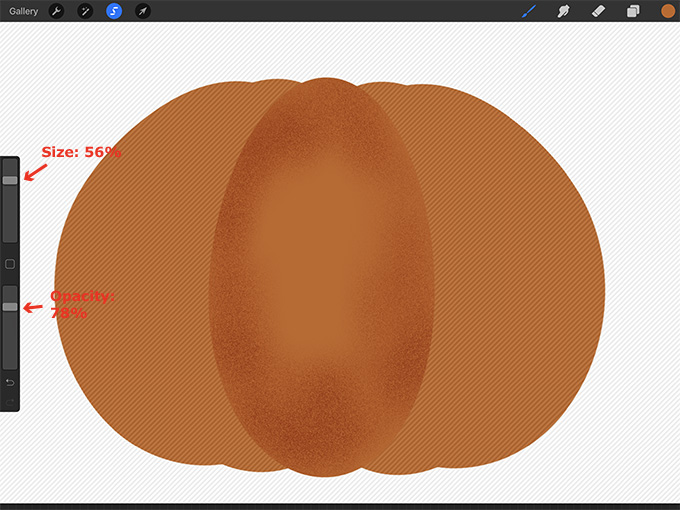
Now open the brush menu and locate the Touchups set. Select the Noise Brush.

Use the slider on the side of the screen to set the size. I made mine about 56%. You may need to use a different size depending on how big your pumpkin is. Use the lower slider to reduce the opacity. I made mine about 78%.
Now add some shading to the middle oval. Because the oval is selected, anything you paint will stay within the oval area. I added shading to the top, bottom, and sides of the oval. The more you add, the darker it will be. The darkness of the brush will also depend on the pressure of your Apple Pencil.
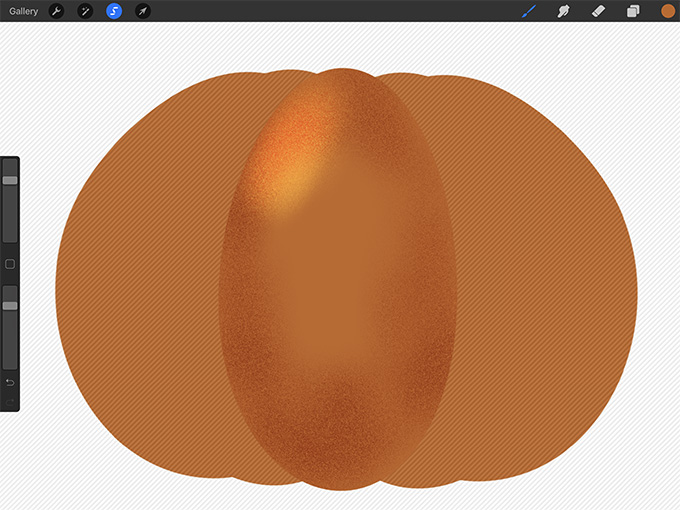
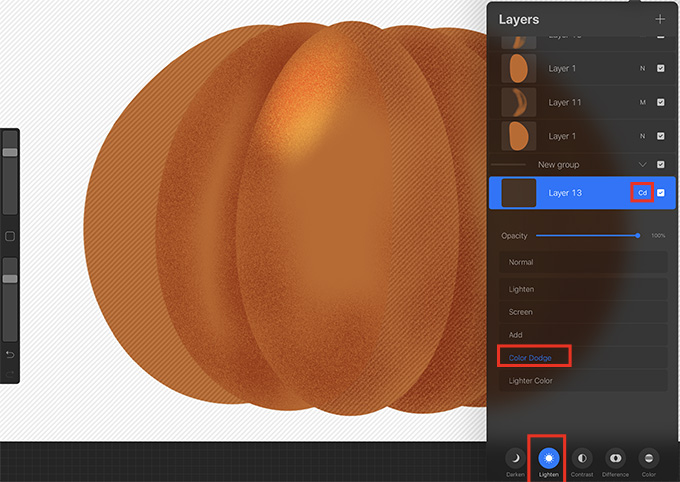
Add some highlights
With the original oval still selected, create a new layer on top of the shading layer (1).
Tap on the N on this layer (2), tap Lighten (3), and choose a blend mode for the highlights. I chose Color Dodge (4). This will make the orange color lighter when you paint it on the oval.

Draw some highlights on the oval. I added them to the top left as if my light source is coming from the top left of the canvas.
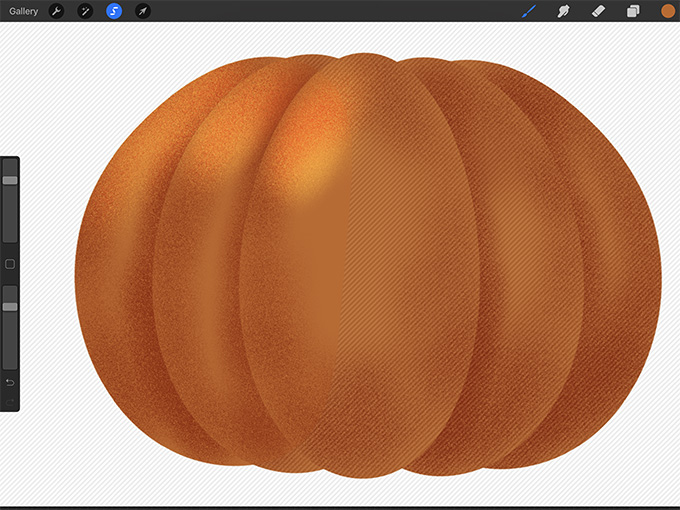
Add shading to the right side of the pumpkin
Tap on “Layer 1” under the top New group layer and in the fly-out menu press Select.

Create a new layer above this oval. Tap on the N on the new layer and choose Multiply for the blend mode.
NOTE: You should be able to see which oval is selected because it won’t have the diagonal lines on it.
Tap on the paintbrush, make sure you still have the Noise Brush selected, and then paint some dark shading between this oval and the original oval. Add some shading to the top, bottom, and side of the oval as well. Because the right side of the pumpkin is farther from the light source, I’m going to make the shading darker and not add a highlight to this layer.

Add shading to the next oval
Now repeat this process for the oval on the right side of the pumpkin. Tap the lower “Layer 1” in the top New group layer, and in the fly-out menu press Select. Create a new layer above it, give it the Multiply blend mode, tap on the paintbrush and then add some shading to the oval.
Add shading and highlights to the left side of the pumpkin
Tap on the top “Layer 1” in the lower New group layer and in the fly-out menu press Select.
Create a new layer above this oval, tap on the N on this layer, and make the blend mode Multiply.
Tap on the paintbrush and then paint some shading on the oval.

With this oval still selected, create a new layer. Tap the N on the new layer, tap Lighten, and make the blend mode Color Dodge.
Tap on the paintbrush and add some highlights to the top of this oval.

Add shading and highlights to the next oval
Repeat this process for the oval on the left side of the pumpkin. Select it, create a new layer, give it the Multiply blend mode, add shading. Then add a new layer, give it the Color Dodge blend mode, and add highlights.
Once you’re done adding highlights, tap on the selection tool to deselect the oval.

Now we need to move this pumpkin to make some room for the stem.
Group all of the pumpkin layers
Tap on the small arrow next to the top New group layer to collapse it. Repeat this process for the lower New group layer.
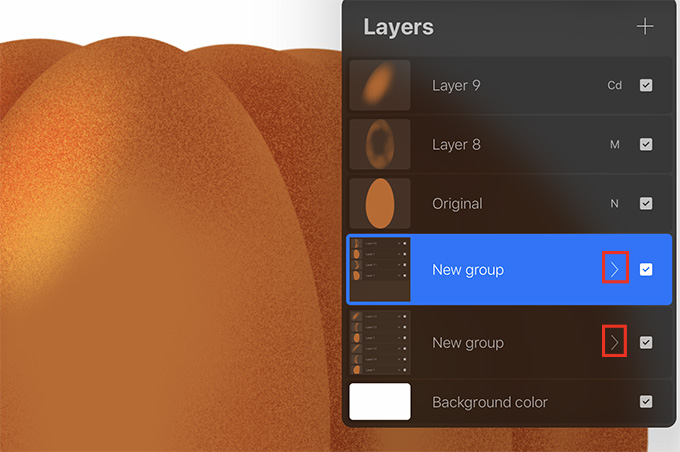
Now tap on the top layer in the layer stack and swipe right on all of the layers below it. Then tap Group to group all of the pumpkin layers.

Tap on the top New group layer.
Now you can tap on the arrow and move or resize the pumpkin to make room for the stem if you need to. If you want to resize it, make sure to press Uniform at the bottom of the screen to resize it proportionally.

Make the stem
Create a new layer for the stem above the group layer.

Tap on the color swatch and get a color for the stem. I chose brown, Hexadecimal #754013.

Get the Monoline brush located in the Calligraphy set again and draw a stem. Make sure the shape is complete with no holes and then drag from the color swatch into the stem to fill it with the brown color.

Move the stem layer to the bottom of the layer stack. This should make the stem appear behind the pumpkin.

If you want, you can tap on the arrow and move the stem, resize it, or warp it a bit until you like how it looks.
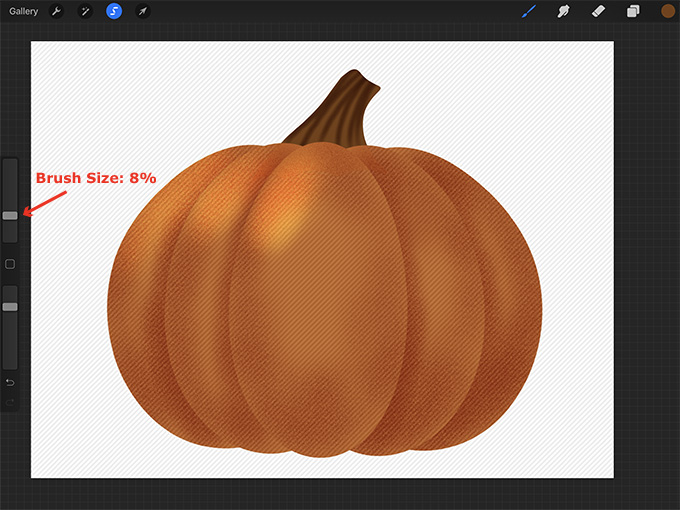
Add shading and highlights to the stem
Now we’ll add some shading and highlights to the stem using the same method as we did with the pumpkin.
Tap on the stem layer and in the fly-out menu press Select.
Create a new layer above the stem, tap the N, and make the blend mode Multiply.
Get the Noise Brush from the Touchups set. Reduce the size of the brush. I made mine about 8%. You may need to use a different size depending on how large your stem is. Then add some dark lines to the stem.
With the stem still selected, create a new layer above the shading layer. Tap the N, tap Lighten, and then tap Add.

Tap on the paintbrush and paint some highlights on the stem.
You can leave your highlights as they are, but If you don’t like how they look, you can blur them. To do this, tap on the Adjustments button and then tap Gaussian Blur.
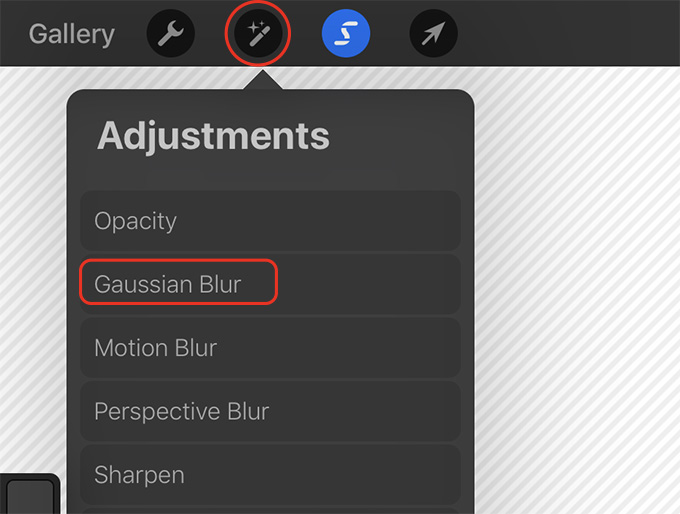
Slide your finger or Apple Pencil across the canvas until the highlights blur a bit.

Group all of the layers
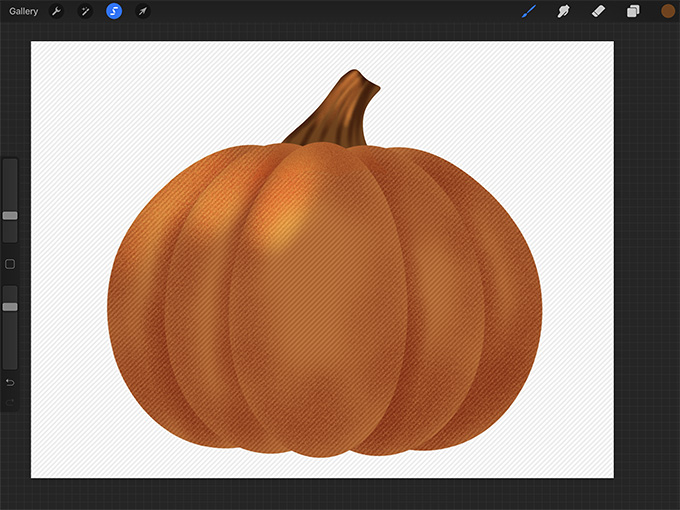
The pumpkin is done! Now we’ll just group all of the layers, duplicate them, and flatten them so you can use the pumpkin more easily in your projects.
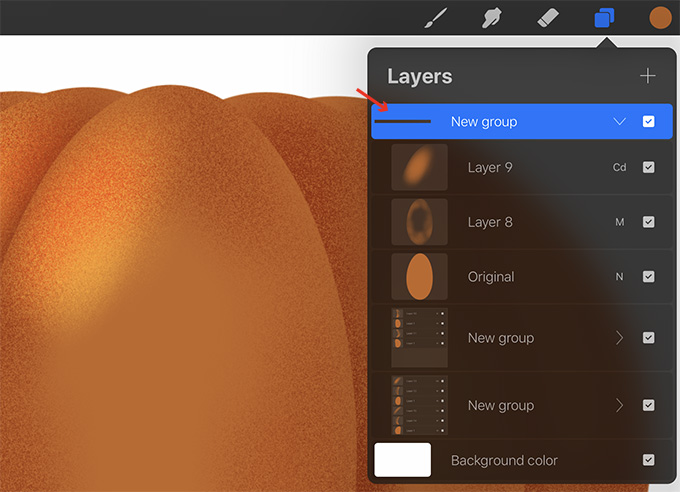
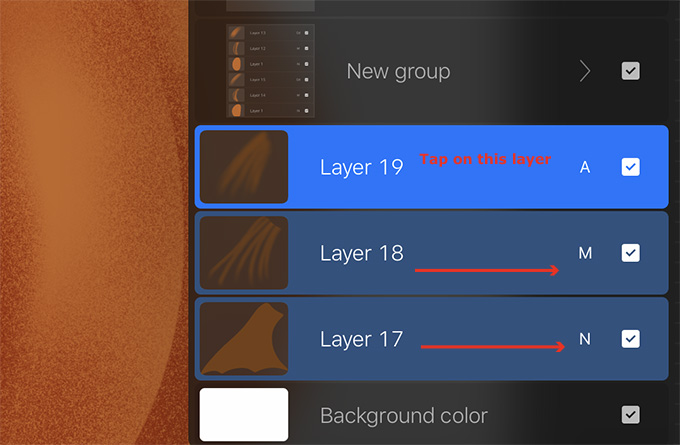
Select all of the stem layers
Tap on the stem highlight layer and then swipe right on the two layers below it so that all of the stem layers are blue.
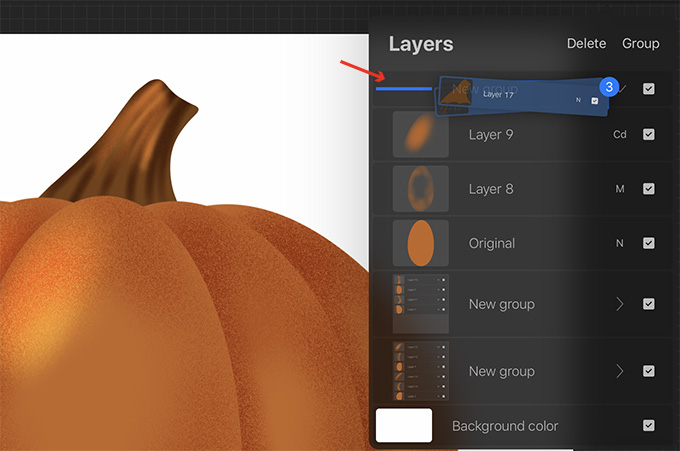
Move the stem layers into the pumpkin group
Tap and hold and drag these layers over the top New group layer until the horizontal line on this layer turns blue. Now the stem layers should be in this group.
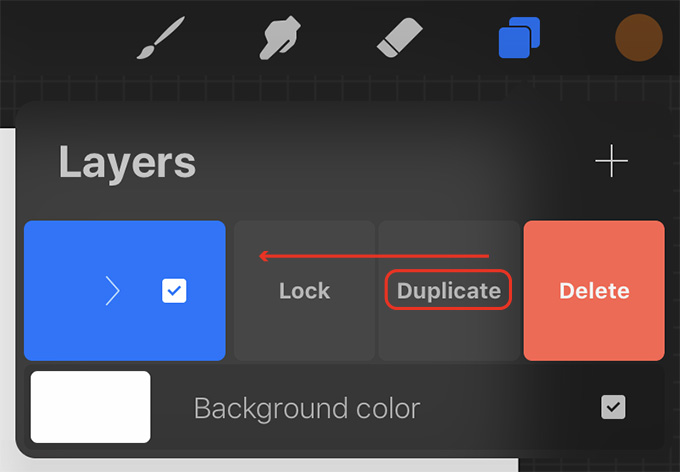
Duplicate the pumpkin group and flatten the pumpkin layers
Tap on the small arrow next to the top New group layer to collapse the group. Now swipe left on the pumpkin group layer and press Duplicate.
Turn off the visibility checkbox for the original pumpkin group layer. Then tap on the duplicated pumpkin layer and press Flatten.
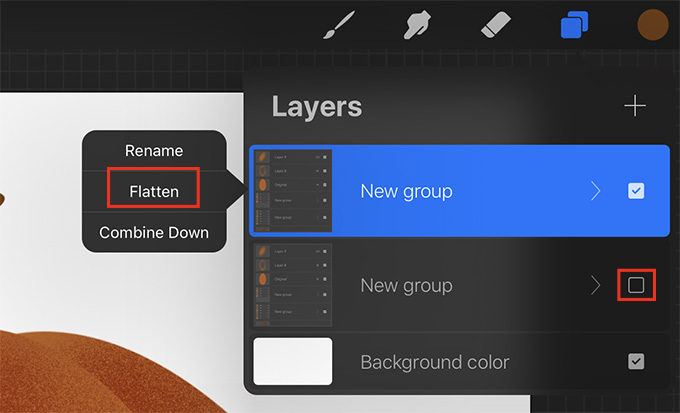
Now you have both a flat version of your pumpkin and the original pumpkin group that you can go back and modify.
Modify Your Pumpkin
If you want to modify your pumpkin, you can go back and edit the group layers.
For example, you can add a back to the pumpkin if you want.
Add a back to your pumpkin
Turn off the visibility checkbox of the flattened pumpkin, turn on the visibility of the group, and tap the small arrow to expand the group.
Swipe left on the Original oval layer and press Duplicate. Then drag the duplicated oval layer to the bottom of the layer stack.

Now tap on the arrow, tap Freeform, and resize this oval so it’s a bit smaller. Move it so it peeks up behind the left side of the pumpkin and warp it a bit.

Swipe left on this layer and press Duplicate. Now tap on the arrow, tap Freeform at the bottom of the screen, and then tap Flip Horizontal. Move the duplicated oval so it peeks up behind the right side of the pumpkin.

Repeat this process to create more back layers
To create more back layers, duplicate the Original oval and drag it to the bottom of the layer stack. Make the duplicated layer smaller to form the left back of the pumpkin. Then duplicate this layer, flip it horizontally, and move it to the other side.

Shade the back of the pumpkin and add highlights
Now shade the back of the pumpkin the same way as we did with the rest of the pumpkin and the stem. Tap on one of the back layers, press Select, create a new layer, tap on the N on this layer, and tap Multiply. Get the original orange color (#c36624). Set the size of the Noise Brush, I made mine 56%, and then add some shading to the back of the pumpkin. Repeat this process for each of the back layers. I made the back layers a bit darker than the rest of the pumpkin.
If you want to add some highlights, select the back layer you want to add a highlight to, create a new layer, give it the Color Dodge blend mode, and paint a highlight. I only added a highlight to the back layer on the left.

Make more pumpkins
Now you can use this process to make lots of different pumpkins! Warp the ovals into different shapes to create different pumpkins. Try different colors such as green for the stem. Then add vines and leaves if you want.

Thank you!
Thanks for visiting mapletreemakery.com. We hope you enjoyed this tutorial! Come back often for more information and tutorials.


Leave a Reply